Outline
we try to implement the login procedure via jwt authentication system. this blog is a series. if you want to know how to install jwt middleware or how to implement signup, see our previous blogs.
Repository
we’ve made the repository of jwt authentication system. click below link to see our repository.
- laravel-jwt-exercise: https://github.com/dev-yakuza/laravel-jwt-exercise
Development Environment
in here, we’ll use Laravel development environment created by Laradock and Ansible. if you want to know our environment, see our previous blog.
Modify Model
modify model which is used jwt authentication system like below.
<?php
...
use Illuminate\Foundation\Auth\User as Authenticatable;
use Tymon\JWTAuth\Contracts\JWTSubject;
...
class User extends Authenticatable implements JWTSubject
{
    ...
    public function getJWTIdentifier() {
        return $this->getKey();
    }

    public function getJWTCustomClaims() {
        return [];
    }
}
in order to use Laravel authentication feature, we have inherited the model from Authenticatable. it also implements the interface of jwt middleware through JWTSubject.
public function getJWTIdentifier() {
    return $this->getKey();
}

public function getJWTCustomClaims() {
    return [];
}
above functions are parts implemented the interface of jwt middleware.
public function getJWTIdentifier() {
    return $this->getKey();
}
this function is to get jwt token.
public function getJWTCustomClaims() {
    return [];
}
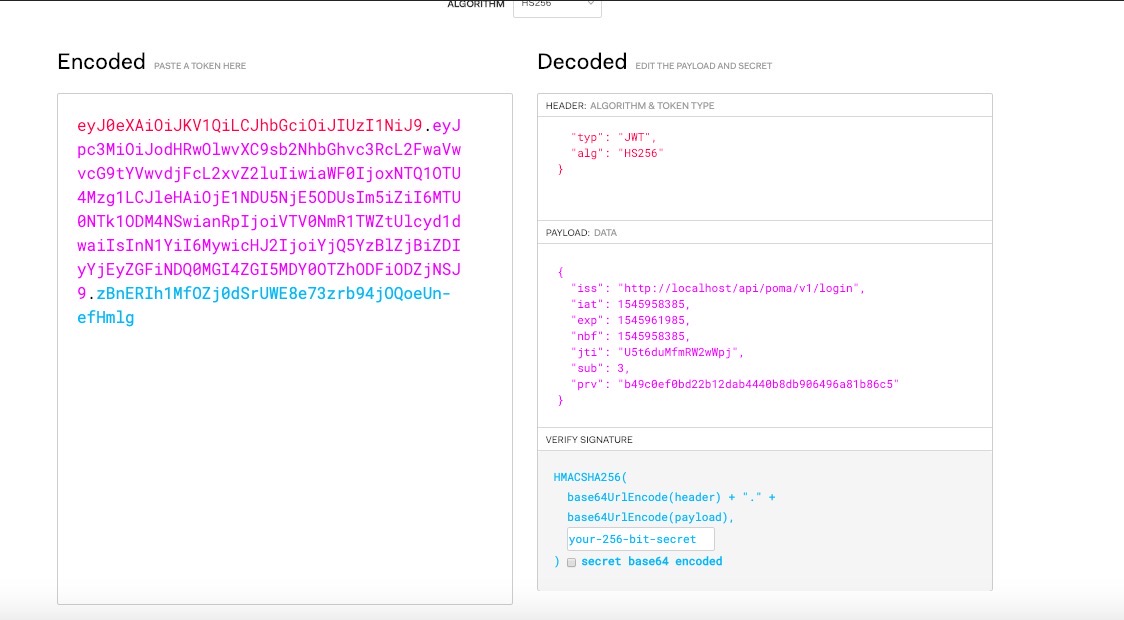
we introduce jwt token for explaining this function. jwt consists largely of Header.Payload.Signature. information parts in Payload is called Claim and it’s consisted of key-value type. jwt basically has information(Claim) in Payload like below.
- iss(Issuer): token issuer
- sub(Subject): token title(default is user id)
- iat(Issued At): issued date(unix timestamp)
- exp(Expiry): token expired date
- nbf(Not Before): the start time when token is available.
- jti(JWT Id): JWT unique identifier. used mainly to prevent redundant processing.
- prv: the hash value of user provider class. especially added it in
tymondesigns/jwt-authfor using multiple guard. (more details)
if you want to add more information to jwt token except these, you would set return value in getJWTCustomClaims().
public function getJWTCustomClaims() {
    return [
        'firstname' => $this->firstname,
        'lastname' => $this->lastname,
        'email' => $this->email
    ];
}
modify Guard
modify guard in config/auth.php file which is responsible the authentication in Laravel like below.
'guards' => [
    'web' => [
        'driver' => 'session',
        'provider' => 'users',
    ],

    'api' => [
        'driver' => 'jwt',
        'provider' => 'users',
    ],
],
Modify Controller
add signin function in app/Http/Controllers/JWTAuthController.php controller created in previous blog.
public function login(Request $request) {
    $validator = Validator::make($request->all(), [
        'email' => 'required|email|max:255',
        'password' => 'required|string|min:8|max:255',
    ]);

    if($validator->fails()) {
        return response()->json([
            'status' => 'error',
            'messages' => $validator->messages()
        ], 200);
    }

    if (! $token = Auth::guard('api')->attempt(['email' => $request->email, 'password' => $request->password])) {
        return response()->json(['error' => 'Unauthorized'], 401);
    }

    return $this->respondWithToken($token);
}

protected function respondWithToken($token) {
    return response()->json([
        'access_token' => $token,
        'token_type' => 'bearer',
        'expires_in' => Auth::guard('api')->factory()->getTTL() * 60
    ]);
}
first, validate the input data in the request.
$validator = Validator::make($request->all(), [
    'email' => 'required|email|max:255',
    'password' => 'required|string|min:8|max:255',
]);

if($validator->fails()) {
    return response()->json([
        'status' => 'error',
        'messages' => $validator->messages()
    ], 200);
}
and then login with user email and password.
if (! $token = Auth::guard('api')->attempt(['email' => $request->email, 'password' => $request->password])) {
    return response()->json(['error' => 'Unauthorized'], 401);
}
if login is success, send response with jwt token.
return response()->json([
    'access_token' => $token,
    'token_type' => 'bearer',
    'expires_in' => Auth::guard('api')->factory()->getTTL() * 60
]);
Connect Route
connect login function in the controller and URL in routes/api.php.
Route::post('login', 'JWTAuthController@login')->name('api.jwt.login');
Test
use Postman to test login feature in jwt authentication system. when you insert email and password and send POST request to localhost/api/login URL, you can see the screen like below.

when you check access_token key which receives from the response in https://jwt.io/, you can see the result screen like below.

Completed
we’ve made login feature in jwt authentication system. in next blog post, we’ll introduce how to get user information by access_token.
Reference
- JSON Web Token (JWT): https://tools.ietf.org/html/rfc7519#section-4.1
- jwt-auth prv: https://github.com/tymondesigns/jwt-auth/issues/1344
- jwt-auth Creating Tokens: https://github.com/tymondesigns/jwt-auth/wiki/Creating-Tokens
Was my blog helpful? Please leave a comment at the bottom. it will be a great help to me!
App promotion
Deku.Deku created the applications with Flutter.If you have interested, please try to download them for free.


