目次
概要
React Nativeで開発したアプリも普通のアプリなのでプッシュメッセージ(Push Message)を受けることができます。このブログポストではReact Nativeで開発したアプリへプッシュメッセージ(Push Message)を受けるためreact-native-firebase(V5)ライブラリでFCM(Firebase Cloud Messaging)を使う方法について説明します。
- react-native-firebase v5: https://v5.rnfirebase.io/
- FCM(Firebase Cloud Messaging): https://firebase.google.com/docs/cloud-messaging
ライブラリインストール
下記のコマンドを使ってreact-native-firebaseのライブラリをインストールします。
npm install --save react-native-firebaseライブラリリンク
react-native-firebaseライブラリを使うためにはライブラリをリンクする必要があります。
0.60以上
下記のコマンドを使ってreact-native-firebaseライブラリをReact Nativeプロジェクトへ連結します。
cd ios
pod install
cd ..
0.59以下
下記のコマンドを使ってreact-native-firebaseライブラリをReact Nativeプロジェクトへ連結します。
react-native link react-native-firebaseFirebaseプロジェクト生成
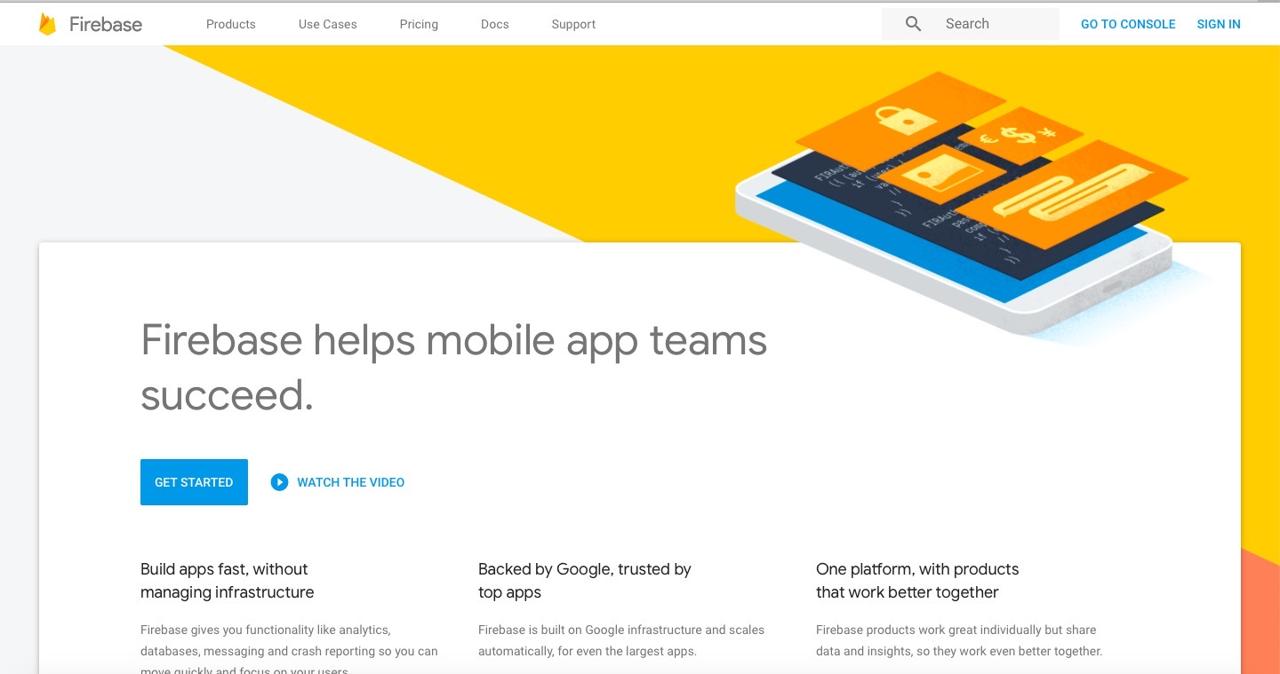
次はGoogleのファイアベース(Google Firebase)でプロジェクトを生成する必要があります。下記のリンクを押してGoogleのファイアベース(Google Firebase)へ移動します。
- Googleのファイアベース(Google Firebase): https://firebase.google.com
右上のSIGN INボタンを押してログインします。
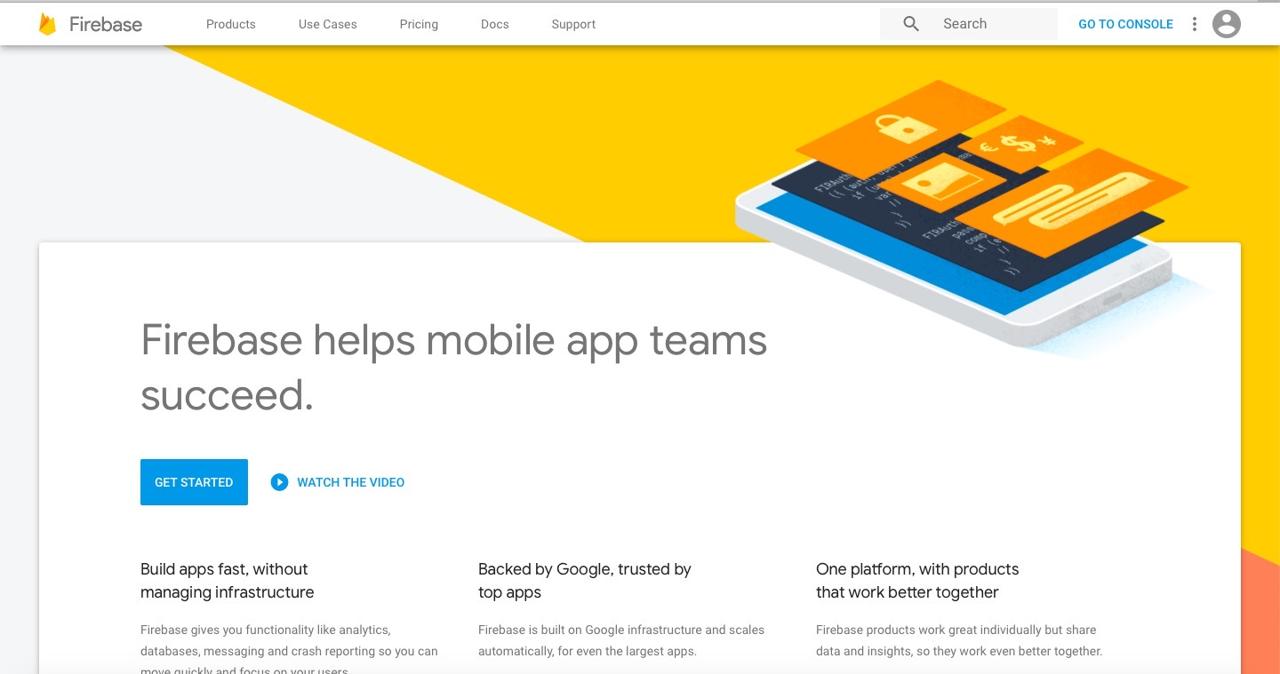
ログインをしたら、右上のGO TO CONSOLEを押してGoogleのファイアベースコンソール(Google Firebase Console)へ移動します。

Googleのファイアベースコンソール(Google Firebase Console)で+ Add projectを押してプロジェクトを追加します。
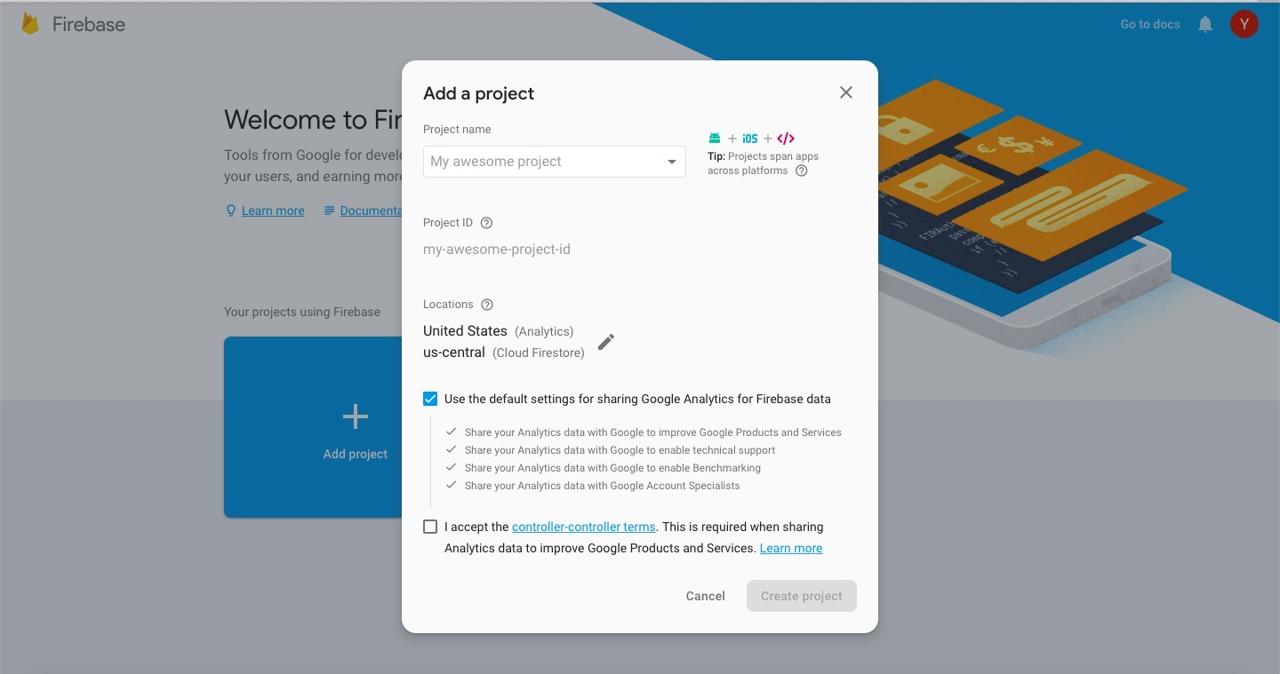
プロジェクトの情報を追加した後、Create projectボタンを押してプロジェクトを生成します。
iOS設定
react-native-firebaseを使うためiOSを設定する方法について説明します。
Firebase iOSプロジェクトの設定
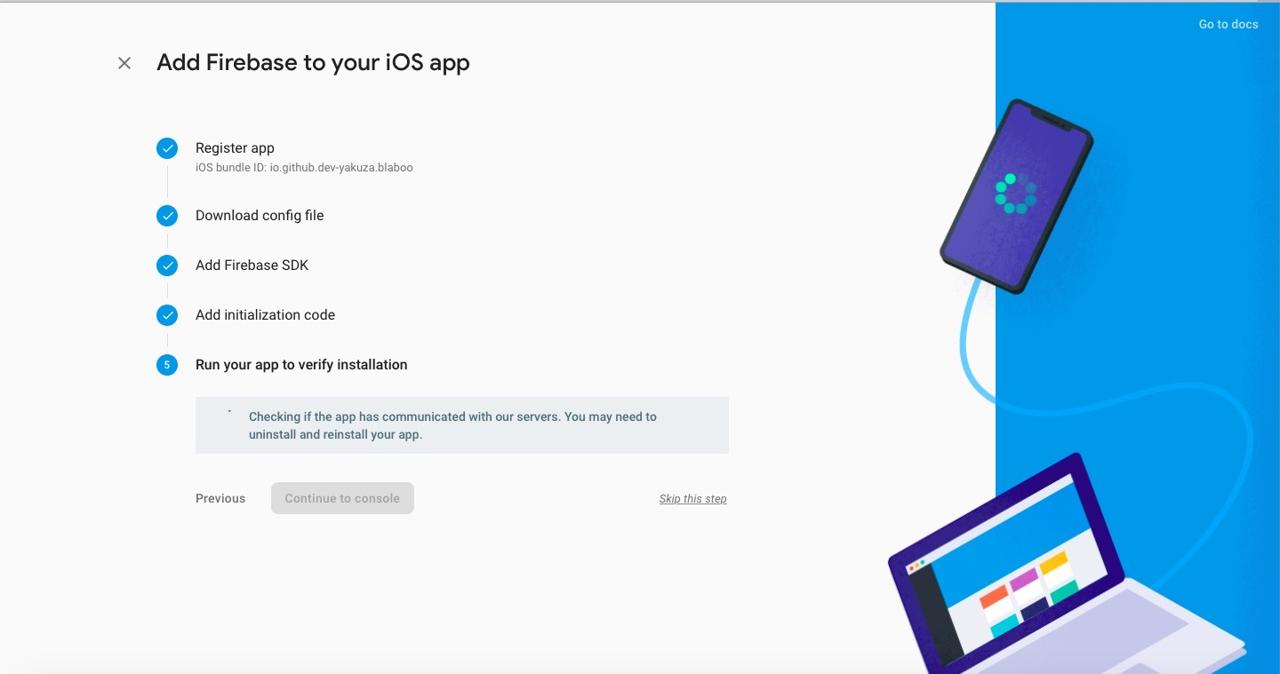
Googleのファイアベースコンソール(Google Firebase Console)でプロジェクトを選択したら下記のような画面が確認できます。
真ん中にあるiOSボランを押してiOS設定画面へ移動します。
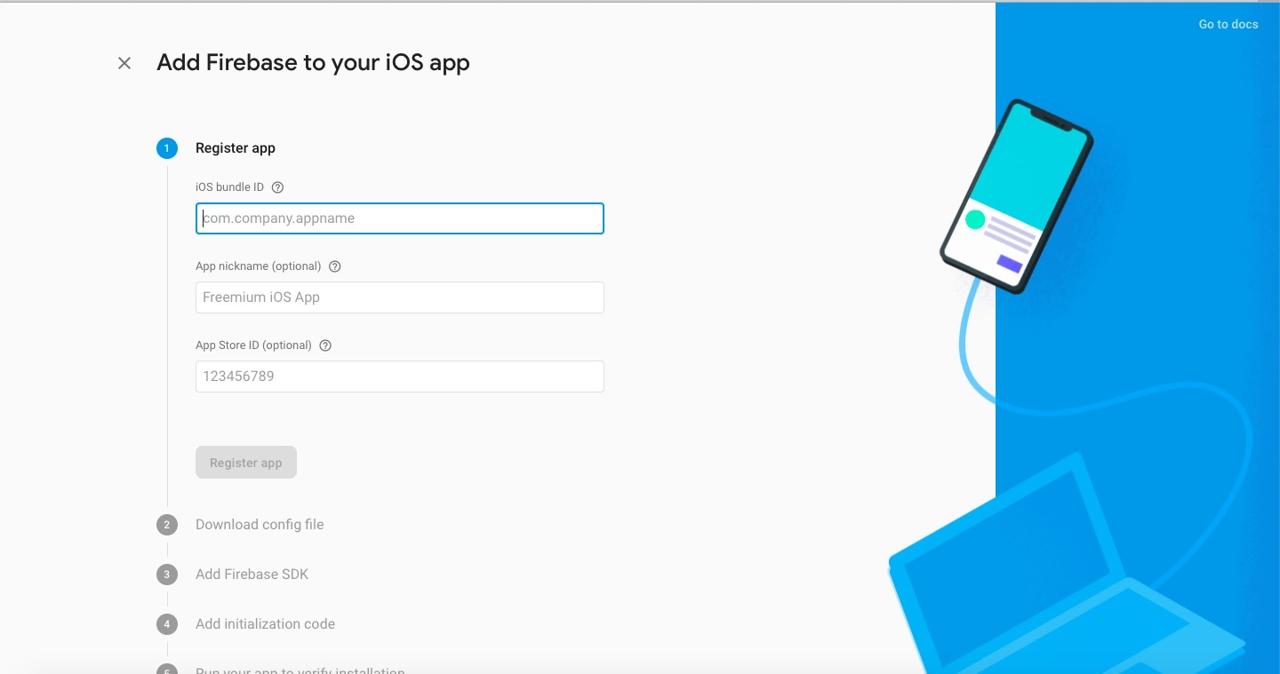
開発したアプリのBundle IDを入力してRegister appボタンを押します。
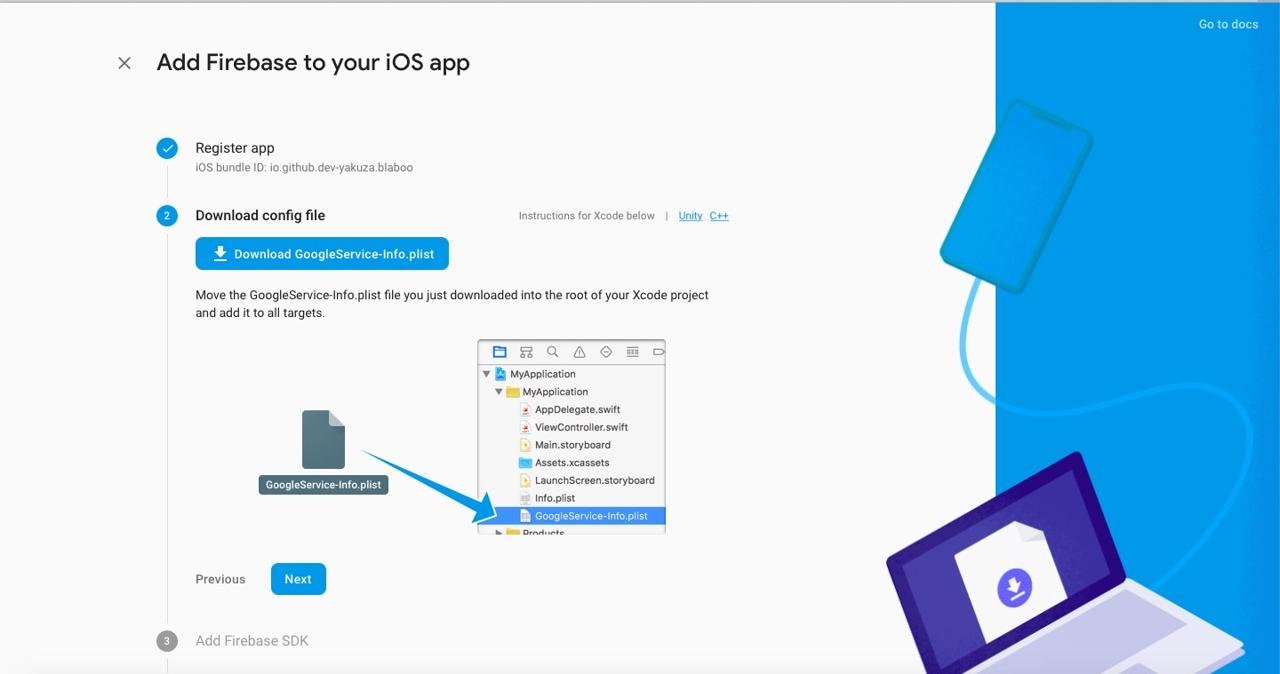
Googleのファイアベース(Google Firebase)が生成したGoogleService-Info.plistファイルをダウンロードして、info.plistと同じ位置へ追加します。GoogleService-Info.plistファイル追加が終わったら、Nextボタンを押します。
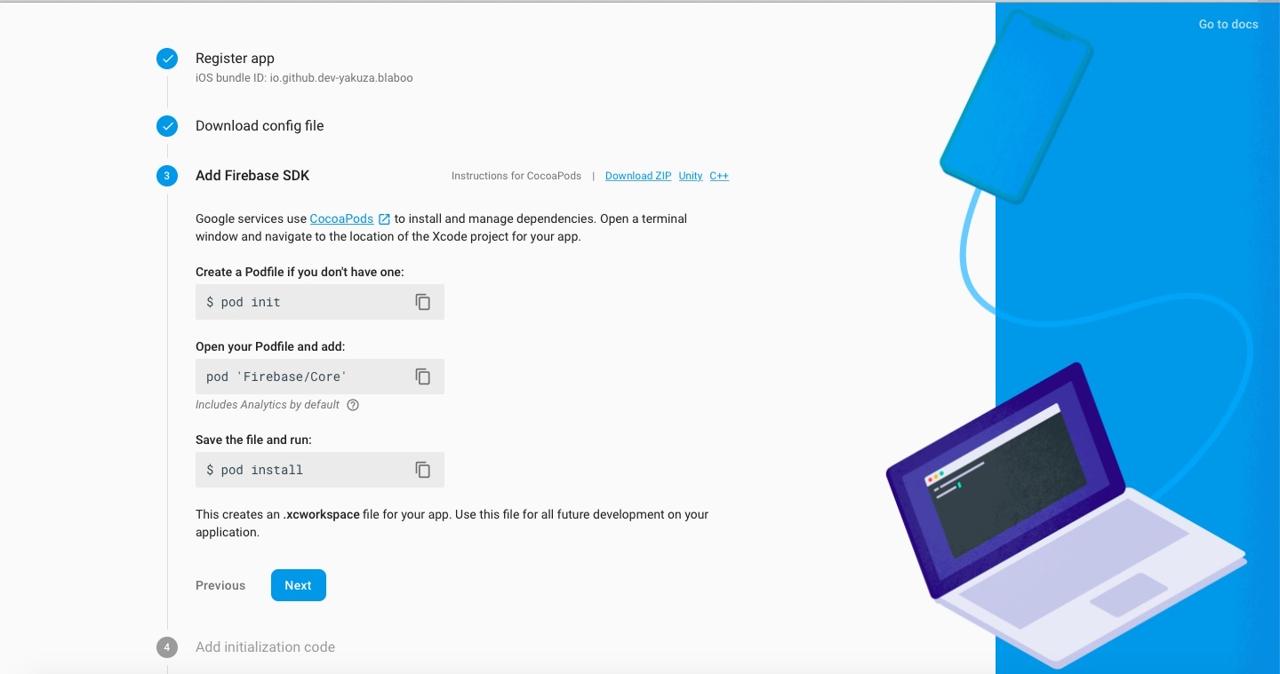
画面へ表示された形でGoogleファイアベースSDK(Google Firebase SDK)をReact Nativeプロジェクトへ追加します。
React Nativeのバージョンが0.59以下の場合、下記のコマンドを実行します。
pod initGoogleのファイアベースSDK(Google Firebase SDK)を./ios/Podfileへ追加します。
target 'blaboo' do
  ...
  pod 'Firebase/Core'
  pod 'Firebase/Analytics' // if you use Analytics
  pod 'Firebase/Messaging'
  ...
end
GoogleのファイアベースSDK(Google Firebase SDK)をインストールします。
pod install
# pod update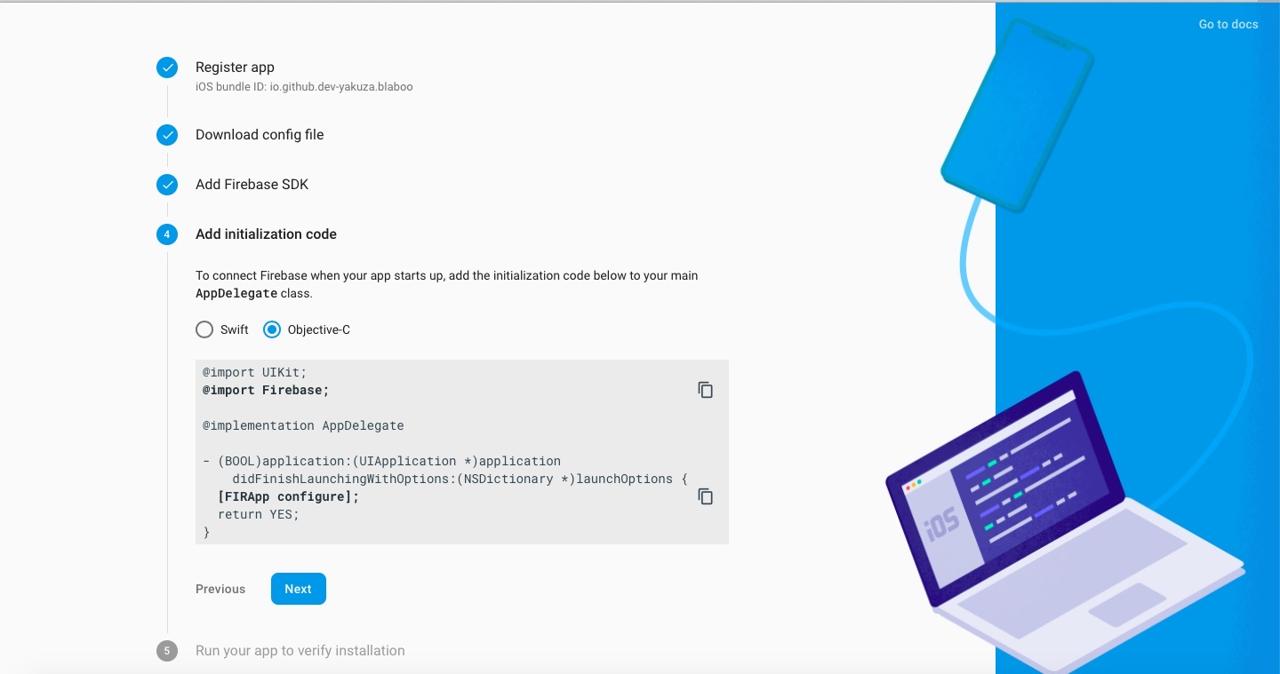
React NativeプロジェクトのAppDelegate.mファイルへ下記のようにソースコードを追加します。
...
@import Firebase;
#import "RNFirebaseNotifications.h"
...
- (BOOL)application:(UIApplication *)application didFinishLaunchingWithOptions:(NSDictionary *)launchOptions
{
  [FIRApp configure];
  [RNFirebaseNotifications configure];
  ...
  return YES;
}
...
GoogleのファイアベースSDK(Google Firebase SDK)を初期化します。
私はこの部分はSkip this stepを押してスキップしました。
権限の設定
権限の設定をするためios/[project name].xcworkspaceファイルを選択してXcodeを実行します。
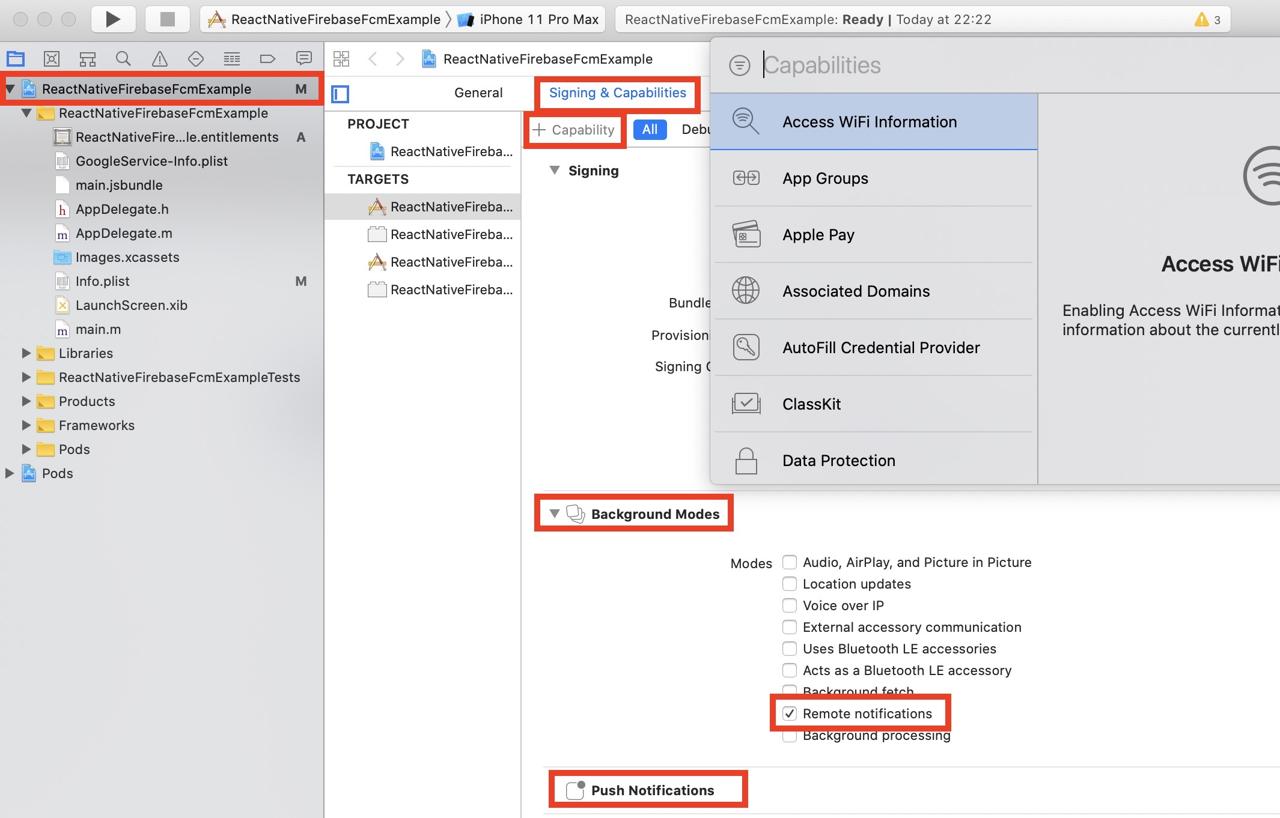
上にある+Capabilityを選択して下記の内容を検索して追加します。
- Push Notifications
- Background modes
Background modesを追加するとPush Notificationsと違ってチェックボックスのリストが確認できます。その中でRemote notificationsを選択します。
APNS設定
iOSでプッシュメッセージを使うためにはAPNS(Apple Push Notification Service)を設定する必要があります。
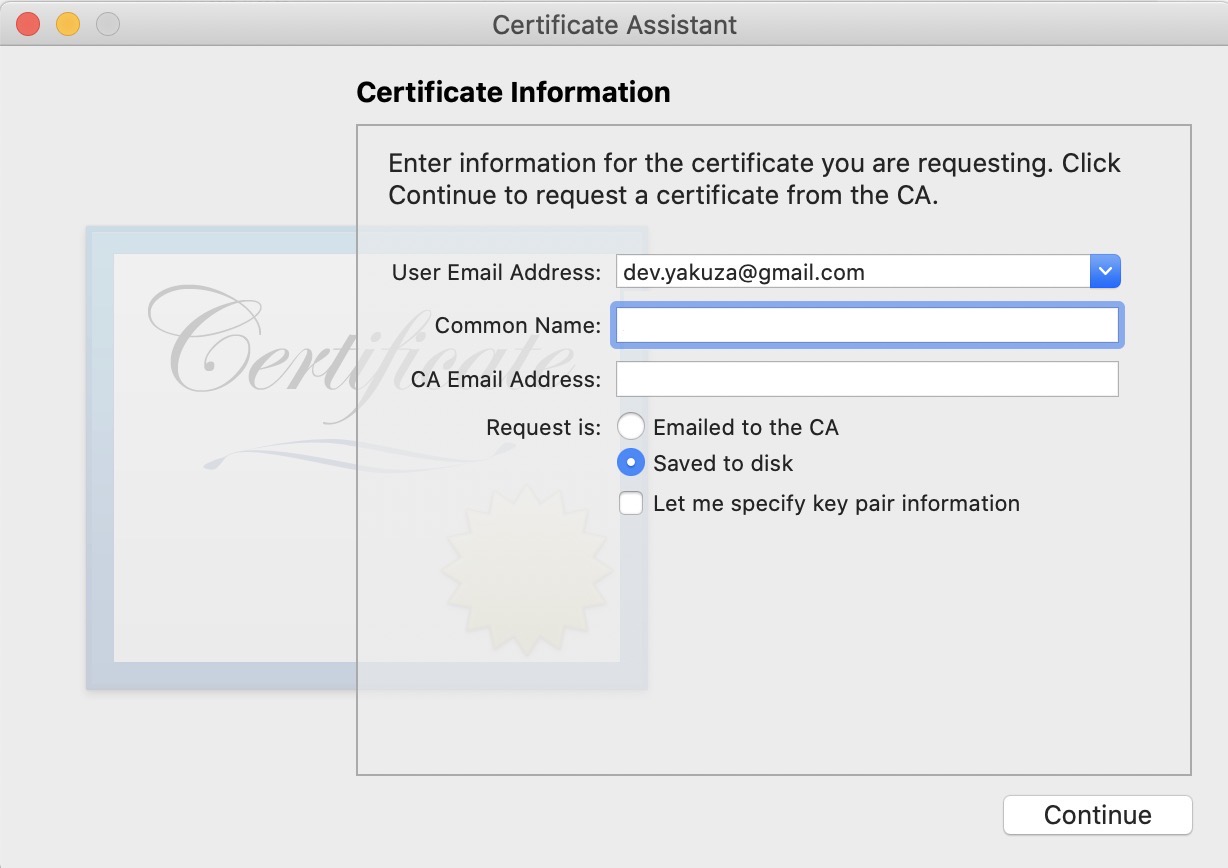
macOSでKeychain Accessを実行します。そしてKeychain Access > Certificate Assistant > Request a Certificate From a Certificate Authority...のメニューを選択します。
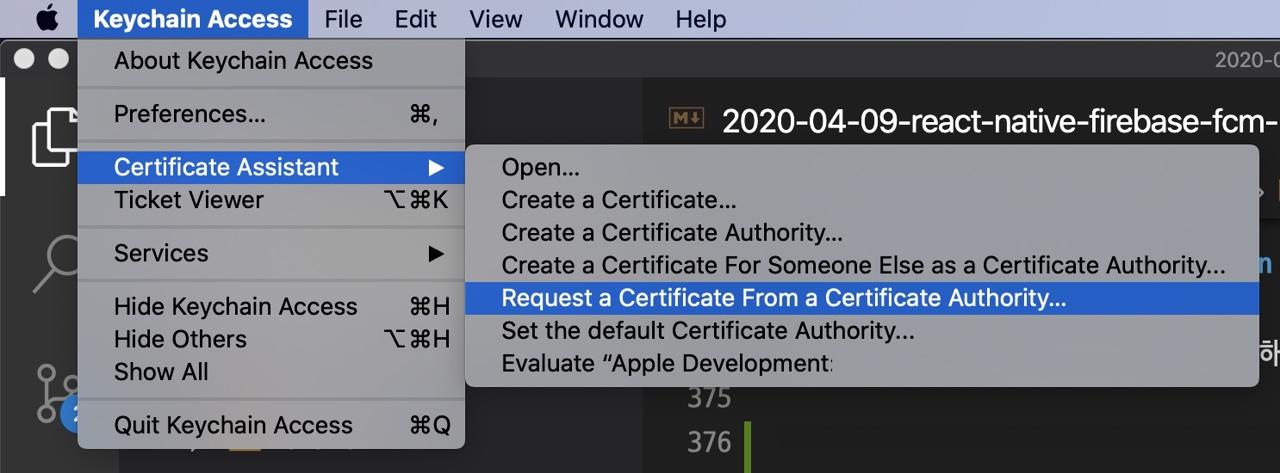
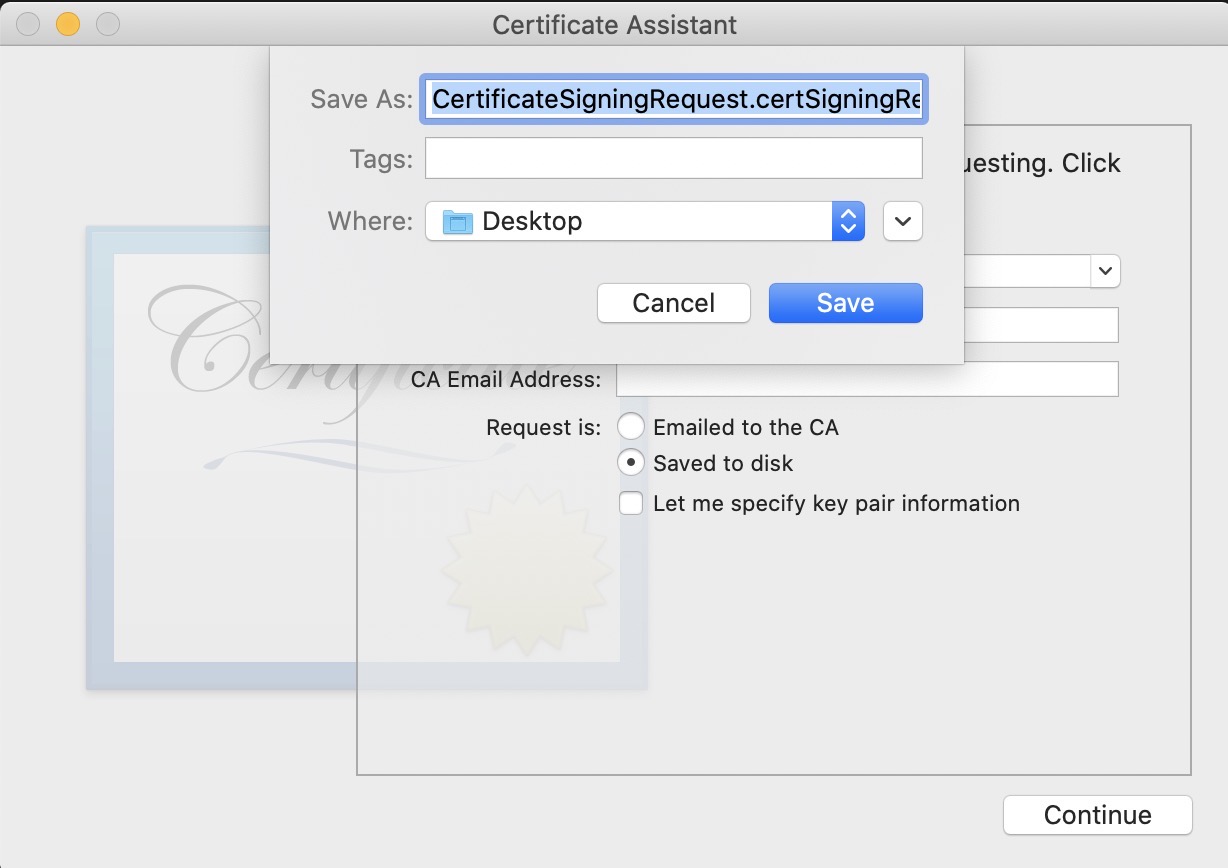
下記のような画面が出るとUser Email AddressとCommon Nameを入力した後、Saved to diskを選択してContinueボタンを選択します。
下記のような画面が出ると、保存したいフォルダを指定してSaveボタンを押して保存します。
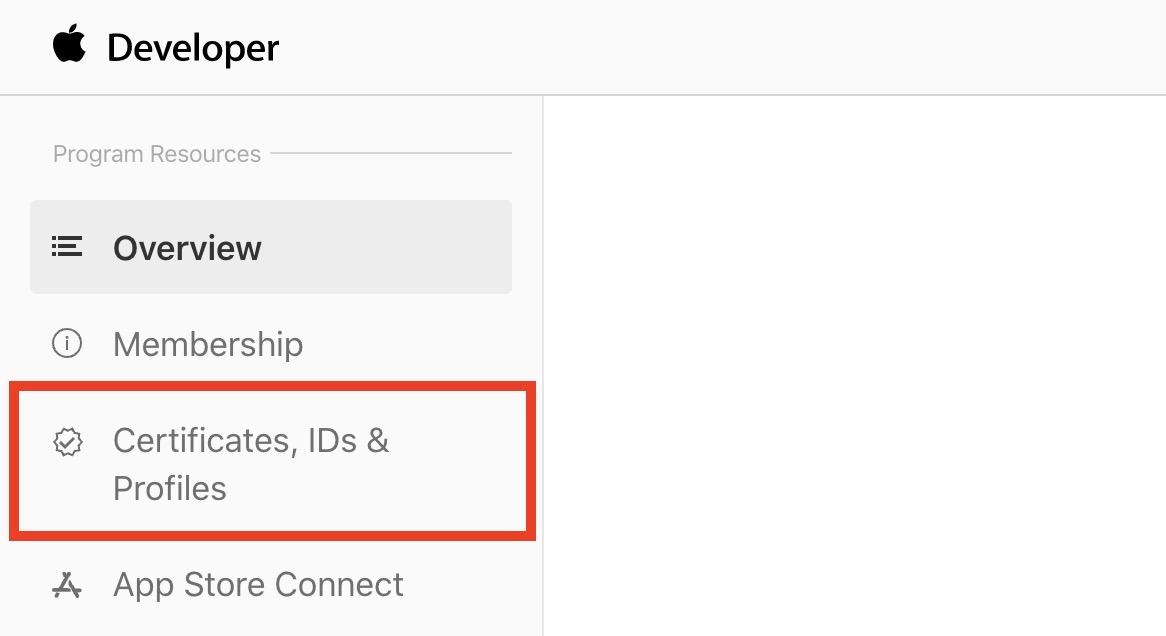
その後、https://developer.apple.com/サイトへ移動します。
その後、右上のAccountメニューを選択してログインします。下記のような画面が出ると左メニューにあるCertificates, Identifiers & Profilesを選択します。
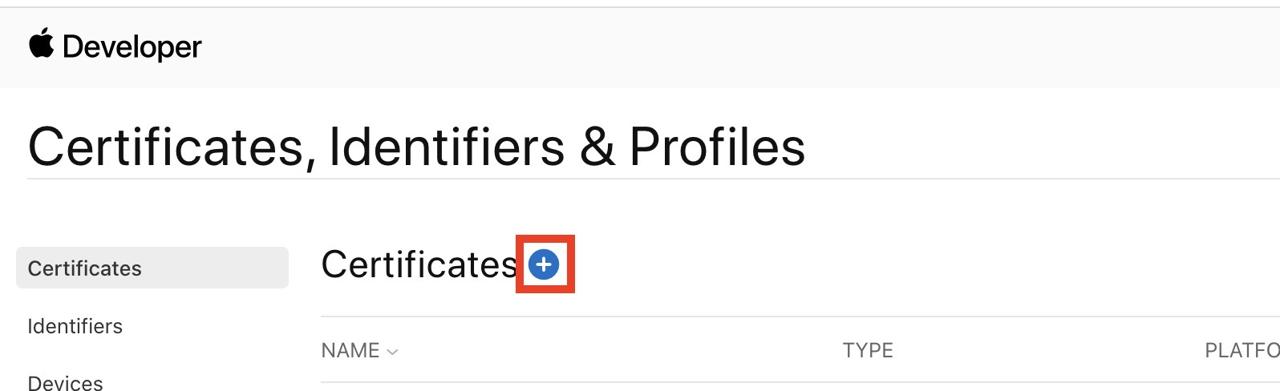
下記のような画面が見えるとCertificatesメニューを押して、上にある+ボタンを押します。
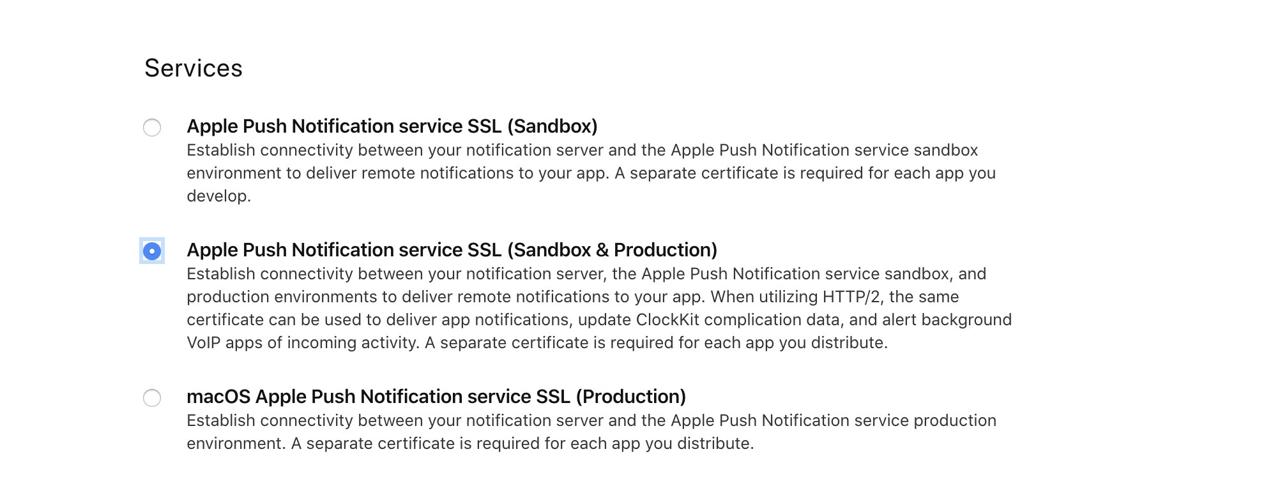
その後、Create a New Certificateの画面が出ると、スクロールして下に移動します。下に移動すると下記のようにServiceのセクションにあるApple Push Notification service SSL (Sandbox & Production)を見つけれます。その項目を選択して右上のContinueボタンを押して次へ移動します。
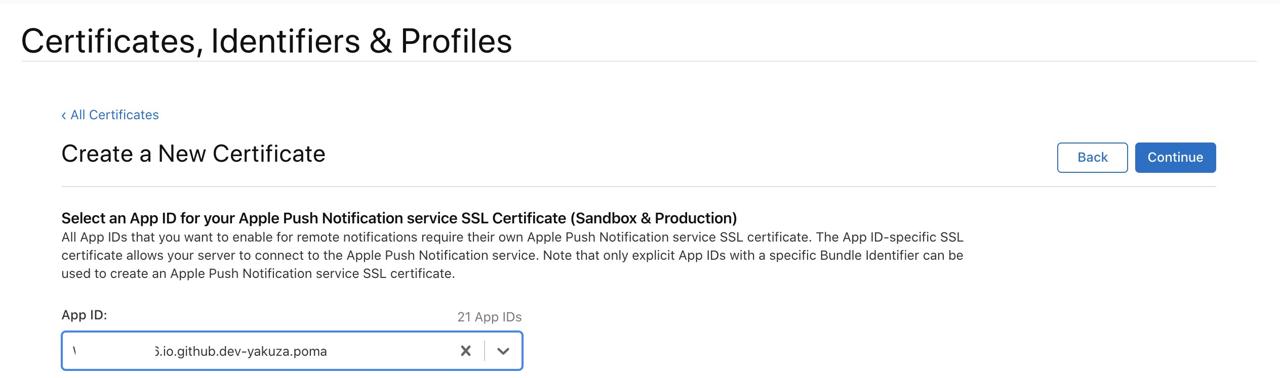
次と同じ画面が出ると、FCMメッセージを使いたいアプリを選択して、右上のContinueボタンを押して次へ進めます。
次のようにファイルを選択する画面が出るとChoose Fileを選択してKeychainで作ったファイルを選択します。選択したら、右上のContinueボタンを選択します。
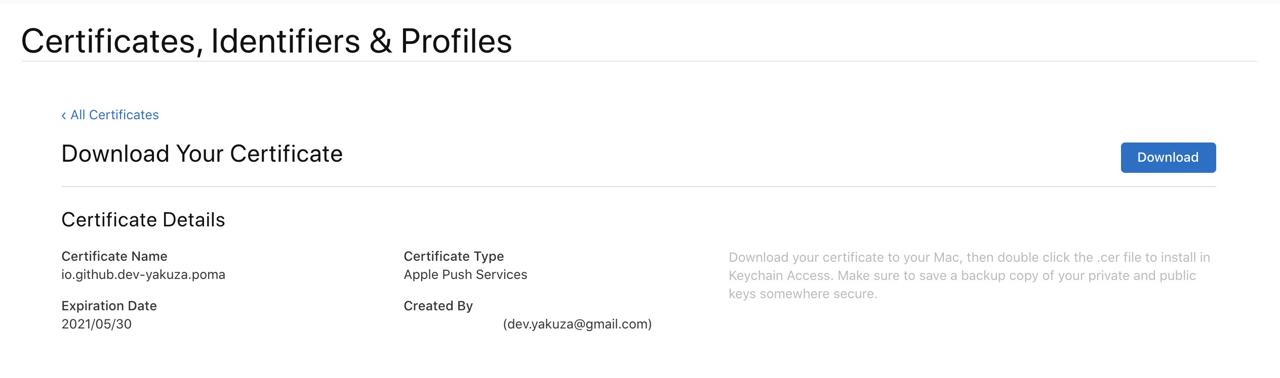
次のような画面が出ると、無事に証明書が生成されました。右上のDownloadボタンを押して、生成した証明書をダウンロードします。
このようにダウンロードした証明書を.p12の形式で変換する必要があります。ダウンロードした証明書をダブルクリックしてKeychainへ登録します。

登録された証明書をマウスの右クリックした後、Export "Apple Push Services: package name"...を選択します。
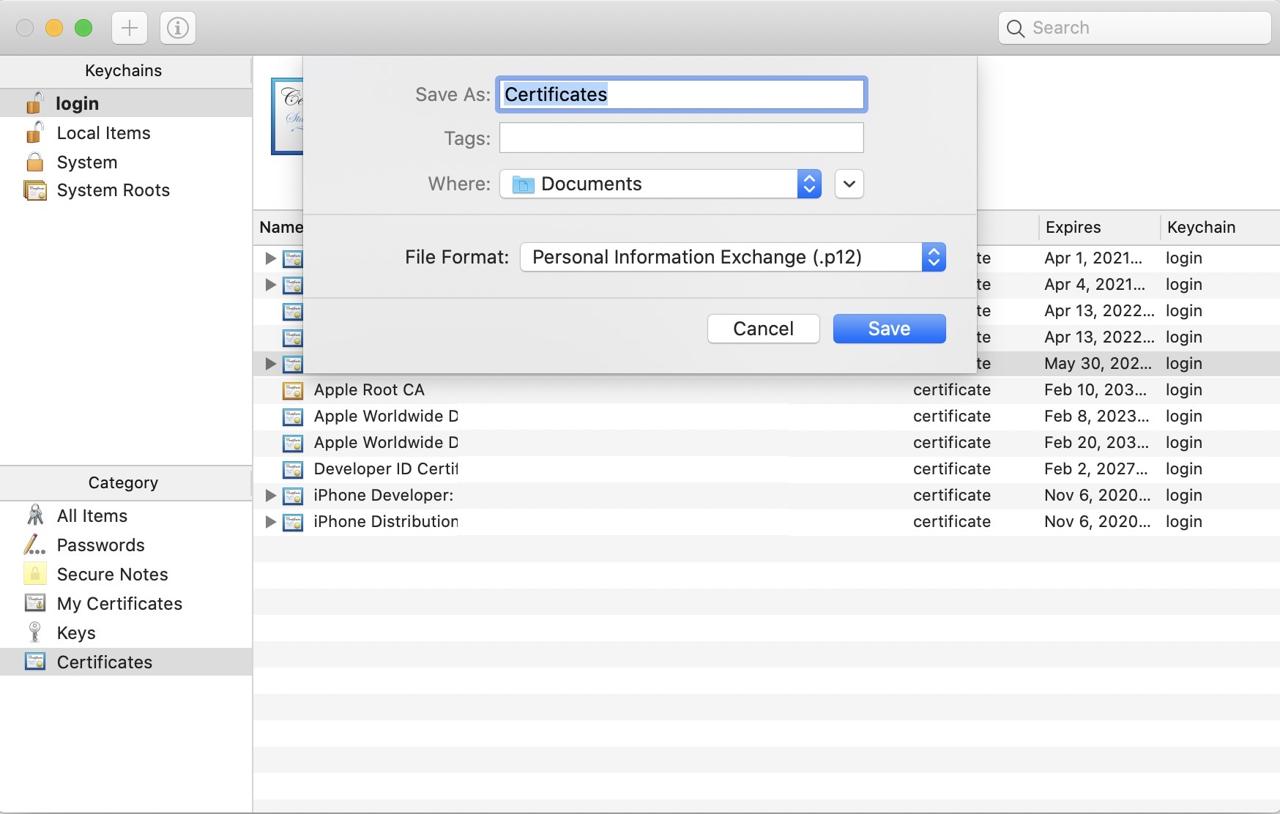
上のようにファイルを保存する画面が出るとFile FormatへPersonal Information Exchange (.p12)が選択された状態でSaveを押してファイルを保存します。
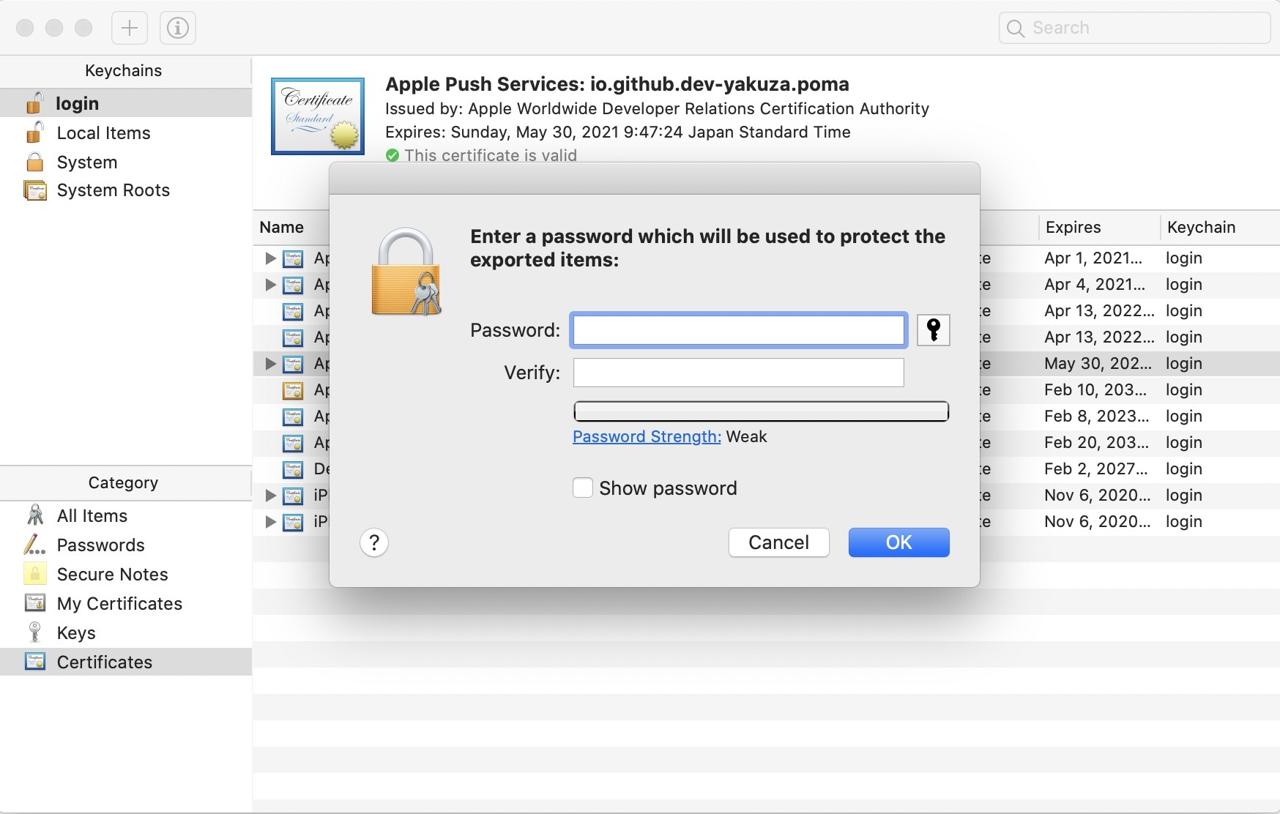
p12ファイルを保存するため、上のようにパスワードを入力する必要があります。パスワードを入力したら.p12ファイル形式で保存します。
また、Firebase Consoleへ移動して、上で作ったプロジェクトを選択します。プロジェクトを選択したら右へ上で作ったiOSのプロジェクトが確認できます。
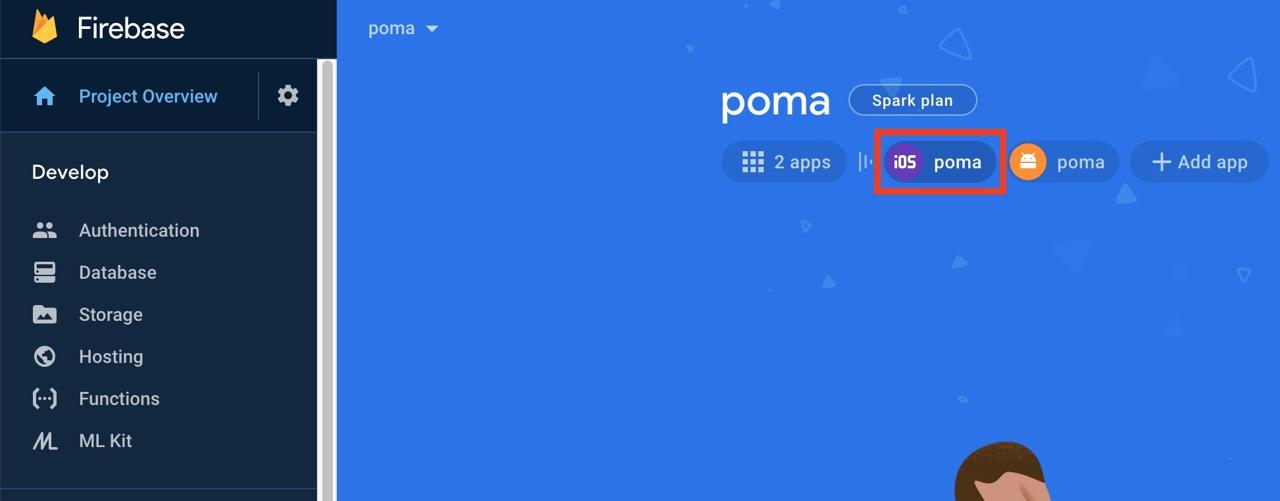
iOSプロジェクトを選択して設定アイコンを押してiOSプロジェクトの設定画面へ移動します。iOSの設定画面の上にあるCloud Messagingのメニューを押します。
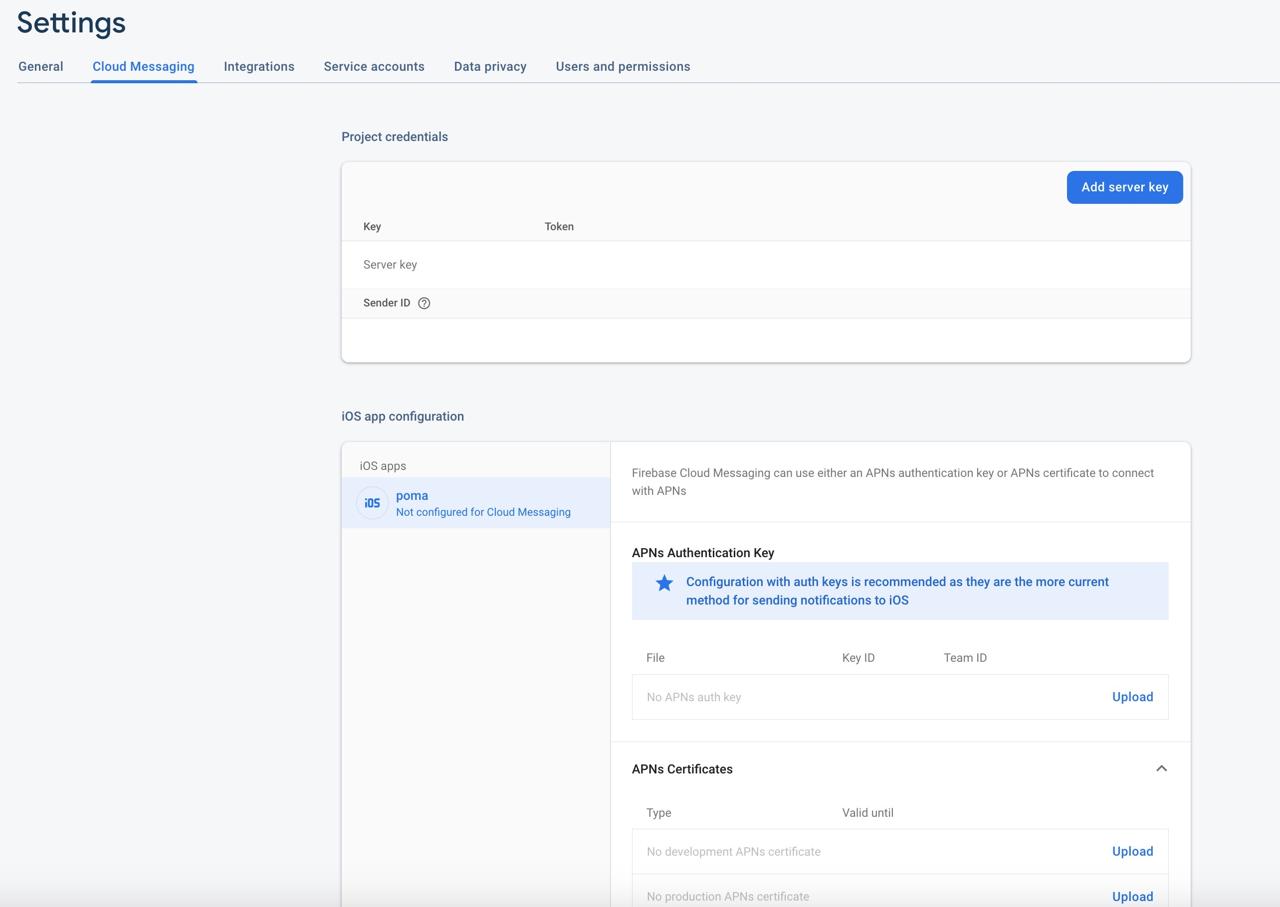
下へiOS app configurationのセクションのAPNs certificatesの項目が確認できます。No development APNs certificateとNo production APNs certificateの横にあるUploadボタンを押します。
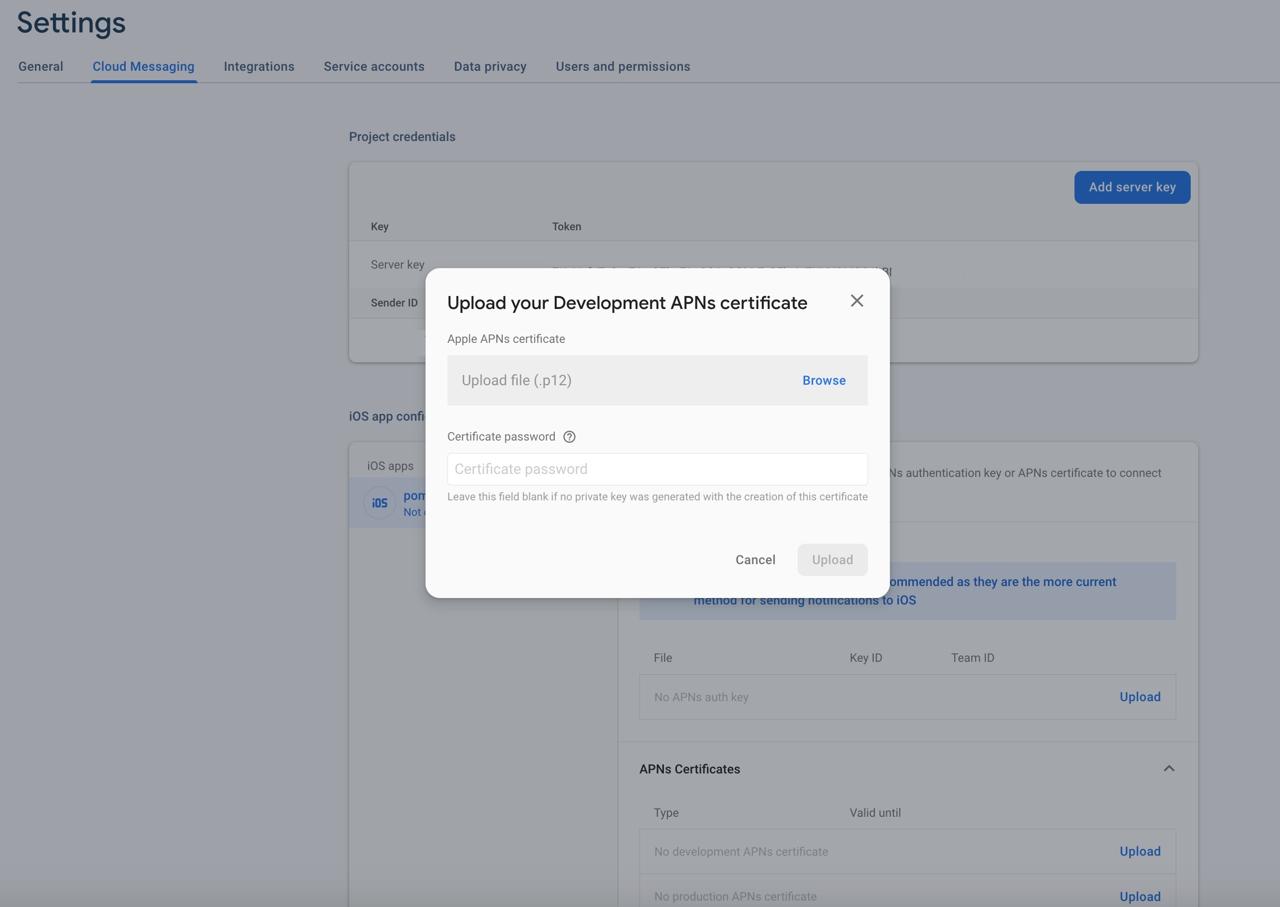
この画面で上で作った.p12ファイルをアップロードして、.p12を保存する時使ったパスワードを入力します。
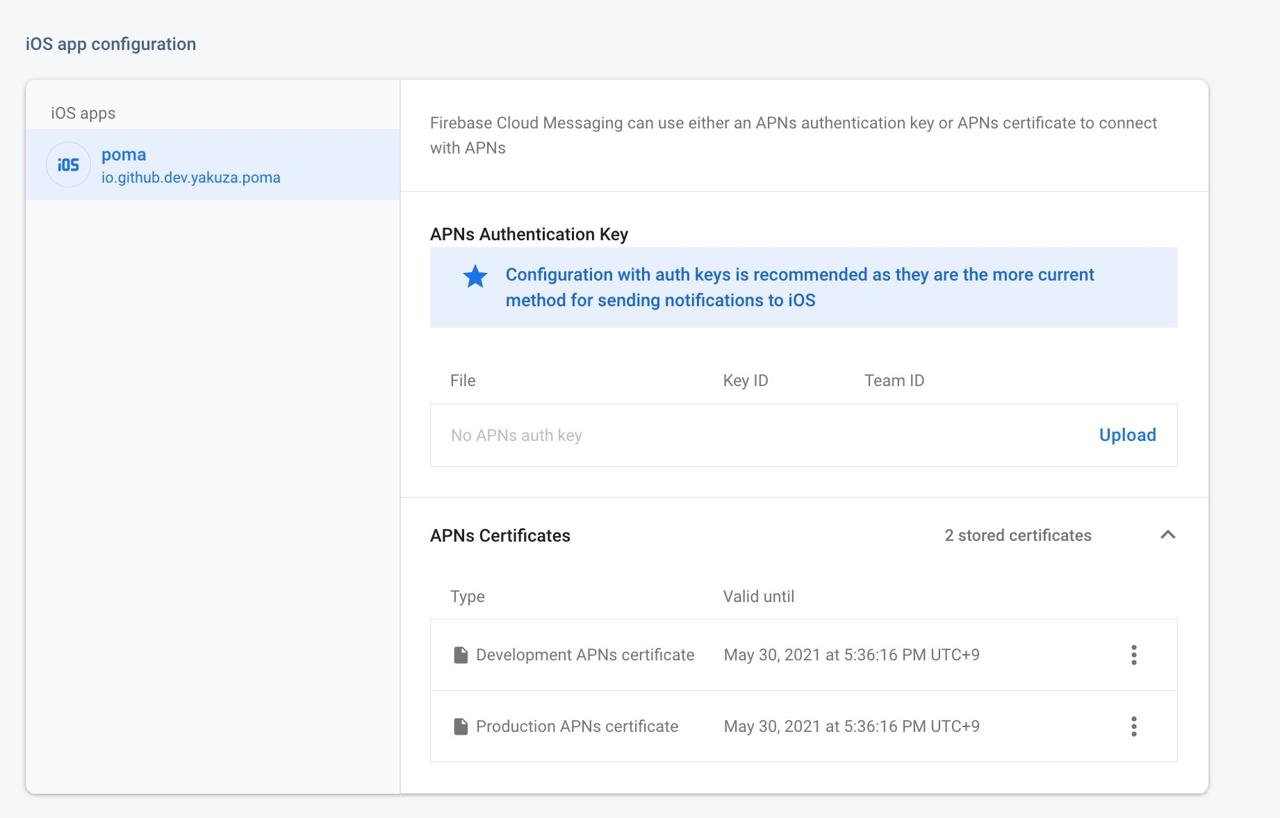
これでAPNS(Apple Push Notification Service)の設定は完了しました。
アンドロイド設定
今からreact-native-firebaseを使うためアンドロイドを設定する方法について説明します。
アンドロイドパッケージ名修正
-
React Nativeプロジェクトのフォルダで
android/app/BUCKファイルを修正... android_build_config( ... package = "package_name", ) ... android_resource( ... package = "package_name", ... ) ... -
React Nativeプロジェクトフォルダにある
android/app/src/main/AndroidManifest.xmlファイルを修正<manifest xmlns:android="http://schemas.android.com/apk/res/android" package="package_name"> ... -
React Nativeプロジェクトフォルダにある
android/app/src/main/java/com/ProjectName/MainActivity.javaファイルを修正package package_name; ... -
React Nativeプロジェクトフォルダにある
android/app/src/main/java/com/ProjectName/MainApplication.javaファイル修正package package_name; ... -
React Nativeプロジェクトフォルダにある
android/app/build.gradleファイル修正... defaultConfig { applicationId package_name ... } ...
Firebase アンドロイドプロジェクト設定
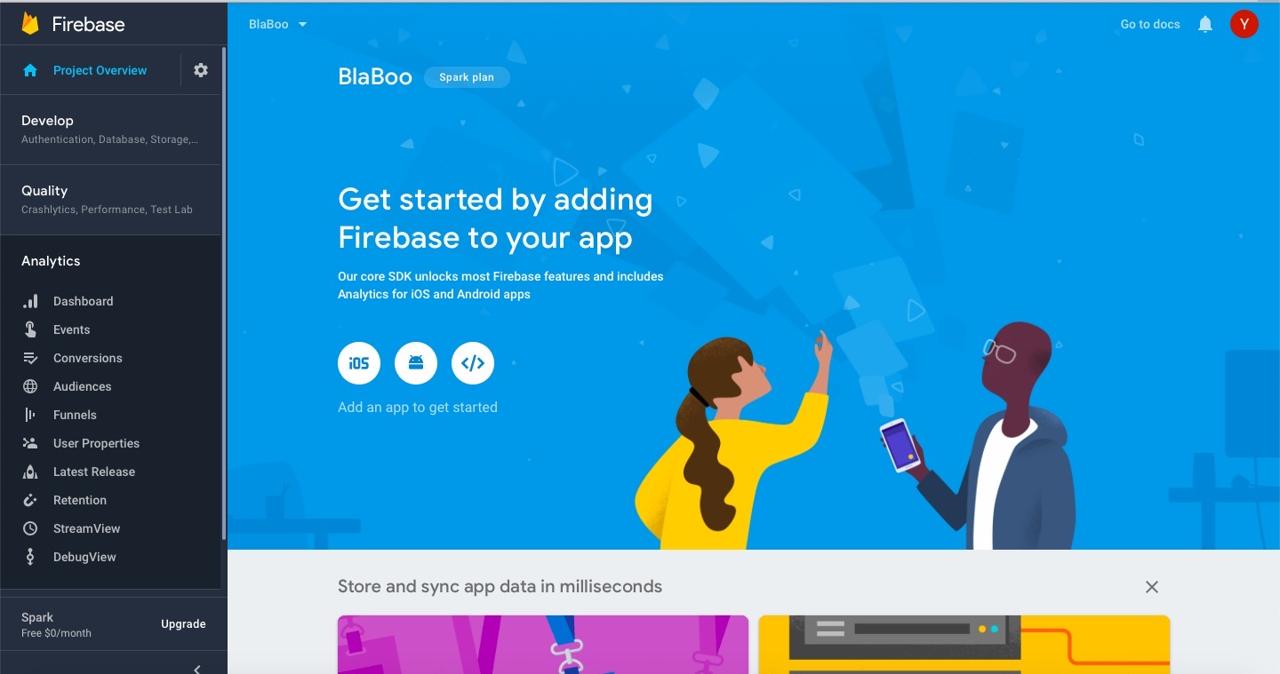
Googleのファイアベースコンソール(Google Firebase Console)の左上のProject Overviewを選択します。

上にある+ Add app > アンドロイドアイコンを押してアンドロイド(Android)プロジェクト設定へ移動します。
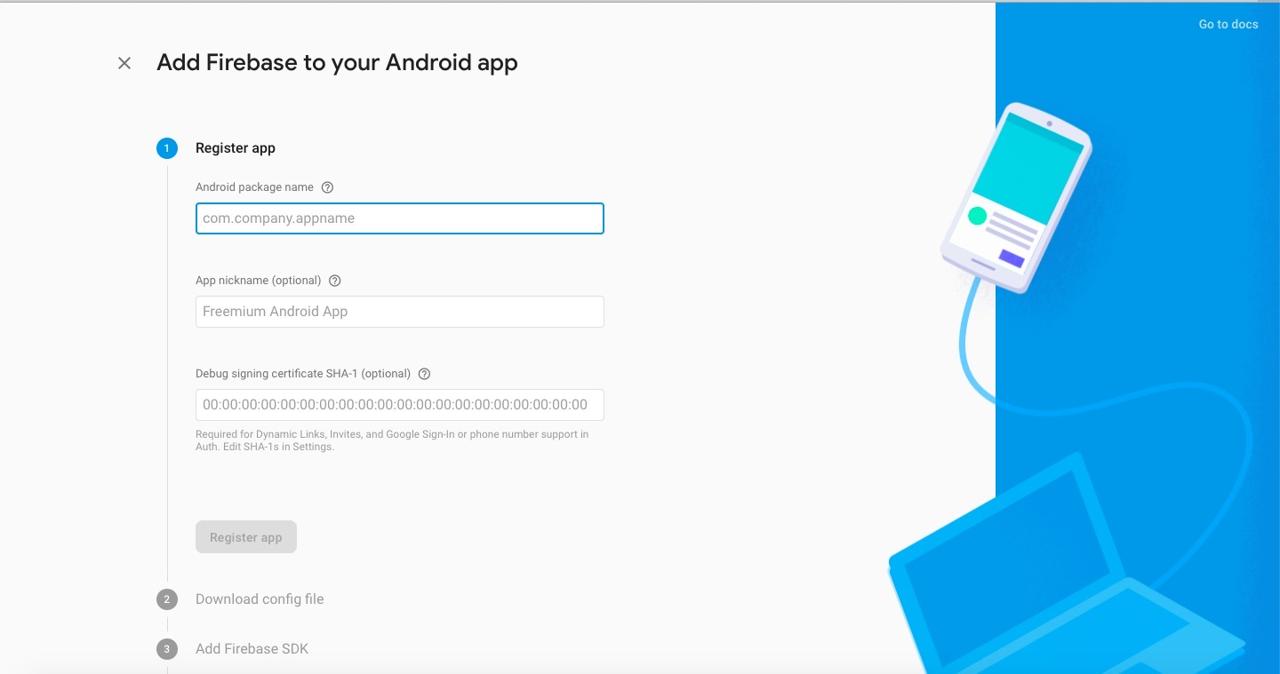
アンドロイドパッケージ名(Android Package Name)を入力してRegister appを選択します。
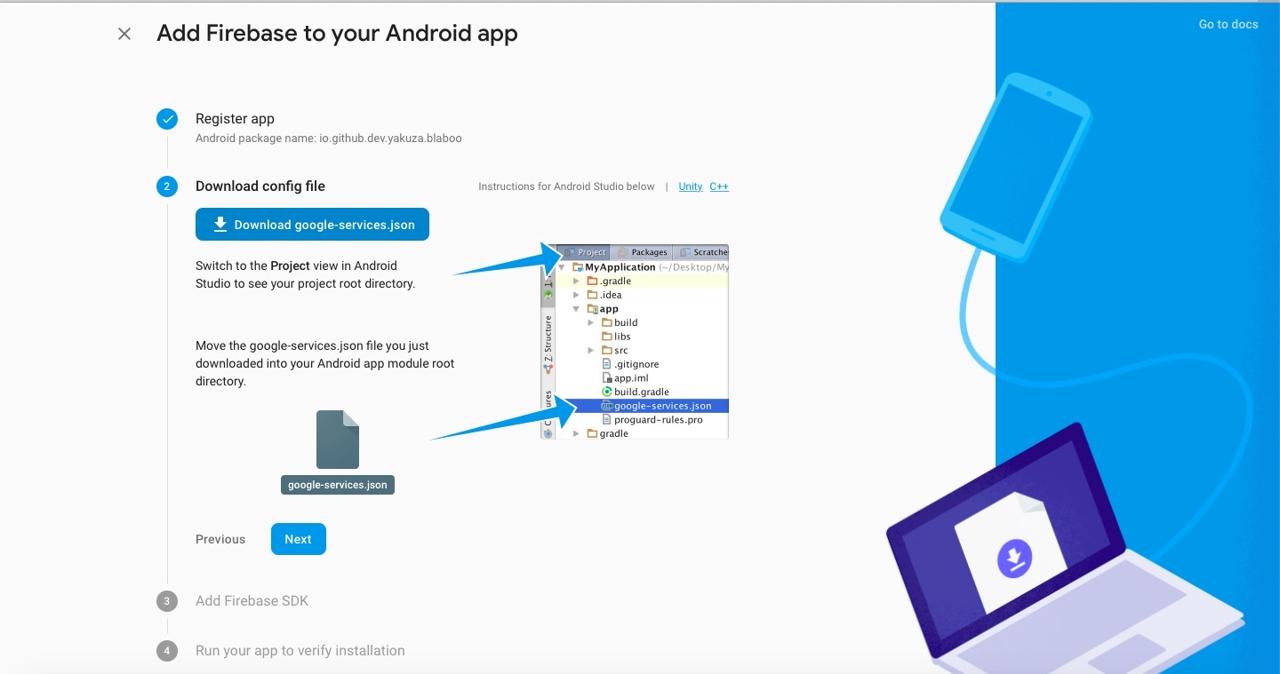
Googleのファイアベース(Google Firebase)が作ったgoogle-services.jsonファイルをReact Nativeプロジェクトのandroid/appフォルダへコピーします。そして、Nextボタンを押して次へ進めます。
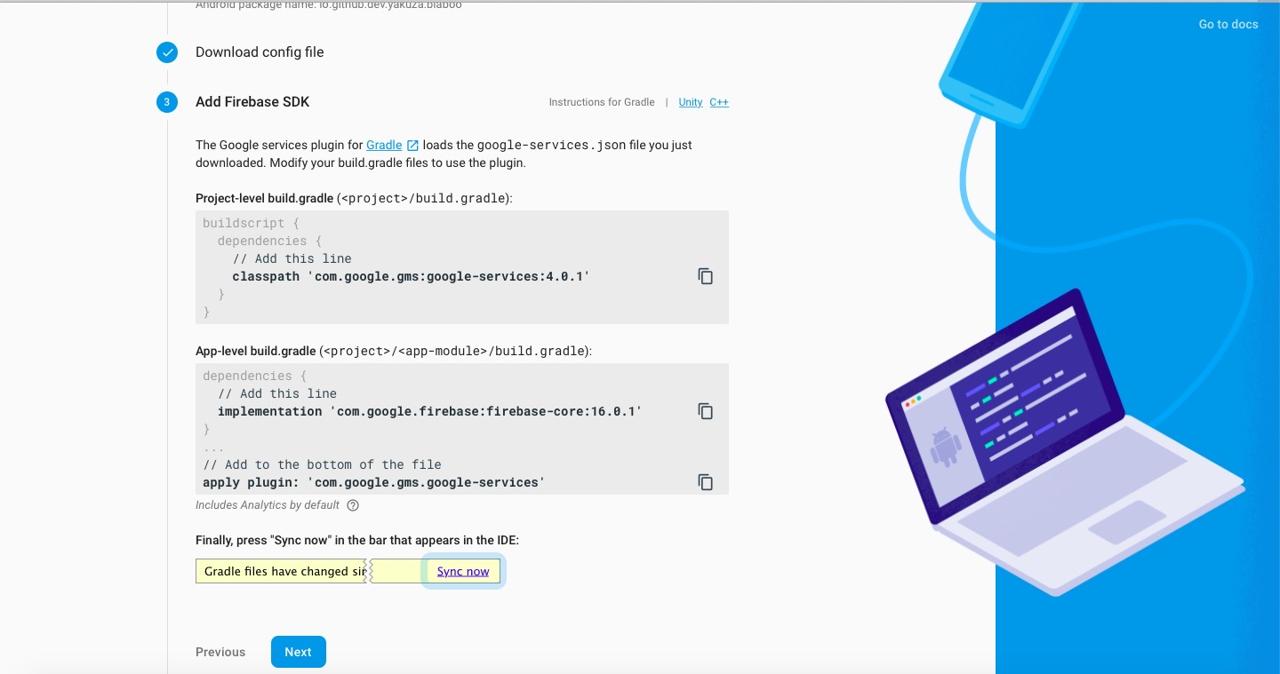
React Nativeプロジェクトがあるフォルダへandroid/build.gradleファイルを開いて下記のようにコードを追加します。
buildscript {
  repositories {
    google()
    jcenter()
  }
  dependencies {
    classpath("com.android.tools.build:gradle:3.4.2")
    classpath 'com.google.gms:google-services:4.3.3'
  }
}
...
allprojects {
  repositories {
    mavenLocal()
    google()
    jcenter()
    ...
  }
}上のようにrepositoriesへgoogle()があるか確認して、jcenter()より上に宣言されてるか確認します。
React Nativeプロジェクトがあるフォルダでandroid/app/build.gradleファイルを開いて下記のようにコードを追加します。
dependencies {
    // under 59 version
    // implementation project(':react-native-firebase')
    ...
    implementation 'com.google.android.gms:play-services-base:17.2.1'
    implementation 'com.google.firebase:firebase-core:17.0.0'
    implementation "com.google.firebase:firebase-messaging:20.0.0"
    implementation 'me.leolin:ShortcutBadger:1.1.21@aar'
}
そして同じファイルの一番下へ下記のようにコードを追加します。
...
apply plugin: 'com.google.gms.google-services'次は./android/build.gradleファイルを開いて下記のように修正します。
buildscript {
    ext {
        ...
    }
    repositories {
        ...
    }
    dependencies {
        classpath("com.android.tools.build:gradle:3.4.2")
        classpath 'com.google.gms:google-services:4.3.3'
    }
}- 0.60以上
react-native-firebaseを使うためandroid/app/src/main/java/com/[app name]/MainApplication.javaファイルを開いて下記のように修正します。
import io.invertase.firebase.RNFirebasePackage;
import io.invertase.firebase.analytics.RNFirebaseAnalyticsPackage;
import io.invertase.firebase.messaging.RNFirebaseMessagingPackage;
import io.invertase.firebase.notifications.RNFirebaseNotificationsPackage;
...
@Override
protected List<ReactPackage> getPackages() {
  @SuppressWarnings("UnnecessaryLocalVariable")
  List<ReactPackage> packages = new PackageList(this).getPackages();
  // Packages that cannot be autolinked yet can be added manually here, for example:
  // packages.add(new MyReactNativePackage());
  packages.add(new RNFirebaseAnalyticsPackage());
  packages.add(new RNFirebaseMessagingPackage());
  packages.add(new RNFirebaseNotificationsPackage());
  return packages;
}
...- 0.59以下
react-native-firebaseを使うためandroid/app/src/main/java/com/[app name]/MainApplication.javaファイルを開いて下記のように修正します。
import io.invertase.firebase.RNFirebasePackage;
import io.invertase.firebase.analytics.RNFirebaseAnalyticsPackage;
import io.invertase.firebase.messaging.RNFirebaseMessagingPackage;
...

@Override
protected List<ReactPackage> getPackages() {
  return Arrays.<ReactPackage>asList(
    ...
    new RNFirebasePackage(),
    new RNFirebaseAnalyticsPackage(),
    new RNFirebaseMessagingPackage()
    ...
  );
}アンドロイドでメッセージを受けるためandroid/app/src/main/AndroidManifest.xmlファイルを開いて下記のように修正します。
<application ...>
...
<service android:name="io.invertase.firebase.messaging.RNFirebaseMessagingService">
  <intent-filter>
    <action android:name="com.google.firebase.MESSAGING_EVENT" />
  </intent-filter>
</service>
<service android:name="io.invertase.firebase.messaging.RNFirebaseBackgroundMessagingService" />
...
</application>
アンドロイドスタジオ(Android Studio)を開いてGradle Syncをします。
テスト
FCMの設定が上手くできたかテストしてみましょう。
Javascriptソースコード追加
テストをするためにはFCM Tokenが必要です。このトークンを取得するためにはJavascriptを利用しなきゃならないです。ここで紹介してるソースコードは実際プロジェクトでも使えます。
FCMを使うため./src/Components/FCMContainer/index.tsxファイルを開いて下記のように修正します。
import React, { useEffect } from 'react';
import { Platform, Alert } from 'react-native';
import firebase from 'react-native-firebase';
import DeviceInfo from 'react-native-device-info';
import AsyncStorage from '@react-native-async-storage/async-storage';
import Axios from 'axios';

import Config from '~/Config';

interface Props {
  children: JSX.Element;
  onNotificationOpened?: (data: { [key: string]: string }) => any;
}

const FCMContainer = ({ children, onNotificationOpened }: Props): JSX.Element => {
  const CHANNEL_ID = 'io.github.dev.yakuza.poma';
  const APP_NAME = 'POMA';
  const DESCRIPTION = 'POMA channel';

  let _onTokenRefreshListener: any = undefined;
  let _notificationDisplayedListener: any = undefined;
  let _notificationListener: any = undefined;
  let _notificationOpenedListener: any = undefined;

  const _registerMessageListener = (): void => {
    firebase
      .notifications()
      .getInitialNotification()
      .then((notificationOpen) => {
        if (
          onNotificationOpened &&
          typeof onNotificationOpened === 'function' &&
          notificationOpen &&
          notificationOpen.notification &&
          notificationOpen.notification.data &&
          notificationOpen.notification.data.notifications_id
        ) {
          onNotificationOpened(notificationOpen.notification.data);
        }
      });

    const channel = new firebase.notifications.Android.Channel(
      CHANNEL_ID,
      APP_NAME,
      firebase.notifications.Android.Importance.Max,
    ).setDescription(DESCRIPTION);
    firebase.notifications().android.createChannel(channel);

    _notificationListener = firebase.notifications().onNotification((notification) => {
      // Process your notification as required
      notification.android.setPriority(firebase.notifications.Android.Priority.Max);
      notification.android.setChannelId(CHANNEL_ID);

      firebase.notifications().displayNotification(notification);
    });
    _notificationDisplayedListener = firebase.notifications().onNotificationDisplayed(() => {});
    _notificationOpenedListener = firebase
      .notifications()
      .onNotificationOpened((notificationOpen) => {
        if (onNotificationOpened && typeof onNotificationOpened === 'function') {
          onNotificationOpened(notificationOpen.notification.data);
        }
      });
  };

  const _registerToken = async (fcmToken: string): Promise<void> => {
    console.log(fcmToken);
    // try {
    //   const deviceUniqueId = DeviceInfo.getUniqueId();
    //   const token = await AsyncStorage.getItem('token');
    //   await Axios.post(
    //     `URL`,
    //     {
    //       token: fcmToken,
    //       device_unique_id,
    //     },
    //     {
    //       headers: { Authorization: 'Bearer ' + token },
    //     },
    //   );
    // } catch (error) {
    //   console.log('ERROR: _registerToken');
    //   console.log(error.response.data);
    // }
  };

  const _registerTokenRefreshListener = (): void => {
    if (_onTokenRefreshListener) {
      _onTokenRefreshListener();
      _onTokenRefreshListener = undefined;
    }

    _onTokenRefreshListener = firebase.messaging().onTokenRefresh((fcmToken) => {
      // Process your token as required
      _registerToken(fcmToken);
    });
  };
  const _updateTokenToServer = async (): Promise<void> => {
    try {
      const fcmToken = await firebase.messaging().getToken();
      _registerMessageListener();
      _registerToken(fcmToken);
    } catch (error) {
      console.log('ERROR: _updateTokenToServer');
      console.log(error);
    }
  };

  const _requestPermission = async (): Promise<void> => {
    try {
      // User has authorized
      await firebase.messaging().requestPermission();
      await _updateTokenToServer();
    } catch (error) {
      // User has rejected permissions
      Alert.alert("you can't handle push notification");
    }
  };

  const _checkPermission = async (): Promise<void> => {
    try {
      const enabled = await firebase.messaging().hasPermission();
      if (enabled) {
        // user has permissions
        _updateTokenToServer();
        _registerTokenRefreshListener();
      } else {
        // user doesn't have permission
        _requestPermission();
      }
    } catch (error) {
      console.log('ERROR: _checkPermission', error);
      console.log(error);
    }
  };

  useEffect(() => {
    _checkPermission();
    return (): void => {
      if (_onTokenRefreshListener) {
        _onTokenRefreshListener();
        _onTokenRefreshListener = undefined;
      }
      if (_notificationDisplayedListener) {
        _notificationDisplayedListener();
        _notificationDisplayedListener = undefined;
      }
      if (_notificationListener) {
        _notificationListener();
        _notificationListener = undefined;
      }
      if (_notificationOpenedListener) {
        _notificationOpenedListener();
        _notificationOpenedListener = undefined;
      }
    };
  }, []);

  if (Platform.OS === 'ios') {
    firebase.notifications().setBadge(0);
  }

  return children;
};

export default FCMContainer;上のソースコードで皆さんのChannel IDとApp Name、Descriptionで修正します。
const CHANNEL_ID = 'io.github.dev.yakuza.poma';
const APP_NAME = 'POMA';
const DESCRIPTION = 'POMA channel';
また、テストのためFCM Tokenをローグで表示しますが、
const _registerToken = async (fcmToken: string): Promise<void> => {
  console.log(fcmToken);
  // try {
  //   const deviceUniqueId = DeviceInfo.getUniqueId();
  //   const token = await AsyncStorage.getItem('token');
  //   await Axios.post(
  //     `URL`,
  //     {
  //       token: fcmToken,
  //       device_unique_id,
  //     },
  //     {
  //       headers: { Authorization: 'Bearer ' + token },
  //     },
  //   );
  // } catch (error) {
  //   console.log('ERROR: _registerToken');
  //   console.log(error.response.data);
  // }
};
実際使うときは、この部分でサーバと通信してFCM Tokenを保存します。
上のソースコードを使うためにはApp.tsxファイルを開いて下記のように修正します。
import React from 'react';
import FCMContainer from '~/Component/FCMContainer';

const App = (): JSX.Element => {
  return (
    <FCMContainer>
      ...
    </FCMContainer>
  );
};

export default App;
iOSテスト
iOSでFCMをテストするためには端末が必要です。端末を連結してXcodeを実行します。
Xcodeが実行されると左上のメニューで端末を選択して>ボタンを押してプロジェクトを実行します。
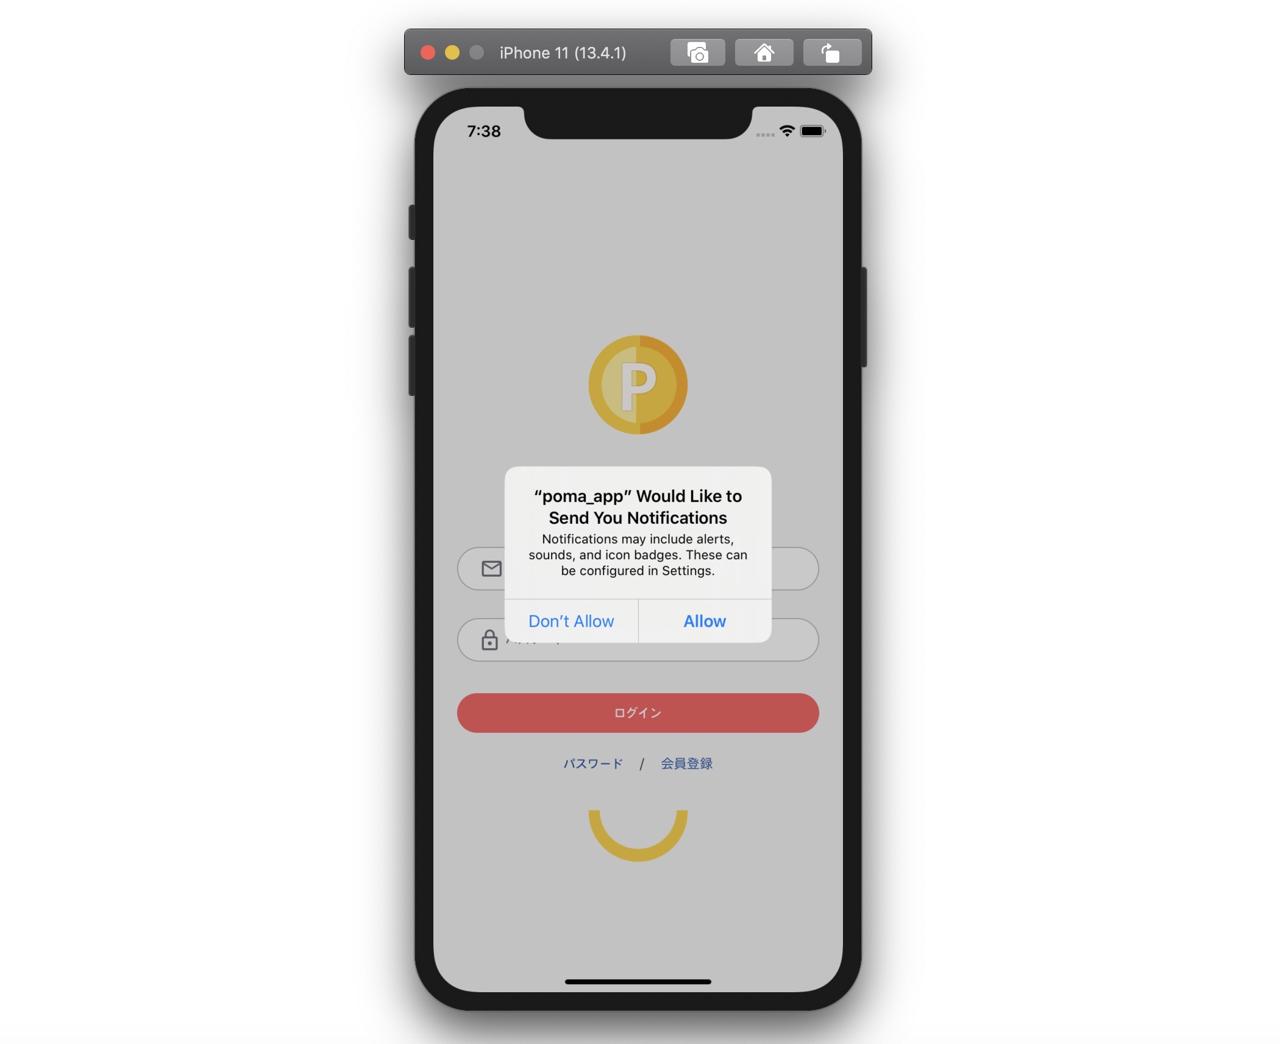
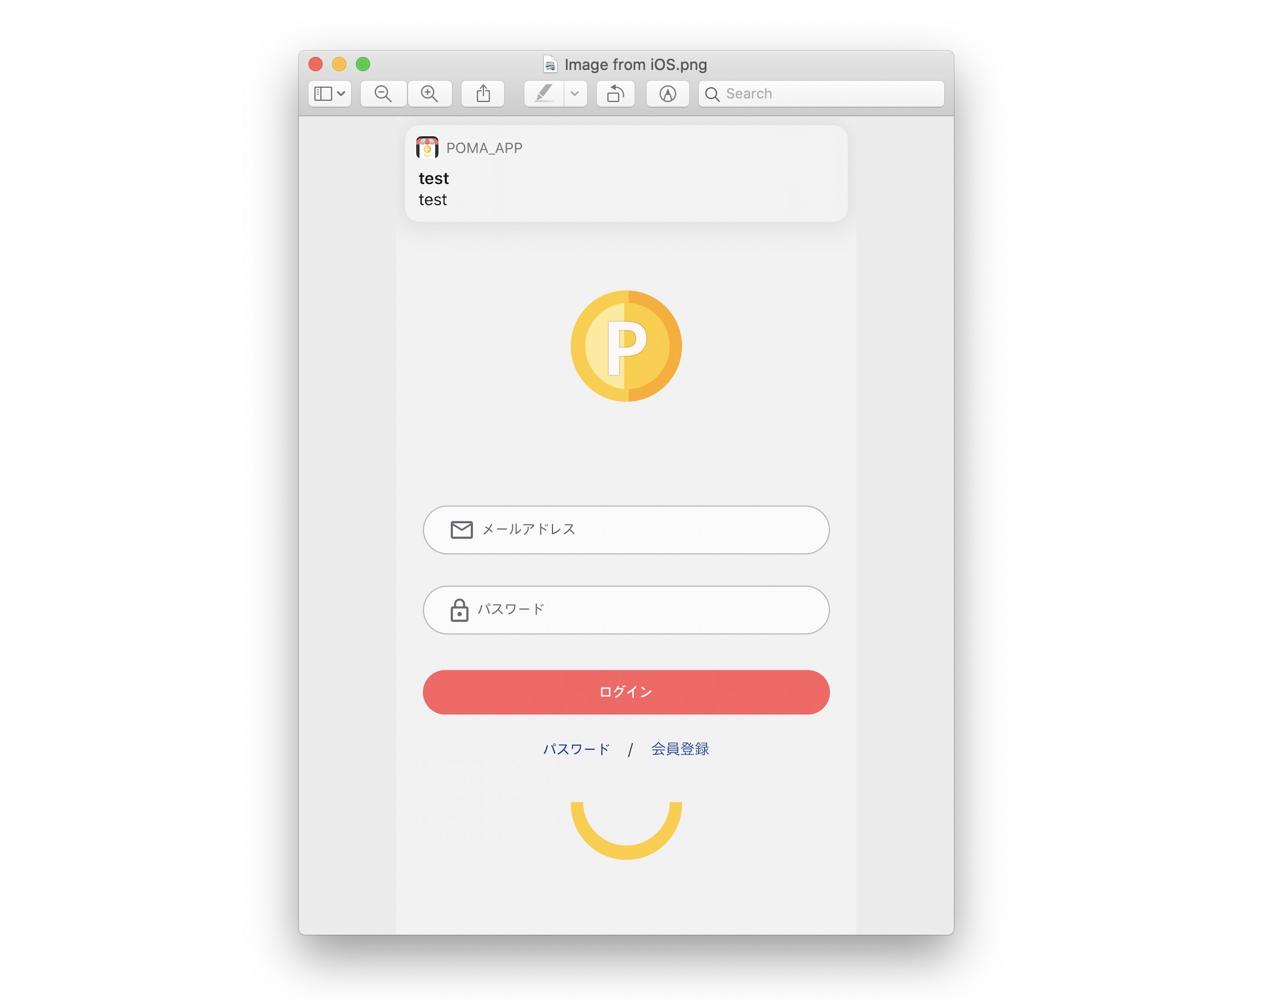
端末でアプリが実行されると下記のようにPush Notificationの権限を許可するか聞いてくれる画面がでます。Allowボタンを押して許可します。
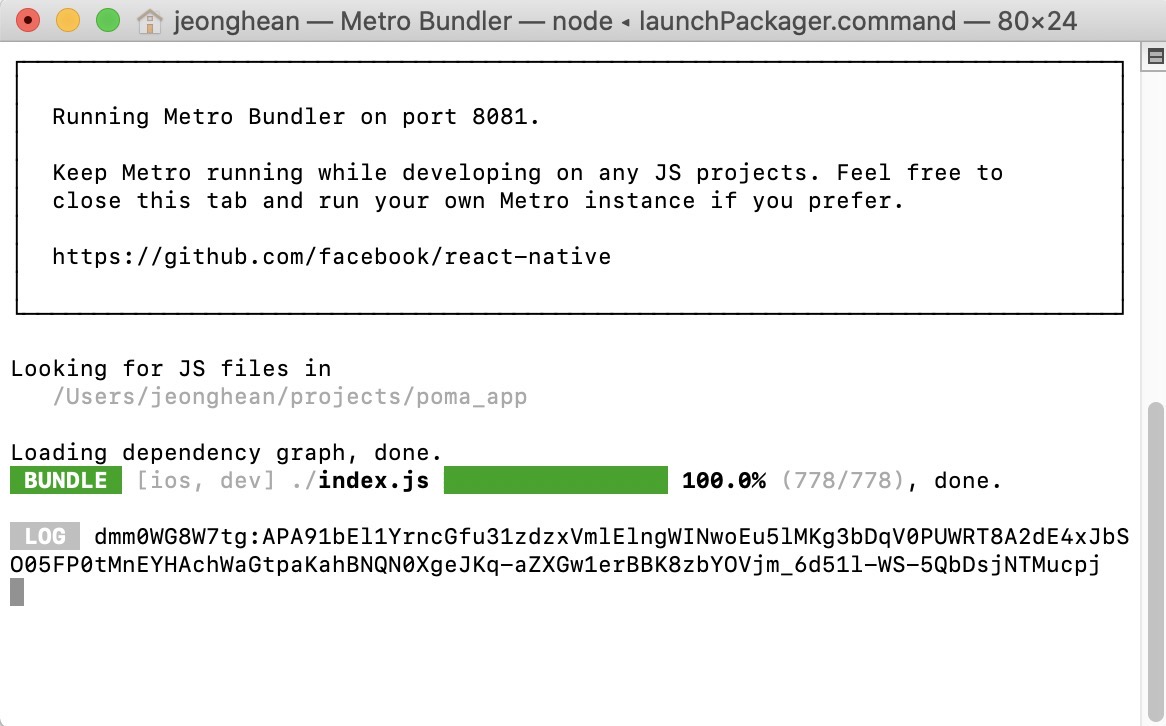
許可するとコンソールへ上のようにFCM Tokenが出力されます。そのTokenをコピーします。
次はFirebase Consoleを接続した後、左メニュでCloud Messagingを選択してSend your first messageボタンを押します。

次のような画面が出るとNotification titleとNotification textへテストメッセージを作成します。作成が完了されたら、右にあるSend test messageを選択します。

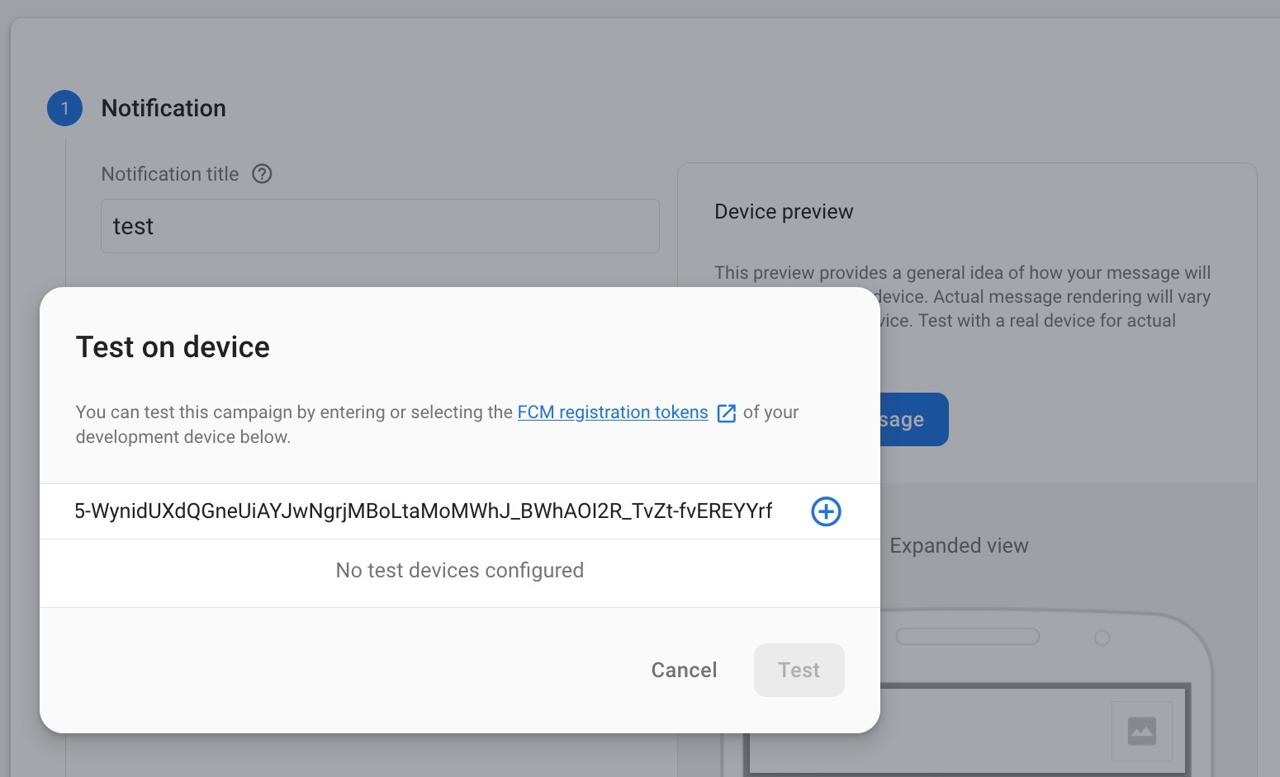
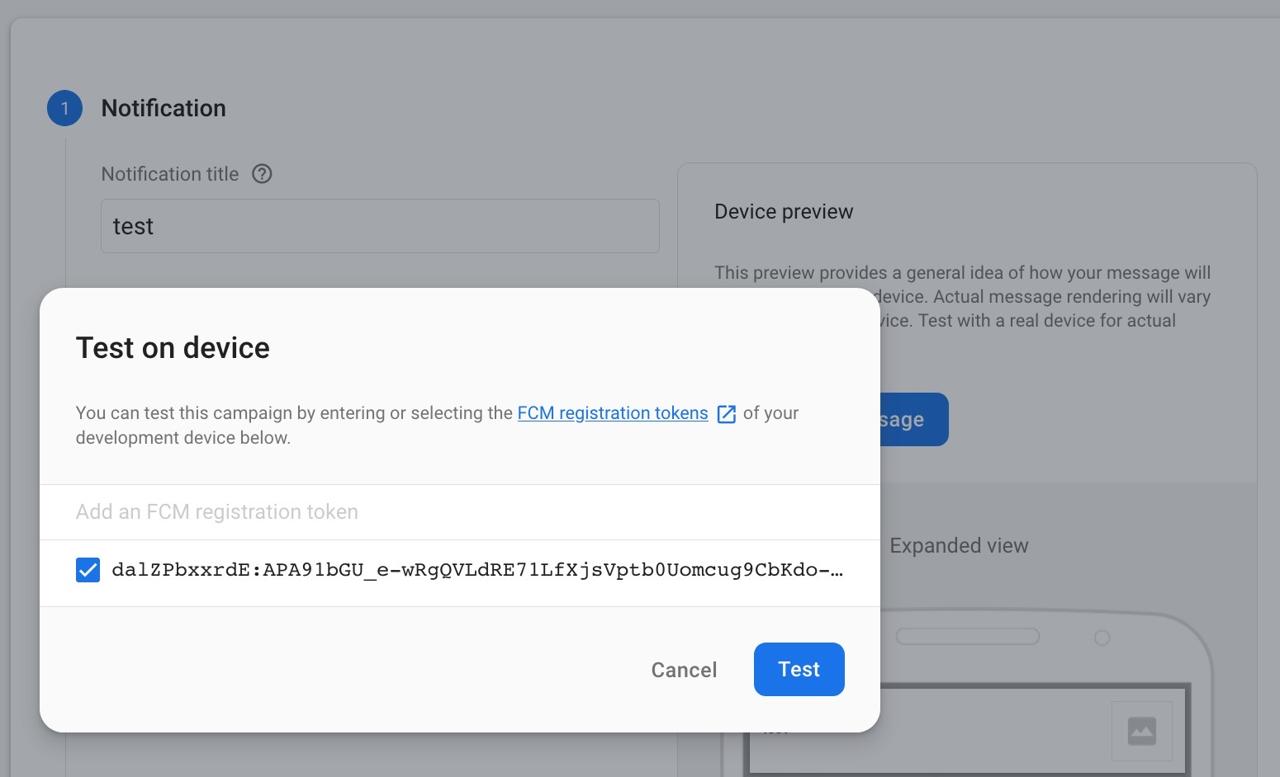
次のような画面が出るとAdd an FCM registration tokenに上でコピーしたFCM Tokenを入力して+ボタンを選択します。
その後、Testボタンを押してテストメッセージを送信してみます。
そしたら下記のように端末へメッセージがうまく受信されることが確認できます。
アンドロイドテスト
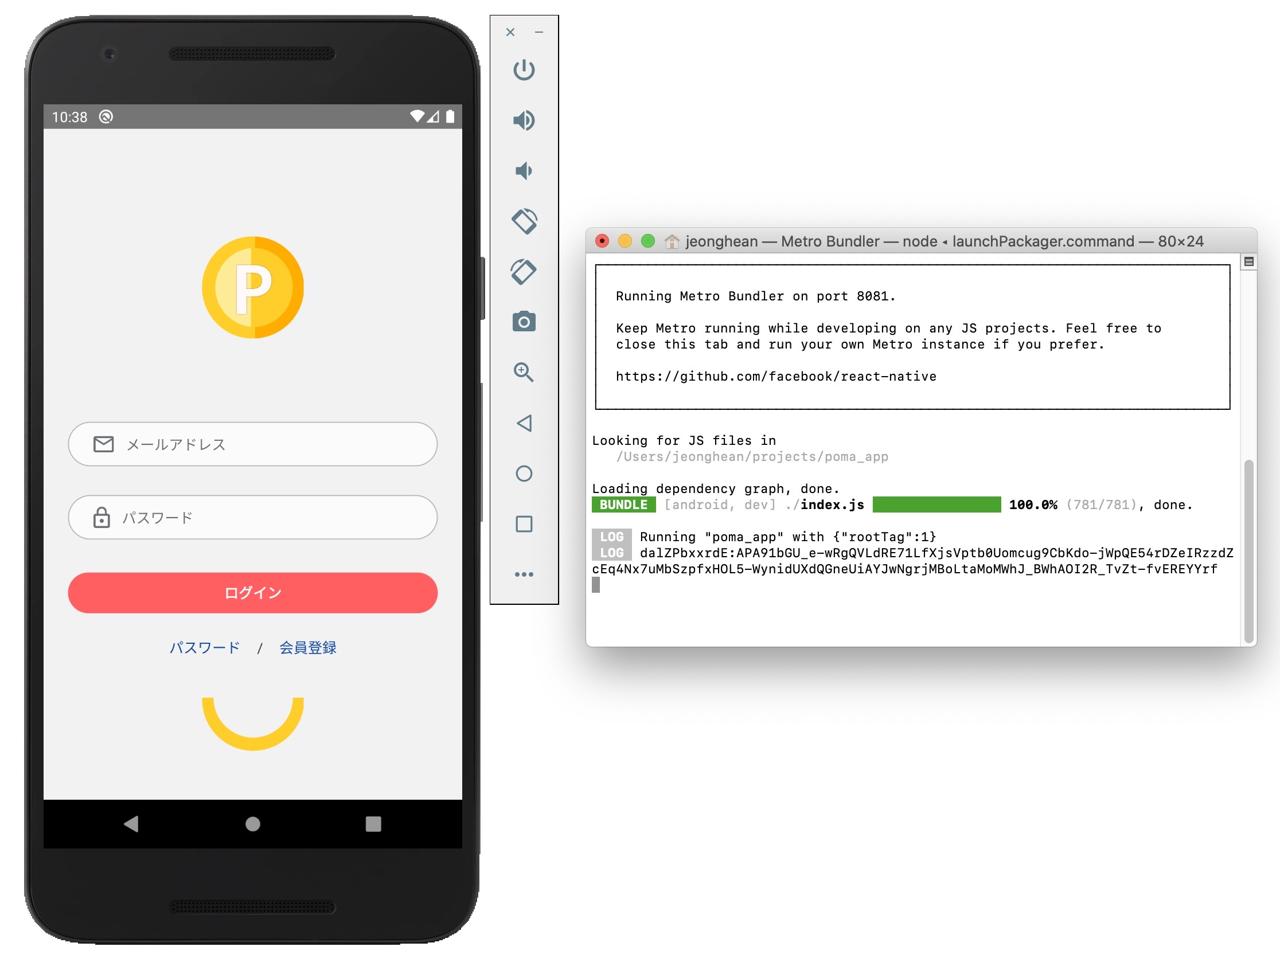
アンドロイドでFCMをテストするため下記のコマンドを使ってアンドロイド実行します。
npm run android実行が完了されたら、下記のようにコンソールへFCM Tokenに出力されることが確認できます。そのキーをコピーします。
次はFirebase Consoleへ移動して、左メニューでCloud Messagingを選択してSend your first messageボタンを押します。
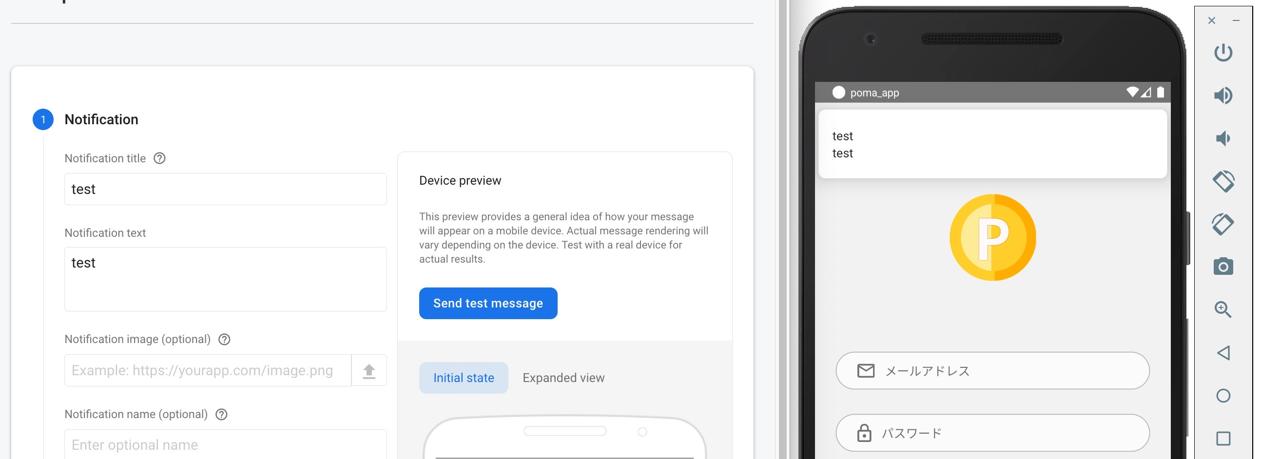
次のような画面が出るとNotification titleとNotification textにテストメッセージを作成します。作成が終わったら、右にあるSend test messageボタンを押します。
次のような画面が出るとAdd an FCM registration tokenへ上でコピーしたFCM Tokenを入力して、+ ボタンを押します。
その後、Testボタンを押してテストメッセージを送信します。
そしたら下記のようにメッセージが受信できることが確認できます。
完了
React Nativeプロジェクトでreact-native-firebaseライブラリを使ってFCMメッセージを受ける方法について見てみました。Javascriptから取得したFCM Tokenをサーバに保存して、そのTokenを使ってメッセージを送信することでPush notificationを実装することができます。
私のブログが役に立ちましたか?下にコメントを残してください。それは私にとって大きな大きな力になります!
アプリ広報
Dekuが開発したアプリを使ってみてください。Dekuが開発したアプリはFlutterで開発されています。興味がある方はアプリをダウンロードしてアプリを使ってくれると本当に助かります。