Blog series
This blog post is a series. You can see the other posts on the link below.
- [React] Prettier
- [React] ESLint
- [React] Husky, lint-staged
- [React] GitHub Actions
Outline
Until now, we’ve configured Prettier and ESLit to the React project with create-react-app, and we’ve used husky and lint-staged to execute Prettier and ESLint automatically. In this blog post, I will show you how to use GitHub Actions to execute Prettier and ESlint when Pull request is created.
- GitHub official site: Actions
You can see the full source code of the blog post on the link below.
- GitHub: Todo
GitHub Actions
To use GitHub Actions, let’s make GitHub Actions configuration file. Create the ./.github/workflows/main.yml file and modify it like the below.
name: Check the source code
on:
  pull_request:
    branches:
      - main
jobs:
  test:
    name: Check the source code
    runs-on: ubuntu-latest
    steps:
      - uses: actions/checkout@v4
      - name: Install packages
        run: npm ci
      - name: Prettier
        run: npm run format
      - name: Lint
        run: npm run lint
Let’s see the code one by one.
This GitHub Actions name is Check the source code.
name: Check the source code
...
This GitHub Actions is executed when the main branch gets Pull Request.
...
on:
  pull_request:
    branches:
      - main
...
This GitHub Actions has a Flow named Check the source code, and is executed on ubuntu.
...
jobs:
  test:
    name: Check the source code
    runs-on: ubuntu-latest
...
First, get the source code from Repository.
...
jobs:
  test:
    ...
    steps:
      - uses: actions/checkout@v4
...
And then, install the Node packages on the source code, and execute the npm scripts of Prettier and ESLint that we’ve defined before.
...
jobs:
  test:
    ...
    steps:
      ...
      - name: Install packages
        run: npm ci
      - name: Prettier
        run: npm run format
      - name: Lint
        run: npm run lint
After modifying the file, execute the commands below to upload it to GitHub.
git add .
git commit -m 'Add GitHub Actions'
git push origin main
Check
Let’s check GitHub Actions working well. Execute the command below to make a new branch.
git checkout -b test-pr
And the, open the ./src/App.tsx file and modify it like the below.
const App = (): JSX.Element => {
  console.log('test!');
  return (
    ...
  );
};
And then, execute the commands below to upload it to GitHub.
git add .
git commit -m 'Add test code' --no-verify
git push origin test-pr
When you commit to Git, you can use --no-verify to commit while skipping husky and lint-staged.
After uploading to GitHub, go to the GitHub site, and click the Pull requests tab, and the click New pull request to create a new Pull Request.

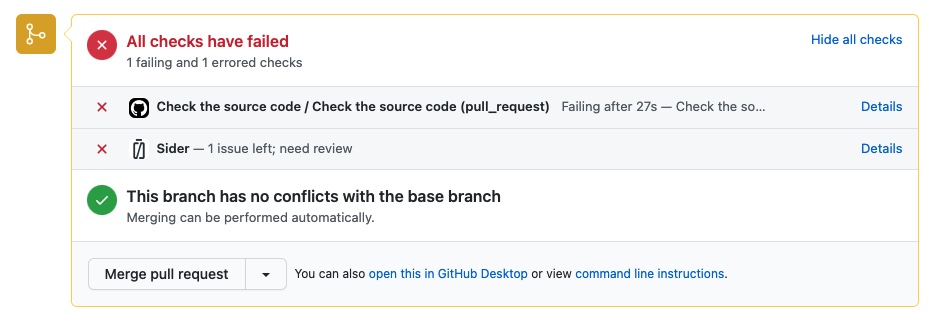
If you configure GitHub Actions well, you can seel the error of GitHub Actions on the bottom of Pull request you’ve created.

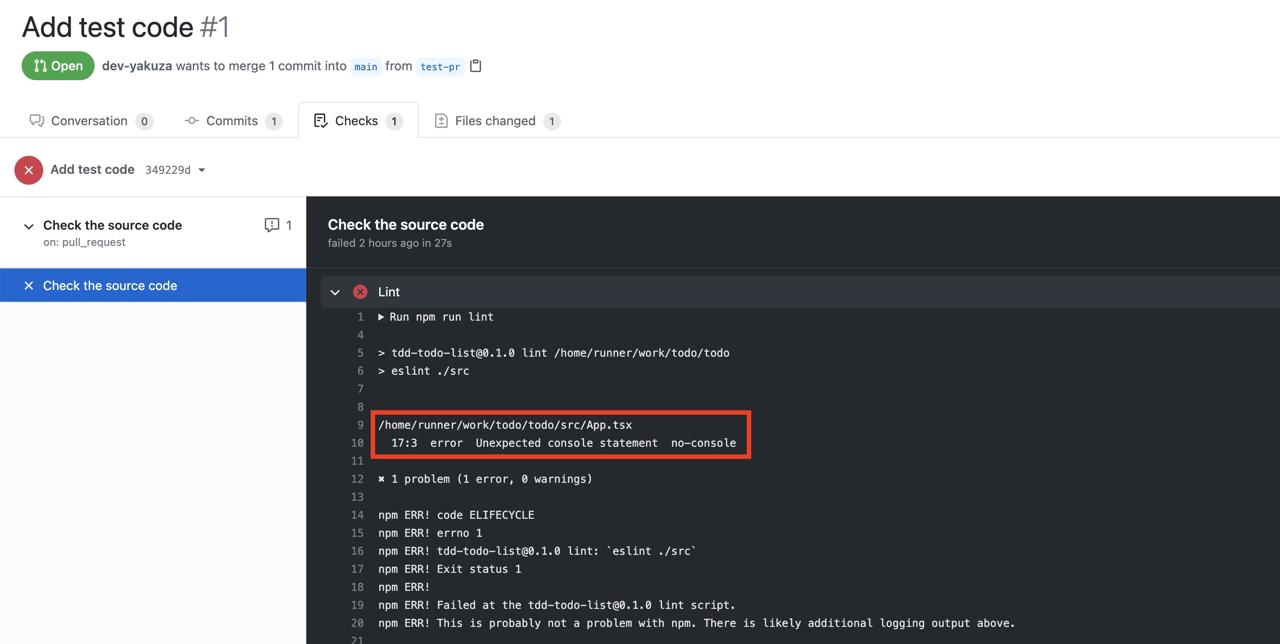
When you click the Details on the right side, you can see the details of the GitHub Actions error.

You can see the details about that one file doesn’t follow the ESLint rules we’ve set. Through this, we can know the GitHub Actions that we’ve set is working well.
Completed
Done! we’ve seen how to execute Prettier and ESLint by GitHub Actions. We can know the problems by husky and lint-staged, but all developers are not in same development environment. Now, we can execute the Prettier and ESlint on the same environment created by GitHub actions to check the source code!
You can implement various features with GitHub Actions in addition to Prettier and ESLint. Please try to implement CI/CD with GitHub Actions!
Was my blog helpful? Please leave a comment at the bottom. it will be a great help to me!
App promotion
Deku.Deku created the applications with Flutter.If you have interested, please try to download them for free.


