Contents
outline
we introduce how to use react-native-vector-icons for displaying vector icons.
library installation
install react-native-vector-icons library with below code.
npm install react-native-vector-icons --save
# For Typescript
npm install --save-dev @types/react-native-vector-icons
after installation, link the library to the project with below code.
Link the library
we need to link the react-native-vector-icons library to use it.
Under 0.59
Execute the command below to link the library.
react-native link react-native-vector-icons
upper 0.60
We need to link the library manually upper 0.60 version.
iOS
To link react-native-vector-icons on iOS, execute ios/[project].xcworkspace to open Xcode.

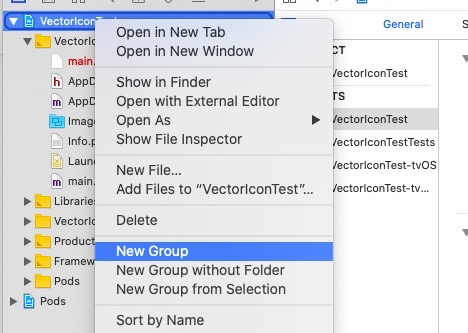
After executing Xcode, right-click the project and click New Group menu to create the folder named Fonts.

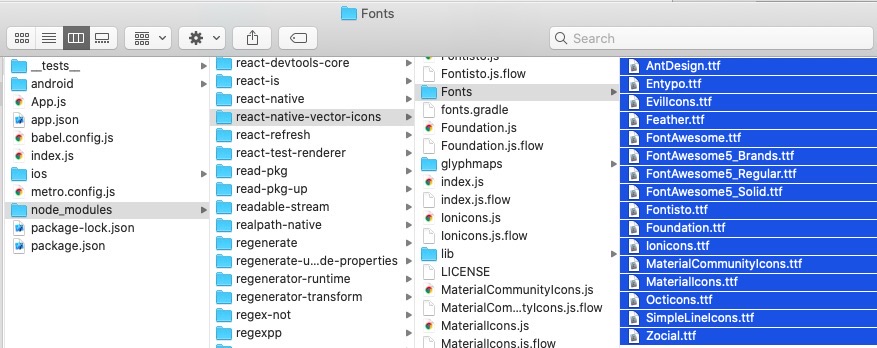
After creating Fonts group, drag all files under node_modules/react-native-vector-icons/Fonts/ to Xcode Fonts group.

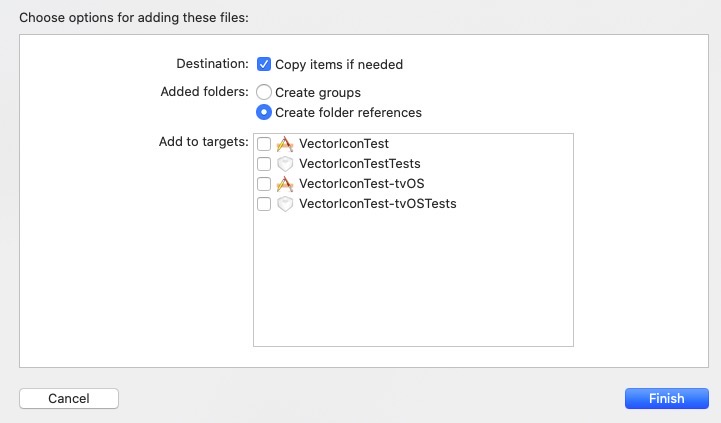
If you drag all files, you can see the screen like above. check Copy items if needed and click Finish button on the right bottom.
Lastly, open ios/[project]/Info.plist file and modify it like below.
<?xml version="1.0" encoding="UTF-8"?>
<!DOCTYPE plist PUBLIC "-//Apple//DTD PLIST 1.0//EN" "http://www.apple.com/DTDs/PropertyList-1.0.dtd">
<plist version="1.0">
<dict>
    ...
  <key>UIViewControllerBasedStatusBarAppearance</key>
  <false/>
  <key>UIAppFonts</key>
  <array>
    <string>AntDesign.ttf</string>
    <string>Entypo.ttf</string>
    <string>EvilIcons.ttf</string>
    <string>Feather.ttf</string>
    <string>FontAwesome.ttf</string>
    <string>FontAwesome5_Brands.ttf</string>
    <string>FontAwesome5_Regular.ttf</string>
    <string>FontAwesome5_Solid.ttf</string>
    <string>Foundation.ttf</string>
    <string>Ionicons.ttf</string>
    <string>MaterialCommunityIcons.ttf</string>
    <string>MaterialIcons.ttf</string>
    <string>Octicons.ttf</string>
    <string>SimpleLineIcons.ttf</string>
    <string>Zocial.ttf</string>
    <string>Fontisto.ttf</string>
  </array>
</dict>
Press cmd + shift + k to execute Clean Build Folder on Xcode.
Android
Android configuration is more simple than iOS. open android/app/build.gradle file and modify it like below.
...
apply from: "../../node_modules/react-native/react.gradle"
apply from: "../../node_modules/react-native-vector-icons/fonts.gradle" // add this line
...
And the, copy all files under node_modules/react-native-vector-icons/Fonts/ folder to android/app/src/main/assets/fonts folder.(if you don’t have assets/fonts folder, create the folder.)
Lastly, open Android project with Android Studio to execute Gradle sync automatically.
You can execute the command below to open Android project with Android Studio.
# in RN project root folder
open -a /Applications/Android\\ Studio.app ./android
how to use
we only write a blog post if we have used libraries. so we will add contents to here when we use.
if you want to know how to use, see official site.
- official site: react-native-vector-icons
Material icons
how to use Material icon
...
import Icon from 'react-native-vector-icons/FontAwesome';
...

export default class Home extends React.Component<Props, State> {
    render() {
        return (
            <View>
                <Icon name="home" size={24} color="#ffffff" />
            </View>
        );
    }
}
reference
- official site: react-native-vector-icons
Was my blog helpful? Please leave a comment at the bottom. it will be a great help to me!
App promotion
Deku.Deku created the applications with Flutter.If you have interested, please try to download them for free.


