Contents
Outline
In this blog post, I will introduce how to use react-native-iap to implement IAP(In-App Purchases) on React Native.
Create IAP product
We need to create a product for IAP(In-APp purchases). Let’s see how to make the product on each platform.
Create IAP product on iOS
Agreements, Tax, and Banking
To create IAP product on iOS, we need to configure Agreements, Tax, and Banking first. To set Agreements, Tax, and Banking, go to App Store Connect.
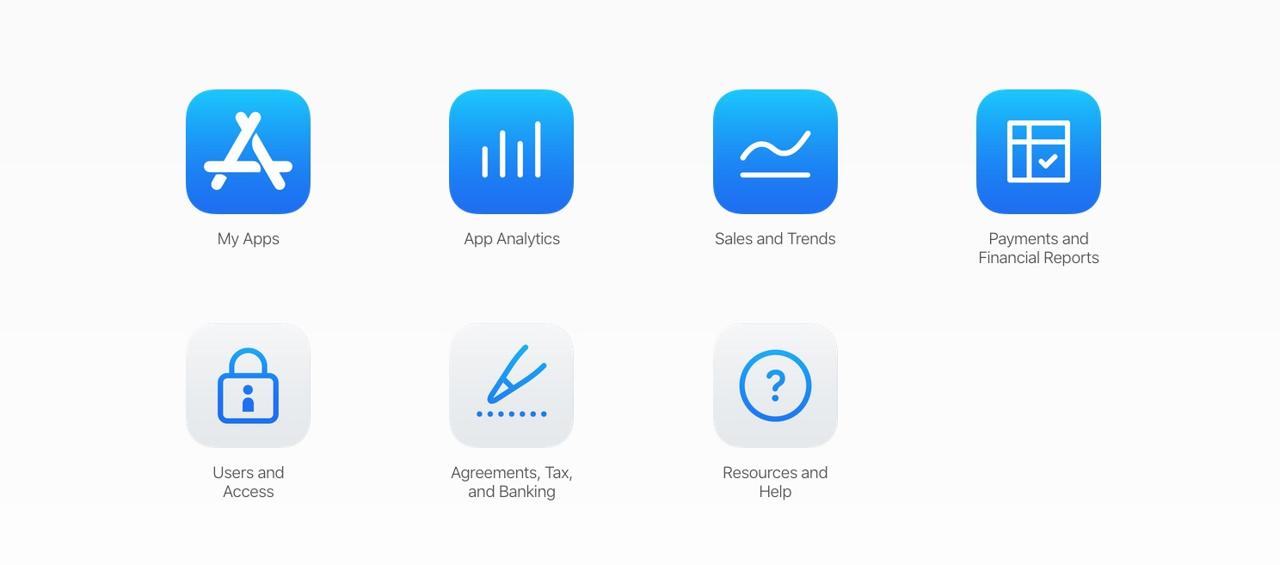
Click the Agreements, Tax, and Banking on the bottom to move on.

I already registered, so I can see the screen above, but you don’t have Paid Apps yet, so you need to set it. There are some items that you should insert. And just enter all necessary items, you can get Paid Apps on here.
Create product on iOS
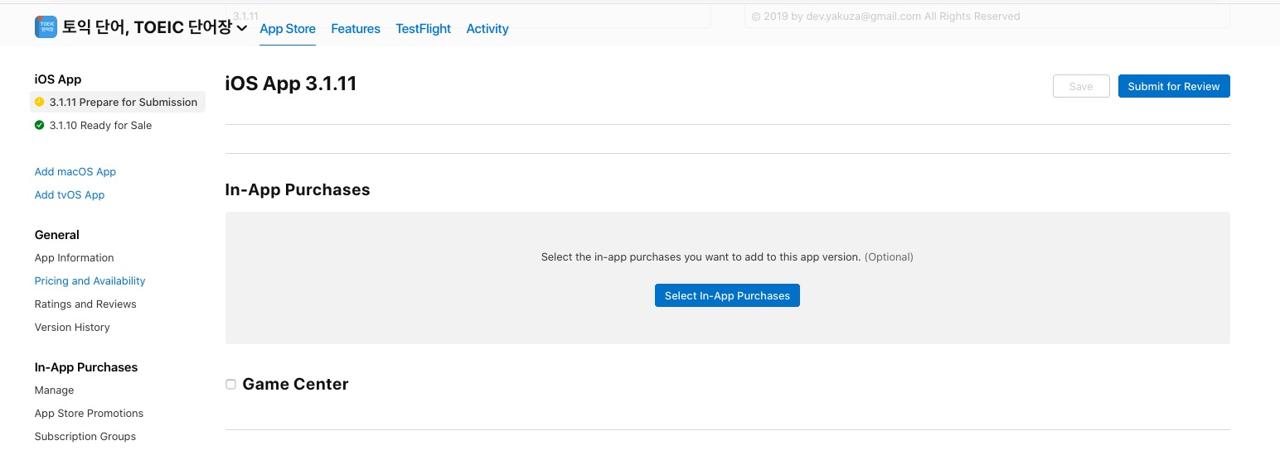
Next, we need to make a product for IAP on iOS. Click the app which you want to implement IAP.
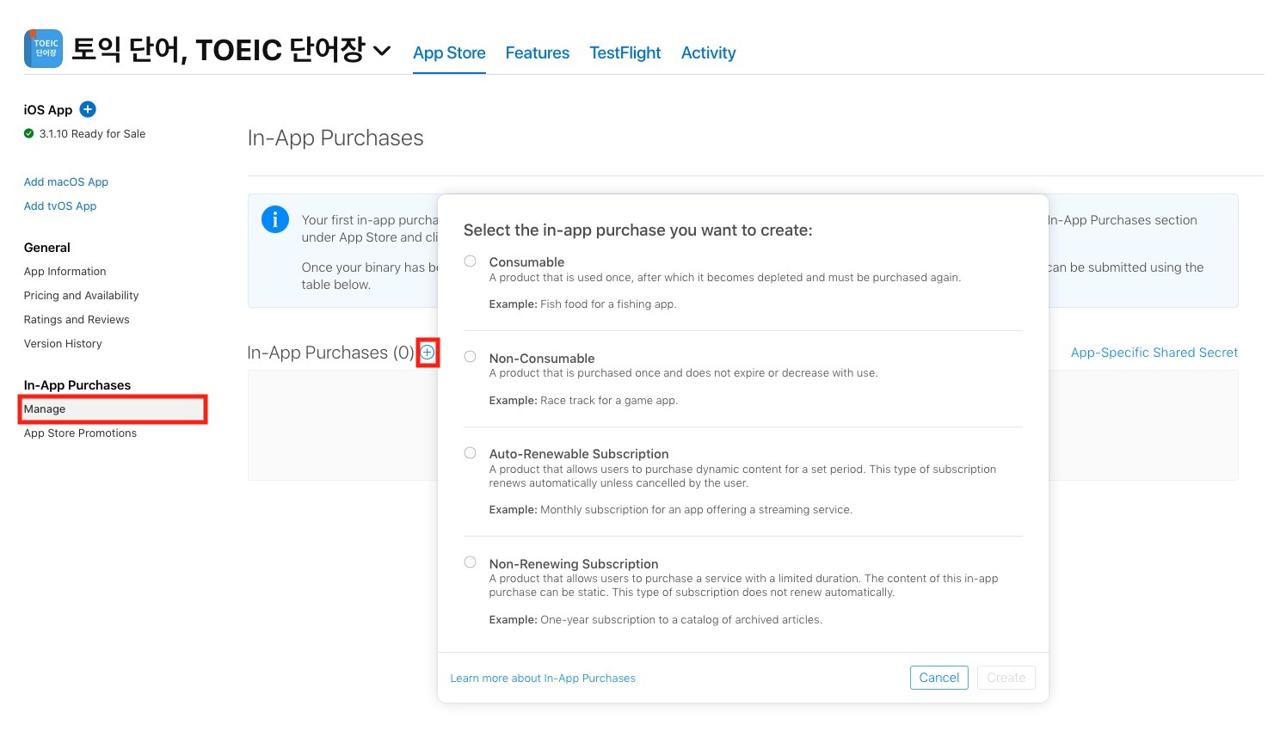
Click the Manage under In-App Purchases on the left bottom, and when you click the plus button(+), you can see the screen like above that you choose the product to add.
I added Auto-Renewable Subscription to my app, so I will explain to focus Auto-Renewable Subscription. When I add other products, I will modify this blog post about them.
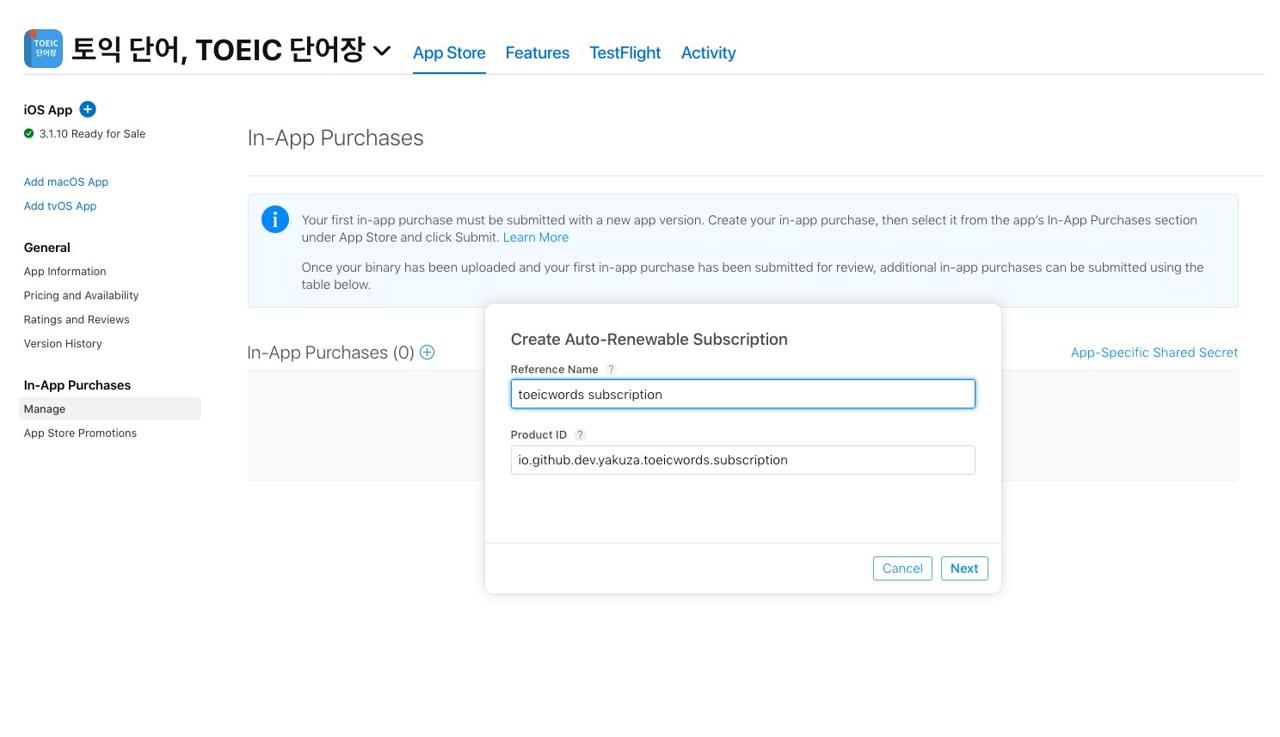
In here, Reference Name is shown up on only App Store Connect, so choose the name that you can recognize easily. We will use Product ID to get the product information on the app.
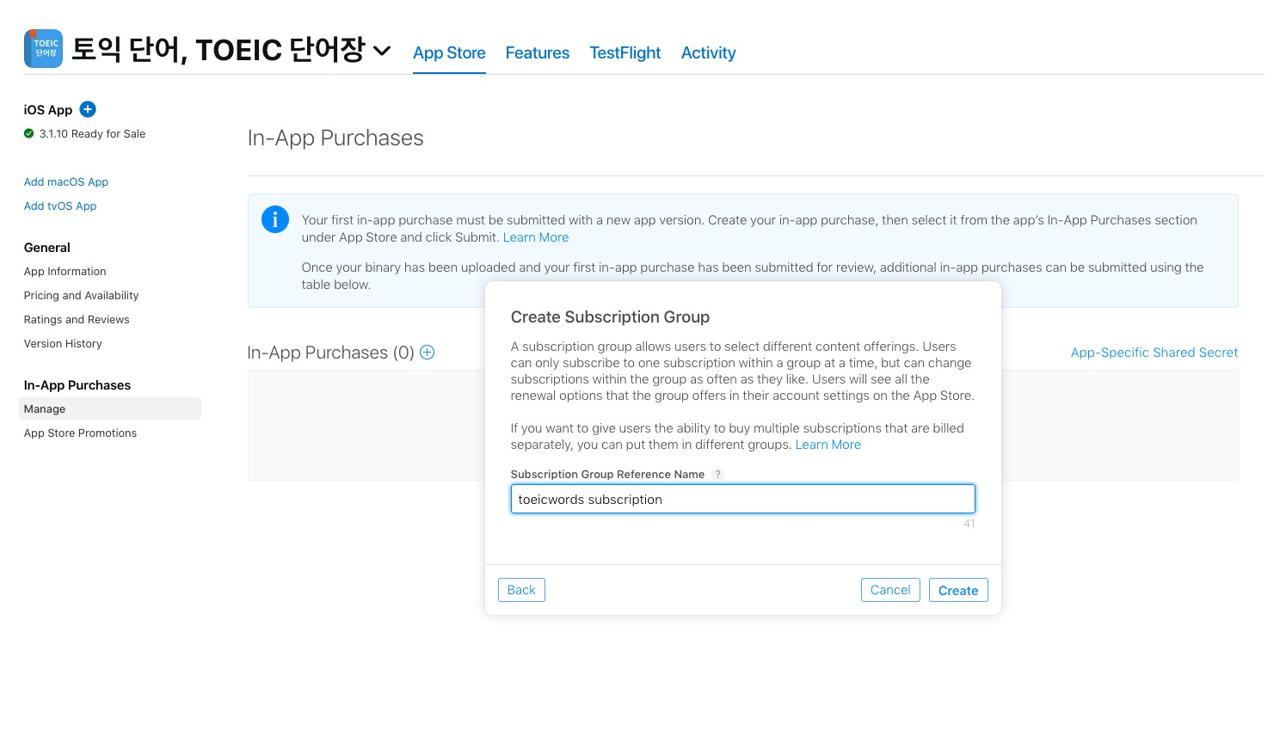
Next, we need to insert Subscription Group Reference Name. it is also shown up on only App Store Connect like Reference Name, so choose the name that you can find easily.
Insert IAP metadata
After creating IAP product item above, we need to add the metadata of the IAP item.
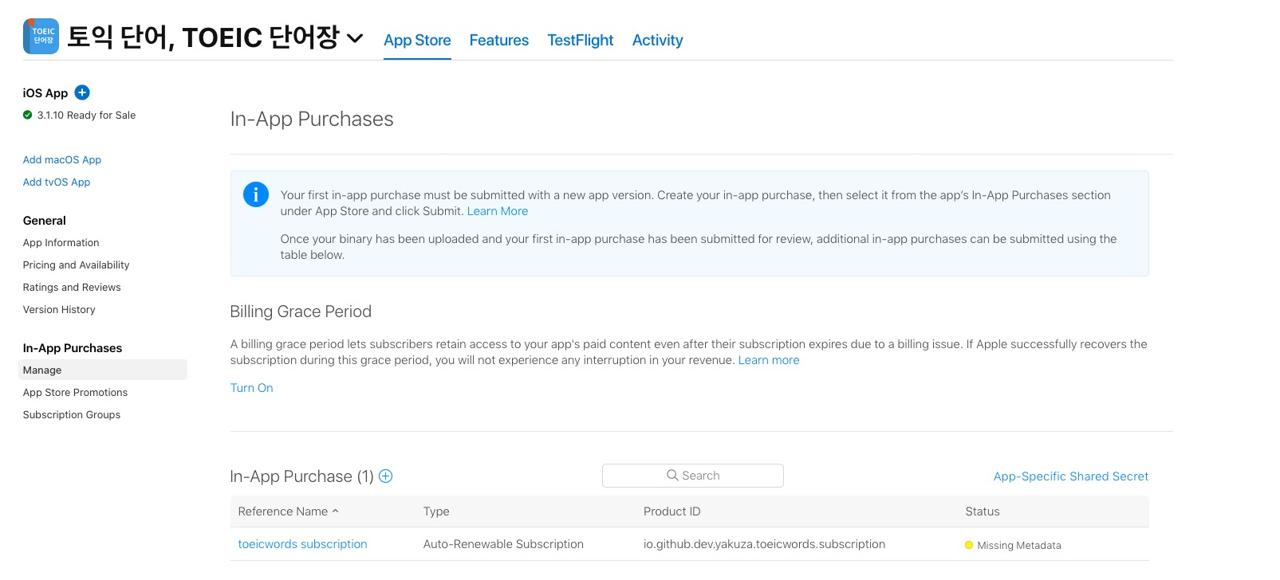
when you click the Manage menu under In-App Purchases on the left bottom again, you can see the missing metadata. Click the reference name to go to the product item detail page.
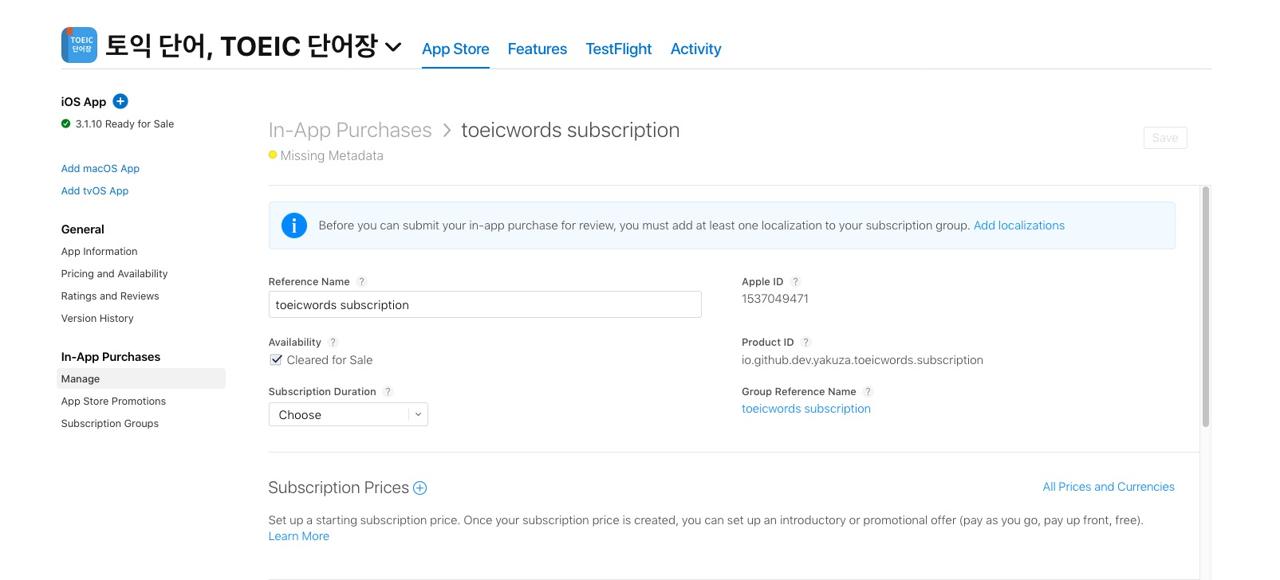
On the detail page, you need to enter the metadata like below.
- Subscription Duration
- Subscription Prices
- Localizations of App Store Information
- Review information
In here, App store information(name and description) will be shown up on the app and App store, so be careful to write them. We can get the name and description via react-native-iap. If we don’t show them as they are, it can be rejected.
In order to avoid Reject, I have written the information in detail like how you can see the payment screen and what contents are shown up on the screen.
- Title of publication or service
- Length of subscription (time period and/or content/services provided during each subscription period)
- Price of subscription, and price per unit if appropriate
- Payment will be charged to iTunes Account at confirmation of purchase
- Subscription automatically renews unless auto-renew is turned off at least 24-hours before the end of the current period
- Account will be charged for renewal within 24-hours prior to the end of the current period, and identify the cost of the renewal
- Subscriptions may be managed by the user and auto-renewal may be turned off by going to the user’s Account Settings after purchase
- Links to Your Privacy Policy and Terms of Use
- Any unused portion of a free trial period, if offered, will be forfeited when the user purchases a subscription to that publication, where applicable
If your app doesn’t have the contents above, you get the Reject. So, I’ve written the contents above with a screenshot.
Configure permission on iOS
Next, we need to configure the permission on iOS for IAP feature.
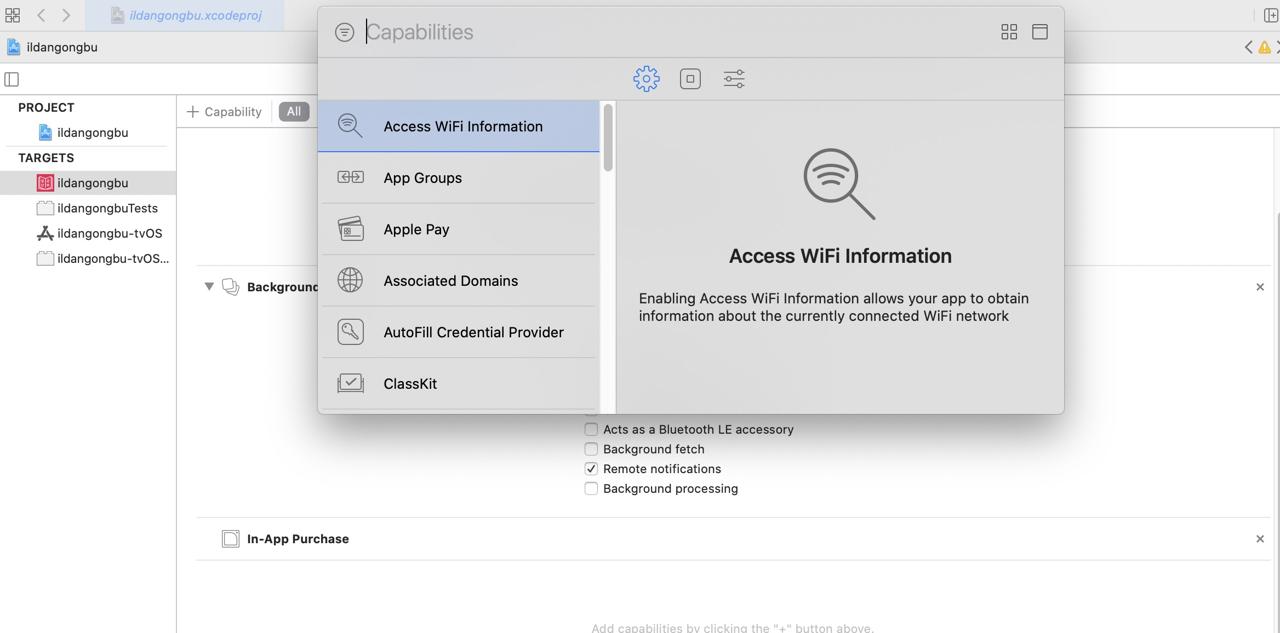
Open the project with Xcode, and add In-App Purchase on Signing & Capabilities.
Create IAP product on Android
Configure Payments
You need to configure the Payments to get the payment when the users purchase. To set the Payments, go to Google Play Console and click Settings > Developer account > Payments settings to configure the Payments information.

I used and connected Google Adsense, so I didn’t need to do anything.
Configure permission on Android
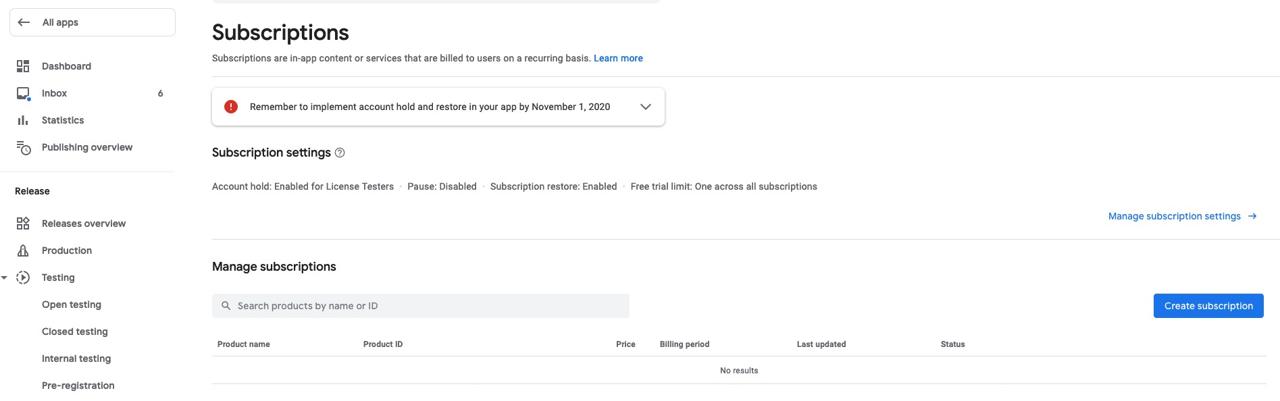
To create IAP product, when you go to Google Play Console and click the app that you want to make, and click Subscriptions menu, you can see the screen like below.
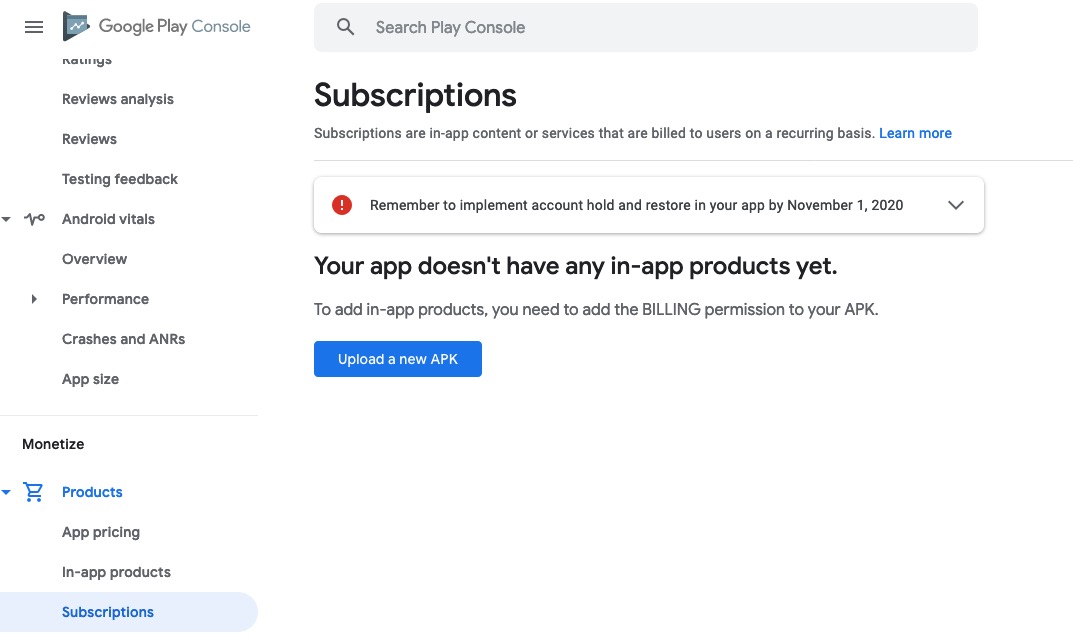
On Android, you need to upload the app which has BILLING permission to create IAP product. First, open android/app/src/main/AndroidManifest.xml file and modify it to add BILLING permission like below.
<manifest xmlns:android="http://schemas.android.com/apk/res/android"
  package="io.github.dev.yakuza.toeicwords">
  ...
  <uses-permission android:name="com.android.vending.BILLING"/>
  ...
  <application
      android:name=".MainApplication"
After configuring the permission, upload the app to Google Play.
After uploading, you can see the contents changed on Subscriptions menu like above.
Create product on Android
Next, click Create subscription button on Subscriptions menu.
And then, enter the Subscription information to make a subscription item.
- Product ID
- Subscription details(Name, Description)
- Price(Billing period, Default price)
The Product ID is for purchasing. Normally use the same Product ID with iOS in here. You can get the subscription detail, price, etc via react-native-iap by this ID. (I am not sure that the app is rejected, if we don’t display the subscription detail, price on Android like iOS.)
Cording
Install react-native-iap
Execute the command below to install react-native-iap.
npm install react-native-iap --saveAnd then execute the command below to install necessary libraries for iOS.
npx pod-installJavaScript
The code below is that I used for production apps.
import React, { createContext, useState, useEffect, useCallback, useRef, useContext } from 'react';
import AsyncStorage from '@react-native-async-storage/async-storage';
import {
  Alert,
  EmitterSubscription,
  Platform,
  Linking,
  ActivityIndicator,
  AppState,
} from 'react-native';
import Styled from 'styled-components/native';
import Icon from 'react-native-vector-icons/MaterialCommunityIcons';
import SplashScreen from 'react-native-splash-screen';

import ENV from '~/env';
import { ThemeContext } from '~/Context';
import { ActionSheet } from '~/Component';

import RNIap, {
  InAppPurchase,
  SubscriptionPurchase,
  finishTransaction,
  purchaseErrorListener,
  purchaseUpdatedListener,
  Subscription,
  PurchaseError,
} from 'react-native-iap';

import { checkReceipt } from './checkReceipt';

let purchaseUpdateSubscription: EmitterSubscription;
let purchaseErrorSubscription: EmitterSubscription;

const itemSubs = Platform.select({
  default: [ENV.subscriptionId],
});

const Container = Styled.View`
`;
const TitleContainer = Styled.View`
  justify-content: center;
  align-items: center;
  padding: 16px;
`;
const Title = Styled.Text`
  font-size: 16px;
  font-weight: bold;
  color: ${({ theme }: { theme: Theme }): string => theme.black};
`;
const SubTitle = Styled.Text`
  font-size: 16px;
  color: ${({ theme }: { theme: Theme }): string => theme.black};
`;
const DescriptionContainer = Styled.View`
  padding: 0 24px;
  width: 100%;
`;
const Description = Styled.Text`
  font-size: 14px;
  color: ${({ theme }: { theme: Theme }): string => theme.black};
`;
const PurchaseButton = Styled.TouchableOpacity`
  margin: 16px;
  padding: 16px;
  border-radius: 10px;
  background-color: ${({ theme }: { theme: Theme }): string => theme.black};
  justify-content: center;
  align-items: center;
`;
const PurchaseLabel = Styled.Text`
  color: ${({ theme }: { theme: Theme }): string => theme.white};
  font-size: 16px;
`;
const Terms = Styled.Text`
  font-size: 12px;
  color: ${({ theme }: { theme: Theme }): string => theme.black};
`;
const Link = Styled.Text`
  color: ${({ theme }: { theme: Theme }): string => theme.primary};
`;
const LoadingContainer = Styled.View`
  position: absolute;
  top: 0;
  left: 0;
  right: 0;
  bottom: 0;
  justify-content: center;
  align-items: center;
`;
const LoadingBackground = Styled.View`
  position: absolute;
  top: 0;
  left: 0;
  right: 0;
  bottom: 0;
  background-color: ${({ theme }: { theme: Theme }): string =>
    theme.isLightTheme ? theme.black : theme.white};
  opacity: 0.8;
`;

interface Props {
  children: JSX.Element | Array<JSX.Element>;
}

const IAPContext = createContext<IAPContext>({
  isSubscription: false,
  subscription: undefined,
  showPurchase: () => {},
});

const IAPProvider = ({ children }: Props): JSX.Element => {
  const [showLoading, setShowLoading] = useState<boolean>(false);
  const [isSubscription, setIsSubscription] = useState<boolean>(false);
  const [subscription, setSubscription] = useState<Subscription | undefined>(undefined);
  const actionSheetRef = useRef<ActionSheet>(null);
  const { theme } = useContext<ThemeContext>(ThemeContext);

  const showPurchase = () => {
    actionSheetRef.current?.open();
  };

  const _checkReceipt = async () => {
    const isValidated = await checkReceipt();

    setIsSubscription(isValidated);
    setTimeout(() => {
      SplashScreen.hide();
    }, 1000);
  };

  const _requestSubscription = () => {
    setShowLoading(true);
    if (subscription) {
      RNIap.requestSubscription(subscription.productId);
    }
  };

  const _restorePurchases = () => {
    setShowLoading(true);
    RNIap.getAvailablePurchases()
      .then((purchases) => {
        console.debug('restorePurchases');
        let receipt = purchases[0].transactionReceipt;
        if (Platform.OS === 'android' && purchases[0].purchaseToken) {
          receipt = purchases[0].purchaseToken;
        }
        AsyncStorage.setItem('receipt', receipt);
        setShowLoading(false);
        setIsSubscription(true);
        Alert.alert(
          ENV.language['restore successful'],
          ENV.language['you have successfully restored your purchase history'],
          [{ text: ENV.language['ok'], onPress: () => actionSheetRef.current?.close() }],
        );
      })
      .catch((err) => {
        console.debug('restorePurchases');
        console.error(err);
        setShowLoading(false);
        setIsSubscription(false);
        AsyncStorage.removeItem('receipt');
        Alert.alert(ENV.language['restore failed'], ENV.language['restore failed reason']);
      });
  };

  const _initIAP = useCallback(async (): Promise<void> => {
    RNIap.clearProductsIOS();

    try {
      const result = await RNIap.initConnection();
      await RNIap.flushFailedPurchasesCachedAsPendingAndroid();
      if (result === false) {
        Alert.alert(ENV.language["couldn't get in-app-purchase information"]);
        return;
      }
    } catch (err) {
      console.debug('initConnection');
      console.error(err.code, err.message);
      Alert.alert(ENV.language['fail to get in-app-purchase information']);
    }

    purchaseUpdateSubscription = purchaseUpdatedListener(
      (purchase: InAppPurchase | SubscriptionPurchase) => {
        console.debug('purchaseUpdatedListener');
        setShowLoading(false);
        setTimeout(() => {
          actionSheetRef.current?.close();
        }, 400);
        const receipt =
          Platform.OS === 'ios' ? purchase.transactionReceipt : purchase.purchaseToken;
        if (receipt) {
          finishTransaction(purchase)
            .then(() => {
              AsyncStorage.setItem('receipt', receipt);
              setIsSubscription(true);
            })
            .catch(() => {
              setIsSubscription(false);
              Alert.alert(
                ENV.language['purchase is failed'],
                ENV.language['the purchase is failed'],
              );
            });
        }
      },
    );

    purchaseErrorSubscription = purchaseErrorListener((error: PurchaseError) => {
      console.debug('purchaseErrorListener');
      console.error(error);
      setShowLoading(false);
      if (error.code !== 'E_USER_CANCELLED') {
        Alert.alert(ENV.language['purchase is failed'], ENV.language['the purchase is failed']);
      }
    });

    const subscriptions = await RNIap.getSubscriptions(itemSubs);
    setSubscription({
      ...subscriptions[0],
    });
  }, []);

  const handleAppStateChange = (nextAppState: string): void => {
    if (nextAppState === 'active') {
      _checkReceipt();
    }
  };

  useEffect(() => {
    _initIAP();
    _checkReceipt();
    AppState.addEventListener('change', handleAppStateChange);

    return (): void => {
      if (purchaseUpdateSubscription) {
        purchaseUpdateSubscription.remove();
      }
      if (purchaseErrorSubscription) {
        purchaseErrorSubscription.remove();
      }
      if (handleAppStateChange) {
        AppState.removeEventListener('change', handleAppStateChange);
      }
    };
  }, []);

  return (
    <IAPContext.Provider
      value={{
        isSubscription,
        subscription,
        showPurchase,
      }}>
      {children}
      <ActionSheet
        ref={actionSheetRef}
        height={Platform.OS === 'ios' ? 380 : 420}
        disableClose={showLoading}
        customStyles={{
          container: {
            backgroundColor: theme.white,
          },
        }}>
        {subscription && (
          <Container>
            <TitleContainer>
              <Title>{subscription.title.split(' (')[0]}</Title>
              <SubTitle>{subscription.description}</SubTitle>
            </TitleContainer>
            <DescriptionContainer>
              <Description>
                <Icon name="information-outline" />{' '}
                {
                  ENV.language[
                    "I'm developing the app alone. So your subscription is a great help to me"
                  ]
                }
              </Description>
              <Description>
                {'  '}
                {ENV.language['Your subscription helps me keep the good words app']}
              </Description>
              <Description>
                {'  '}
                {
                  ENV.language[
                    'Learn vocabulary without ads for the price of a cup of coffee each month'
                  ]
                }
              </Description>
            </DescriptionContainer>
            <PurchaseButton
              onPress={() => {
                _requestSubscription();
              }}>
              <PurchaseLabel>
                {subscription.localizedPrice} / {ENV.language['month']}
              </PurchaseLabel>
            </PurchaseButton>
            <DescriptionContainer>
              <Terms>
                - {ENV.language['Already subscribed?']}{' '}
                <Link onPress={() => _restorePurchases()}>
                  {ENV.language['Restoring purchases']}
                </Link>
              </Terms>
              <Terms>- {ENV.language['cancel the purchase']}</Terms>
              {Platform.OS === 'ios' && (
                <Terms>- {ENV.language['payment is charged to your iTunes account']}</Terms>
              )}
              <Terms>
                - {ENV.language['If you have any question,']}{' '}
                <Link onPress={() => Linking.openURL('https://deku.posstree.com/ko/contact/')}>
                  Contact
                </Link>{' '}
                {ENV.language['us']}
              </Terms>
              <Terms>
                - {ENV.language['see the']}
                <Link onPress={() => Linking.openURL('https://deku.posstree.com/privacy/ko/')}>
                  {ENV.language['terms of use']}
                </Link>{' '}
                {ENV.language['details']}
              </Terms>
            </DescriptionContainer>
          </Container>
        )}
        {showLoading && (
          <LoadingContainer>
            <LoadingBackground />
            <ActivityIndicator color={theme.primary} size="large" />
          </LoadingContainer>
        )}
      </ActionSheet>
    </IAPContext.Provider>
  );
};

export { IAPProvider, IAPContext };
The source code above is dependent on my project, so you can’t use it directly. Also, I use Context API to implement the payment logic. Let’s see the code one by one to understand the payment logic.
Mainly, We can divide the payment logic initialization, payment, validation, and restore.
Initialization
First, we need to initialize the library, and get the product information.
...
const itemSubs = Platform.select({
  default: [ENV.subscriptionId],
});
...
const IAPProvider = ({ children }: Props): JSX.Element => {
  ...
  const _initIAP = useCallback(async (): Promise<void> => {
    RNIap.clearProductsIOS();

    try {
      const result = await RNIap.initConnection();
      await RNIap.flushFailedPurchasesCachedAsPendingAndroid();
      if (result === false) {
        Alert.alert(ENV.language["couldn't get in-app-purchase information"]);
        return;
      }
    } catch (err) {
      console.debug('initConnection');
      console.error(err.code, err.message);
      Alert.alert(ENV.language['fail to get in-app-purchase information']);
    }
    ...
    const subscriptions = await RNIap.getSubscriptions(itemSubs);
    setSubscription({
      ...subscriptions[0],
    });
  }, []);
  ...
  useEffect(() => {
    _initIAP();
    ...
  }, []);

  return (
    ...
  );
};
...
To initialize the library, we can use the code below.
RNIap.clearProductsIOS();

try {
  const result = await RNIap.initConnection();
  await RNIap.flushFailedPurchasesCachedAsPendingAndroid();
  if (result === false) {
    Alert.alert(ENV.language["couldn't get in-app-purchase information"]);
    return;
  }
} catch (err) {
  console.debug('initConnection');
  console.error(err.code, err.message);
  Alert.alert(ENV.language['fail to get in-app-purchase information']);
}
The clearProductsIOS function and flushFailedPurchasesCachedAsPendingAndroid function are dependent the platform, but we don’t need to use Platform.OS to separate the logic in here.
And then, we need to set the product ID to get the subscription product information.
const itemSubs = Platform.select({
  default: [ENV.subscriptionId],
});
I use the same ID between iOS and Android, so I just set the default, if the iOS ID and Android ID are different, you can set it like below.
const itemSubs = Platform.select({
  ios: [ENV.ios.subscriptionId],
  android: [ENV.android.subscriptionId],
});
You can get the detail of the product by this product ID.
const subscriptions = await RNIap.getSubscriptions(itemSubs);
setSubscription({
  ...subscriptions[0],
});
And store it on State. In my case, I have just one subscription item, so I just use subscriptions[0] to store one item.
And then, display the information on the screen like below.
...
<Title>{subscription.title.split(' (')[0]}</Title>
<SubTitle>{subscription.description}</SubTitle>
...
<PurchaseLabel>
  {subscription.localizedPrice} / {ENV.language['month']}
</PurchaseLabel>
...
Payment
Next, let’s see the payment logic to use the product information stored above.
...
let purchaseUpdateSubscription: EmitterSubscription;
let purchaseErrorSubscription: EmitterSubscription;
...
const IAPProvider = ({ children }: Props): JSX.Element => {
  ...
  const _requestSubscription = () => {
    setShowLoading(true);
    if (subscription) {
      RNIap.requestSubscription(subscription.productId);
    }
  };
  ...
  const _initIAP = useCallback(async (): Promise<void> => {
    ...
    purchaseUpdateSubscription = purchaseUpdatedListener(
      (purchase: InAppPurchase | SubscriptionPurchase) => {
       ...
        const receipt =
          Platform.OS === 'ios' ? purchase.transactionReceipt : purchase.purchaseToken;
        if (receipt) {
          finishTransaction(purchase)
            .then(() => {
              AsyncStorage.setItem('receipt', receipt);
              setIsSubscription(true);
            })
            .catch(() => {
              setIsSubscription(false);
              Alert.alert(
                ENV.language['purchase is failed'],
                ENV.language['the purchase is failed'],
              );
            });
        }
      },
    );

    purchaseErrorSubscription = purchaseErrorListener((error: PurchaseError) => {
      console.debug('purchaseErrorListener');
      console.error(error);
      setShowLoading(false);
      if (error.code !== 'E_USER_CANCELLED') {
        Alert.alert(ENV.language['purchase is failed'], ENV.language['the purchase is failed']);
      }
    });
    ...
  }, []);
  ...

  useEffect(() => {
    ...
    return (): void => {
      if (purchaseUpdateSubscription) {
        purchaseUpdateSubscription.remove();
      }
      if (purchaseErrorSubscription) {
        purchaseErrorSubscription.remove();
      }
      ...
    };
  }, []);
  ...
};
...
We need to register the Listener to get the success or fail of the payment after purchasing.
...
let purchaseUpdateSubscription: EmitterSubscription;
let purchaseErrorSubscription: EmitterSubscription;
...
purchaseUpdateSubscription = purchaseUpdatedListener(
  (purchase: InAppPurchase | SubscriptionPurchase) => {
    ...
    const receipt =
      Platform.OS === 'ios' ? purchase.transactionReceipt : purchase.purchaseToken;
    if (receipt) {
      finishTransaction(purchase)
        .then(() => {
          AsyncStorage.setItem('receipt', receipt);
          setIsSubscription(true);
        })
        .catch(() => {
          setIsSubscription(false);
          Alert.alert(
            ENV.language['purchase is failed'],
            ENV.language['the purchase is failed'],
          );
        });
    }
  },
);

purchaseErrorSubscription = purchaseErrorListener((error: PurchaseError) => {
  ...
});
...
useEffect(() => {
  ...
  return (): void => {
    if (purchaseUpdateSubscription) {
      purchaseUpdateSubscription.remove();
    }
    if (purchaseErrorSubscription) {
      purchaseErrorSubscription.remove();
    }
    ...
  };
}, []);
...
If the payment is success, purchaseUpdatedListener is called, and use finishTransaction to notice the payment is finished. If the purchase is failed, purchaseErrorListener is called, and we need to notice the fail to the user.
Also, we need to unregister the Listener when the component is Unmount via useEffect.
Next, connect the _requestSubscription function and the payment button like below.
<PurchaseButton
  onPress={() => {
    _requestSubscription();
  }}>
  <PurchaseLabel>
    {subscription.localizedPrice} / {ENV.language['month']}
  </PurchaseLabel>
</PurchaseButton>
Validation
After purchasing, we can get the result of the payment. And then, we need to validate the result. we can validate the payment in the app or server on iOS, and we can validate the payment in the server on Android.
I didn’t have a server to validate, so I validated it in the app on iOS, and didn’t validate it on Android. On Android, I just validate the payment by getting the payment information again.
On iOS, you can use validateReceiptIos to validate in the App. Fist, get the Receipt by getReceiptIOS and then validate the Receipt via validateReceiptIos like below.
const checkReceiptIOS = async () => {
  let isValidated = false;
  const receipt = await AsyncStorage.getItem('receipt');
  if (receipt) {
    const newReceipt = await getReceiptIOS();
    const validated = await validateReceiptIos(
      {
        'receipt-data': newReceipt,
        password: '****************',
      },
      __DEV__,
    );

    if (validated !== false && validated.status === 0) {
      isValidated = true;
      AsyncStorage.setItem('receipt', newReceipt);
    } else {
      isValidated = false;
      AsyncStorage.removeItem('receipt');
    }
  }
  return isValidated;
};
We need a password when we use validateReceiptIos to validate the receipt. This password is Shared secret on App Store connect.
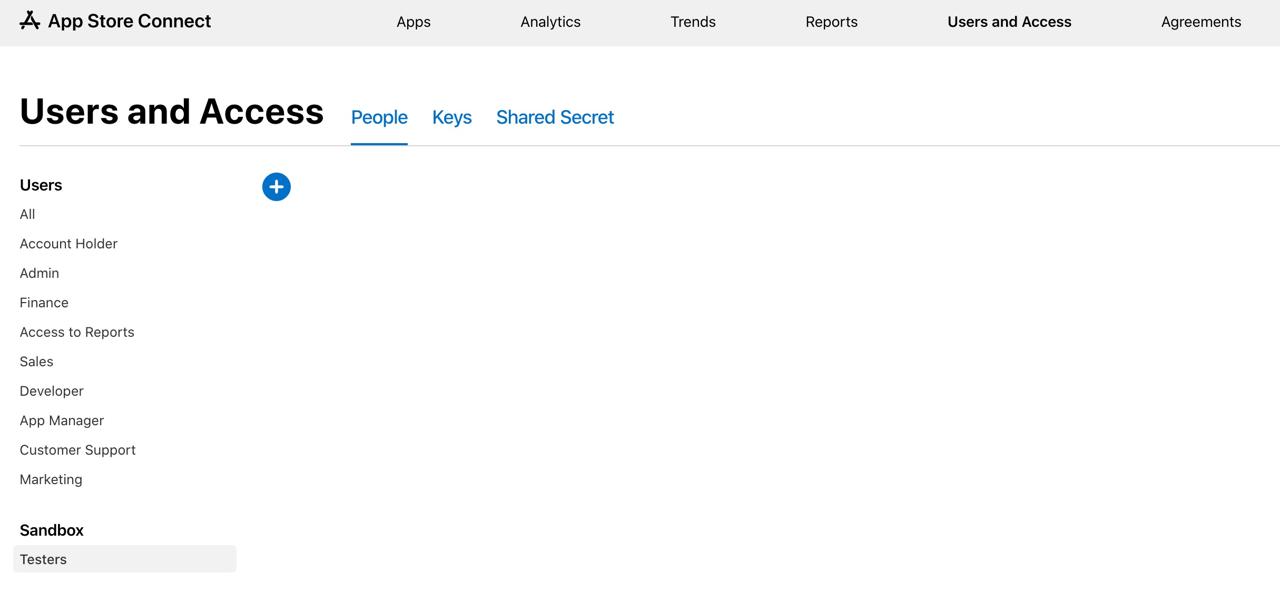
To make Shared secret, go to App Store Connect and click Users and Access.

On the top, click Shared secret and create a shared secret. You can use thee password issued in here for all your app. If you want to create a specific shared secret for an app, you can create it like below.
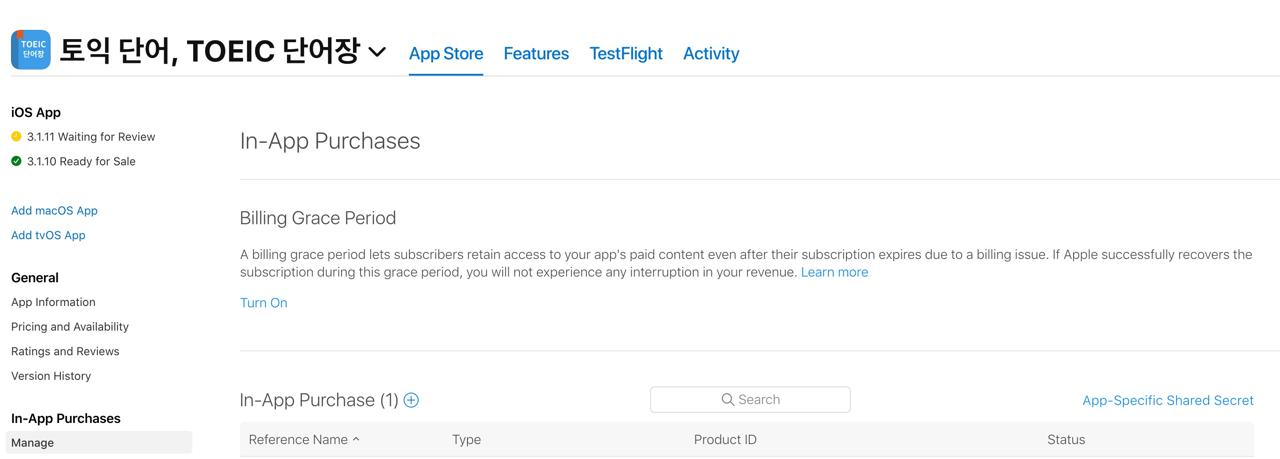
To create a specific shared secret, go to the app which you want to create the shared secret, and click Manage menu under In-App Purchases. On Manage, you can generate a shared secret via App-Specific Shared Secret on the right of the screen.
On Android, you can validate the receipt via validateReceiptAndroid. But you need to make the accessToken via the server.
const checkReceiptAndroid = async () => {
  let isValidated = false;
  const receipt = await AsyncStorage.getItem('receipt');
  if (receipt) {
    try {
      const purchases = await RNIap.getAvailablePurchases();
      console.debug('checkReceiptAndroid');
      let receipt = purchases[0].transactionReceipt;
      if (Platform.OS === 'android' && purchases[0].purchaseToken) {
        receipt = purchases[0].purchaseToken;
      }
      AsyncStorage.setItem('receipt', receipt);
      isValidated = true;
    } catch (error) {
      isValidated = false;
      AsyncStorage.removeItem('receipt');
    }
  }
  return isValidated;
};
I don’t have the server, so I just get the product information via getAvailablePurchases, and if the information exists, I confirm the payment is OK.
Restore
If the user re-install the app, or disconnected to payment because of some reasons, we can restore via getAvailablePurchases function.
const _restorePurchases = () => {
  setShowLoading(true);
  RNIap.getAvailablePurchases()
    .then((purchases) => {
      console.debug('restorePurchases');
      let receipt = purchases[0].transactionReceipt;
      if (Platform.OS === 'android' && purchases[0].purchaseToken) {
        receipt = purchases[0].purchaseToken;
      }
      AsyncStorage.setItem('receipt', receipt);
      setShowLoading(false);
      setIsSubscription(true);
      Alert.alert(
        ENV.language['restore successful'],
        ENV.language['you have successfully restored your purchase history'],
        [{ text: ENV.language['ok'], onPress: () => actionSheetRef.current?.close() }],
      );
    })
    .catch((err) => {
      console.debug('restorePurchases');
      console.error(err);
      setShowLoading(false);
      setIsSubscription(false);
      AsyncStorage.removeItem('receipt');
      Alert.alert(ENV.language['restore failed'], ENV.language['restore failed reason']);
    });
};
If you don’t implement the restore feature, you ill get the reject, so make sure to implement it!
<Link onPress={() => _restorePurchases()}>
  {ENV.language['Restoring purchases']}
</Link>
And the, connect the function to restore button like above.
Test
iOS
Create test account on iOS
To test on iOS, you need to an email which you've never used for Apple account. And then go to App Store Connect, and click Users and Access.
Click Testers under Sandbox on the left bottom, and insert the email to create a Sandbox account.
Test on iOS
You can’t test on the simulator. You need to test IAP on the device.
First, logout your account on App store.
And then, open your app on the device, press the payment button. On payment process, login and purchase with the Sandbox account created above.
Android
Create test account on Android
You can use the Google account that you used unlike iOS. Go to Google Play Console, and click Settings > License testing.
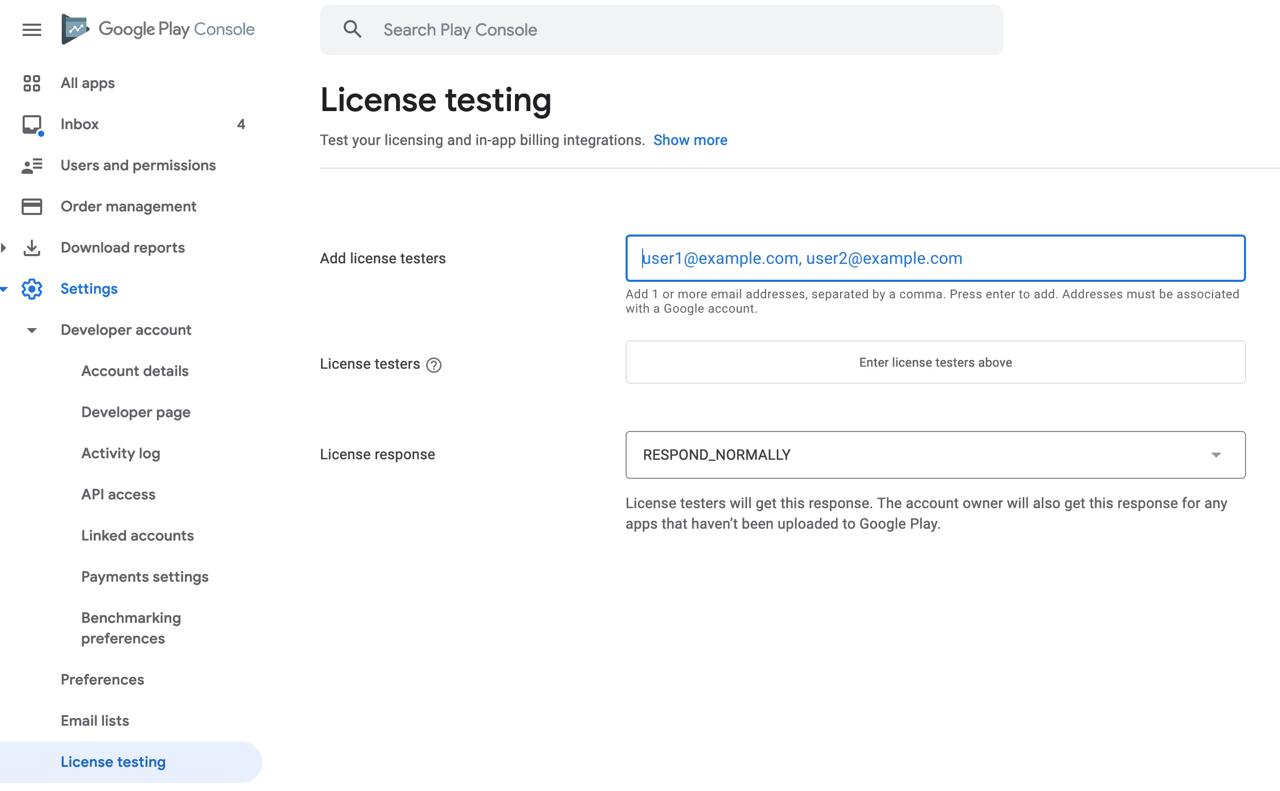
And then, enter your Google account here
Test on Android
You can’t test on the emulator like iOS. But you don’t logout unlike iOS.
You can test the subscription period and subscription end. See the details about this on the official document.
Deployment
iOS deployment
When you deploy the app include IAP, you need to configure In-App Purchases section.
Android deployment
You don’t need to do anything to deploy the app unlike iOS.
Completed
We’ve seen how to use react-native-iap to implement IAP. I try to write all information in one blog post, so the post became too long.
And then, I like to write and share the blog post that I experience, so the blog post has only the subscription contents. If you want to implement the normal product, it’s a little bit different, so you need to implement the logic by referring to the contents above.
Was my blog helpful? Please leave a comment at the bottom. it will be a great help to me!
App promotion
Deku.Deku created the applications with Flutter.If you have interested, please try to download them for free.