Contents
Outline
I try to develop an app with Flutter. In this blog post, I will introduce the Widget that is the base element of Flutter.
You can see the source code, that is introduced in this blog post, on the link below.
Widget
Flutter is started by Widget and ended by Widget. In Flutter, everything that you can see on the screen is Widgets, and even things that you can’t see on the screen like Layout are also Widgets.
So, we need to understand the Widget to develop an app with Flutter.
The Widget can be classified into two main categories.
- Stateful Widget
- Stateless Widget
Let’s see the detail of them.
Stateful Widget
In Flutter, Stateful Widget is that can have status values, and is used to express movement or change on the screen according to the corresponding status value.
- Example: Text field, button, the widgets that shows the data from the server, etc.
Like above, Stateful Widget is used to change the appearance or shape by user interaction. Stateful Widget is created by inheriting StatefulWidget.
Stateless Widget
Stateless Widget is the opposite of Stateful Widget. It is static Widget that doesn’t have any status. Stateless Widget doesn’t have any status value, so there is no movement and change on the screen.
- Example: Text, Image, etc.
Like above, Stateless Widget is shown up on the screen, but there is no interaction with users, and no movements and changes. Stateless Widget is created by inheriting StatelessWidget.
Widget tree
Basically, we use the Widget to develop an app with Flutter. A Widget can include various Widgets, and all Widgets have a parent-child relationship. If something has the parent-child relationship, we can express it in a Tree hierarchy and manage it.
For example, when HTML is shown up on the browser, the browser creates and manages the DOM tree with all HTML element. Like this, Flutter creates and manage all Widgets on the Widget tree.
All Widgets are under the parent-child relationship, and the parent widget is called the Parent Widget or Widget Container.
Coding
Let’s code to understand the Widget.
Stateless widget coding
To understand Stateless widget, execute the command below to create a new Flutter project.
flutter create stateless_widgetAnd then, execute the command below to open VSCode.
cd stateless_widget
code .
When the VSCode is opened, open lib/main.dart file and modify it like below.
import 'package:flutter/material.dart';

void main() {
  runApp(MyApp());
}

class MyApp extends StatelessWidget {
  @override
  Widget build(BuildContext context) {
    return MaterialApp(
      home: HomeWidget(),
    );
  }
}

class HomeWidget extends StatelessWidget {
  @override
  Widget build(BuildContext context) {
    return Scaffold(
      appBar: AppBar(
        title: Text('Stateless Widget'),
      ),
      body: Center(
        child: Text('Hello world'),
      ),
    );
  }
}
Now, let’s see the code one by one.
import 'package:flutter/material.dart';First, we’ll develop the app following material design that Flutter provides.
void main() {
  runApp(MyApp());
}
If you study Dart language, you’re familiar with the main function. The main function is a start point of Dart program, and we should call runApp in here for Flutter.
If you don’t know Dart language well, see the link below to understand Dart.
The runApp function requires one parameter of Widget, and this Widget is the start point of the Flutter app, and is located at the top of the Widget tree.
class MyApp extends StatelessWidget {
  @override
  Widget build(BuildContext context) {
    return MaterialApp(
      home: HomeWidget(),
    );
  }
}
The MyApp is custom Widget we’ve created. You can use any names for this Widget, but I made the MyApp in here. This widget inherits StatelessWidget. In other word, this Widget won’t have any dynamic status value.
All Widgets basically have the build function, and this build function returns the other Widgets. Like this, the Widget can include the widgets, and the parent-child relationship is created, the Widget tree can be created.
In this example, we’ve used MaterialApp Widget, that flutter/material.dart provides, to create an app. The MaterialApp Widget has the Named parameter called home.
This home means the first screen after the app is started, and the Widget passed via this parameter will be shown up on the first screen.
Next, let’s see the HomeWidget which is shown up on the first screen. The HomeWidget is a custom Widget created by inheriting StatelessWidget like MyApp, so you can use any name for it. In here, I name HomeWidget.
class HomeWidget extends StatelessWidget {
  @override
  Widget build(BuildContext context) {
    return Scaffold(
      appBar: AppBar(
        title: Text('HOME'),
      ),
      body: Center(
        child: Text('Hello world'),
      ),
    );
  }
}
The HomeWidget returns the Scaffold Widget that flutter/material.dart provides. The Scaffold Widget is a base Widget used on the material app, and has appBar and body to make the screen easily.
Scaffold(
  appBar: AppBar(
    title: Text('HOME'),
  ),
  ...,
);
In this example, I display the app bar via Scaffold. We can pass the AppBar Widget to the appBar parameter, and the AppBar Widget has the title parameter. We can pass Text Widget to this parameter, and show the HOME text via Text Widget.
Scaffold(
  ...,
  body: Center(
    child: Text('Hello world'),
  ),
);
I use the Center Widget to make the child Widget centering, and show the Hello world text via Text Widget.
Stateful widget Coding
To understand the Stateful widget, execute the command below to create a new Flutter project.
flutter create stateful_widgetAnd then, execute the command below to open the VSCode.
cd stateful_widget
code .
After the VSCode is executed, open the lib/main.dart file and modify it like below.
import 'package:flutter/material.dart';

void main() {
  runApp(MyApp());
}

class MyApp extends StatelessWidget {
  @override
  Widget build(BuildContext context) {
    return MaterialApp(
      title: 'Flutter Demo',
      theme: ThemeData(
        primarySwatch: Colors.blue,
      ),
      home: HomeWidget(),
    );
  }
}

class HomeWidget extends StatefulWidget {
  @override
  _HomeWidgetState createState() => _HomeWidgetState();
}

class _HomeWidgetState extends State<HomeWidget> {
  int counter = 0;
  @override
  Widget build(BuildContext context) {
    return Scaffold(
      appBar: AppBar(title: Text('Stateful Widget')),
      body: Center(
        child: Row(
          mainAxisAlignment: MainAxisAlignment.center,
          children: [
            ElevatedButton(
                onPressed: () => setState(() => {counter++}),
                child: Icon(Icons.add)),
            Container(
              child: Text('$counter'),
              margin: EdgeInsets.fromLTRB(30.0, 0.0, 30.0, 0.0),
            ),
            ElevatedButton(
                onPressed: () => setState(() => {counter--}),
                child: Icon(Icons.remove)),
          ],
        ),
      ),
    );
  }
}
Let’s see the code one by one. I will skip explaining that I explain on Stateless Widget section.
Let’s see how to create Stateful widget. To create Stateful Widget, we need to inherit StatefulWidget.
class HomeWidget extends StatefulWidget {
  @override
  _HomeWidgetState createState() => _HomeWidgetState();
}
Unlike the Stateless Widget, The Stateful Widget uses the createState instead of the build function, and this createState should return a custom State inherited State class.
The custom State has the status and the Widgets that are changed by the status.
class _HomeWidgetState extends State<HomeWidget> {
  int counter = 0;
  @override
  Widget build(BuildContext context) {
    return Scaffold(
      ...
      body: Center(
        child: Row(
          ...,
          children: [
            ...,
            Container(
              child: Text('$counter'),
              margin: EdgeInsets.fromLTRB(30.0, 0.0, 30.0, 0.0),
            ),
            ...,
          ],
        ),
      ),
    );
  }
}
First, we need to define the variable which will be used for the State. In here, I defined int counter = 0;. This variable will be shown up on the screen via the Text Widget(Text('$counter')).
We need to use the setState function to update the State variable. If we don’t use to update the State, the change is applied to the screen.
ElevatedButton(
  onPressed: () => setState(() => {counter++}),
  child: Icon(Icons.add))
The State mechanism is a little bit difficult, so in here, I just show how to use it. If you want to know about the State mechanism, see the official site.
- Official site: StatefulWidget class
Closing Label
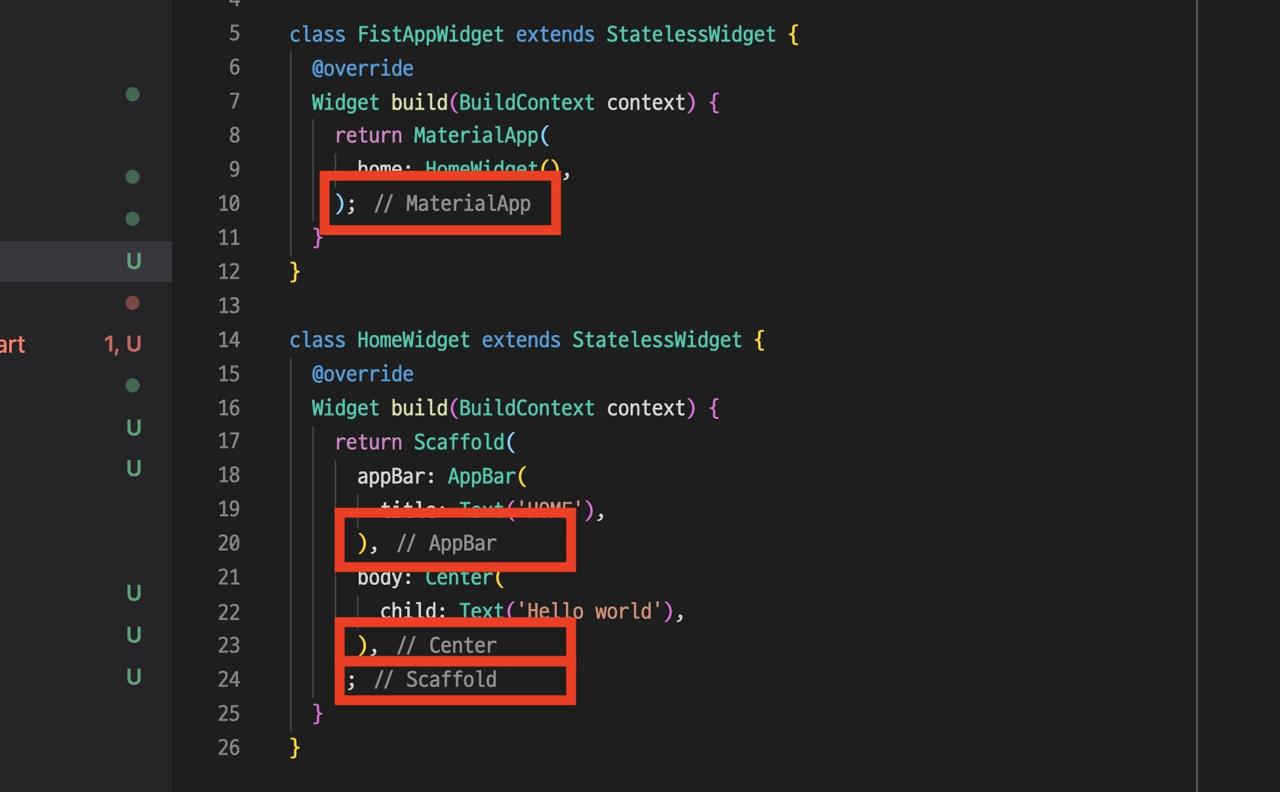
When you write the example codes, you can see the comments like below that we’ve not added.

We develop the app with many Widgets in Flutter. Because of many Widgets and codes, we can’t know easily where the Widget is started, and where the end is. To solve this problem, Flutter provides the Closing Label to mark the end of the Widget. Flutter add the comments automatically to the end of each widget to make us know the end of the Widgets.
We can’t add and modify these comments.
Check
We’ve seen how to make an app with Widgets in Flutter via simple codes. we can know everything is Widgets as you see the code.
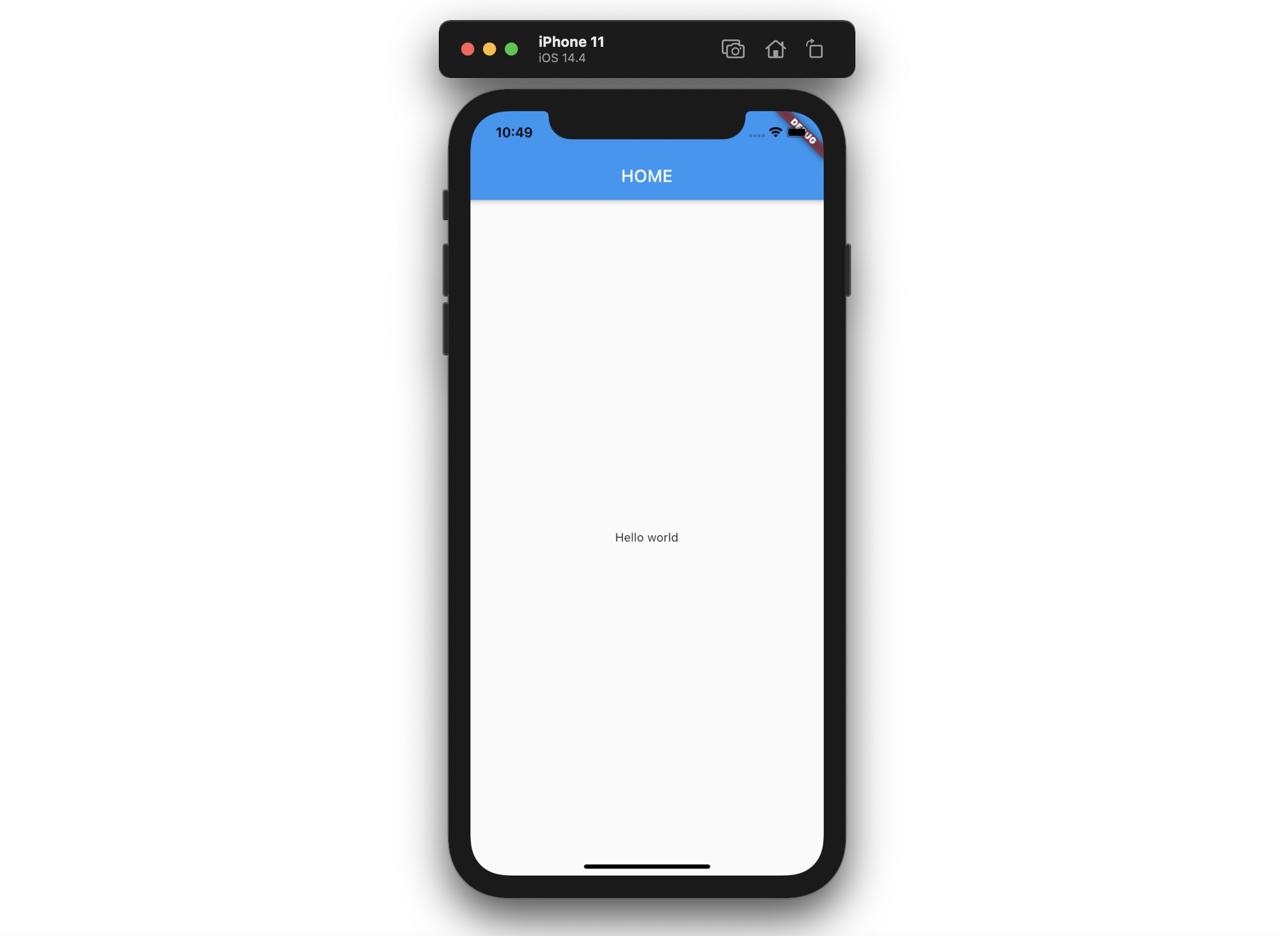
Now, let’s see the result of our code. To open the app, see the link below to open the emulator and execute the Flutter project.
After executing the app, you can see the screen like below.

Completed
We’ve seen how to create a new Flutter project, and what the Widget is in Flutter via simple examples. Flutter is started by Widget and ended by Widget, so keep in mind what the Widget is and how to use it!
Was my blog helpful? Please leave a comment at the bottom. it will be a great help to me!
App promotion
Deku.Deku created the applications with Flutter.If you have interested, please try to download them for free.


