Contents
Outline
Int this blog post, I will introduce how to use Provider to manage the global state or share the state between widgets in Flutter.
You can see the full source code of the blog post on GitHub.
So, let’s see how to use Provider in Flutter to manage the global state and share the state between widgets.
Create Flutter project
To use the flutter_provider package, execute the command below to create new Flutter project.
flutter create provider_exampleTo apply Null safety, execute the command below.
cd provider_example
dart migrate --apply-changes
Install flutter_provider package
To share the global state and share the state between widgets, execute the command below to install the flutter_provider package.
flutter pub add flutter_providerWhat is Provider
There are two types of the widgets. One is the Stateless Widget which has no state, and another is the Stateful Widget which has the state.
The Stateful Widget has the state(data) and when the state is changed, the UI is changed by the state.
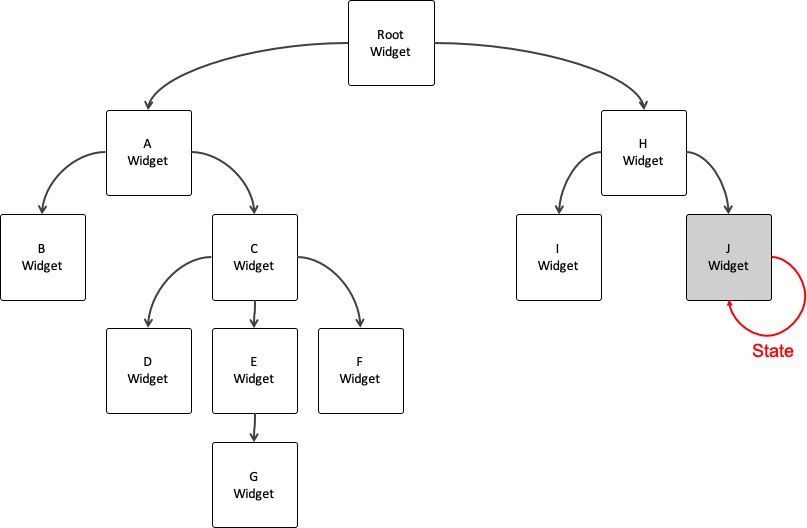
If the other widgets need the same state(data), what can we do?
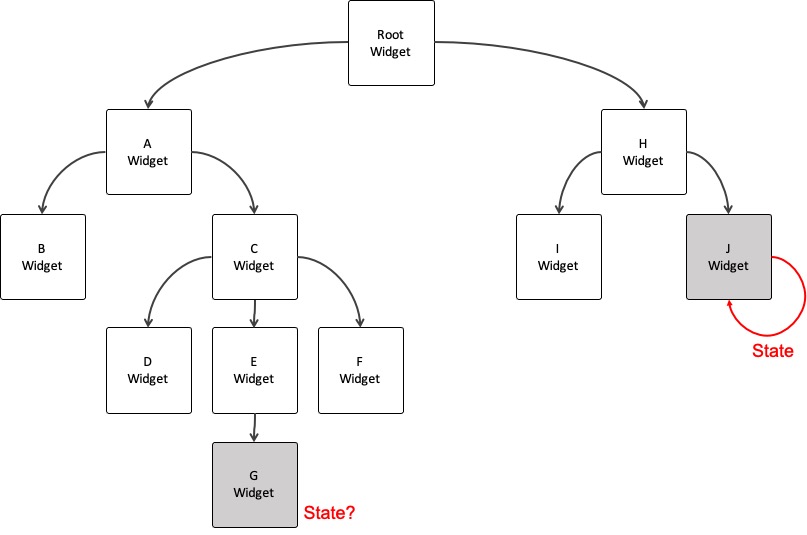
Change the two widgets’ shared parent widget to the Stateful Widget, and by passing the state to the child widget when you create the child widget, you can share the state between two widgets.
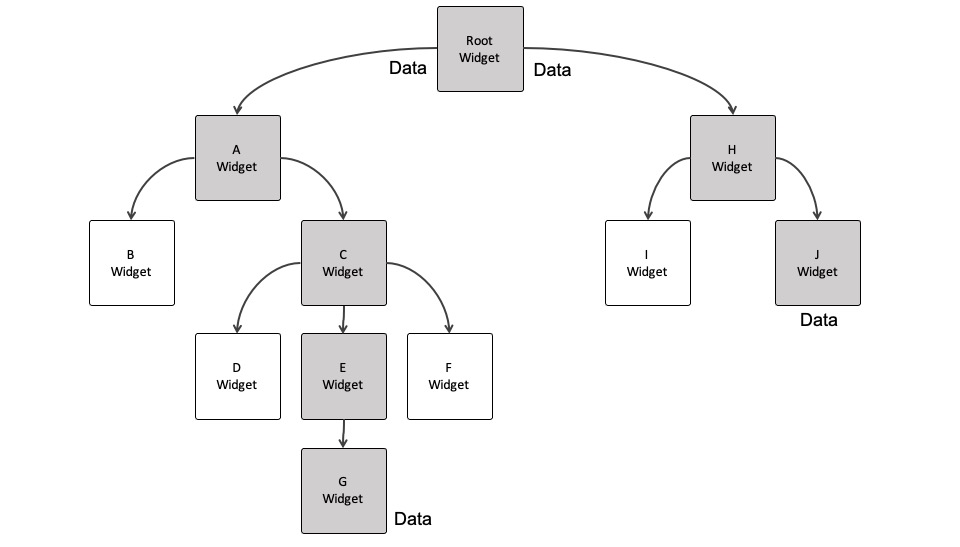
However, to show the state, many widgets do re-build unnecessarily, so the performance issue may occur. To solve this issue, Provider is created. When we want to share the state between widgets globally, we use Provider.
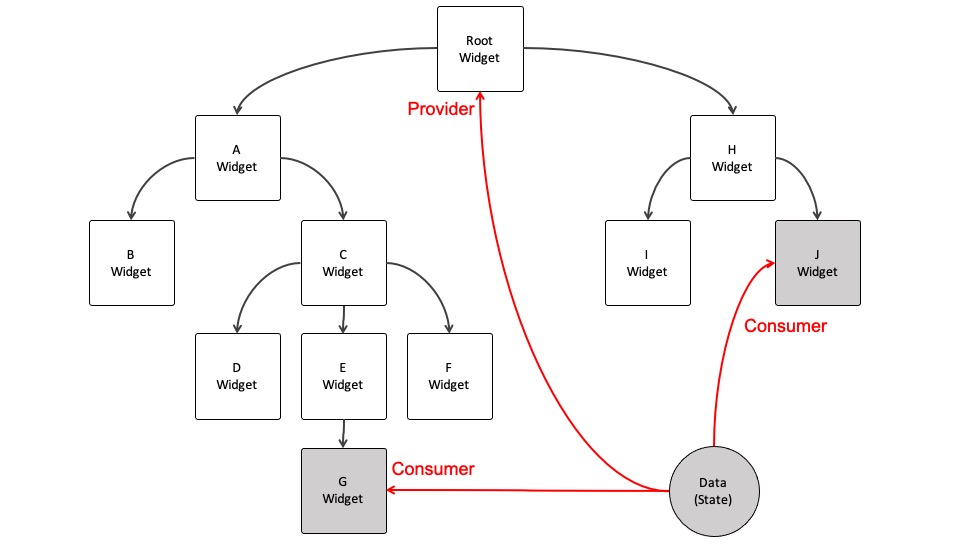
When we use Provider, we create a class to store the state(data) regardless of the widget tree, and provider Provider to the shared parent widget, and read Provider data in the widget which needs to consume the state.
How to use
Now, let’s see how to use the flutter_provider package to manage the global state. In this blog post, we will make a simple counter app which uses the flutter_provider package.
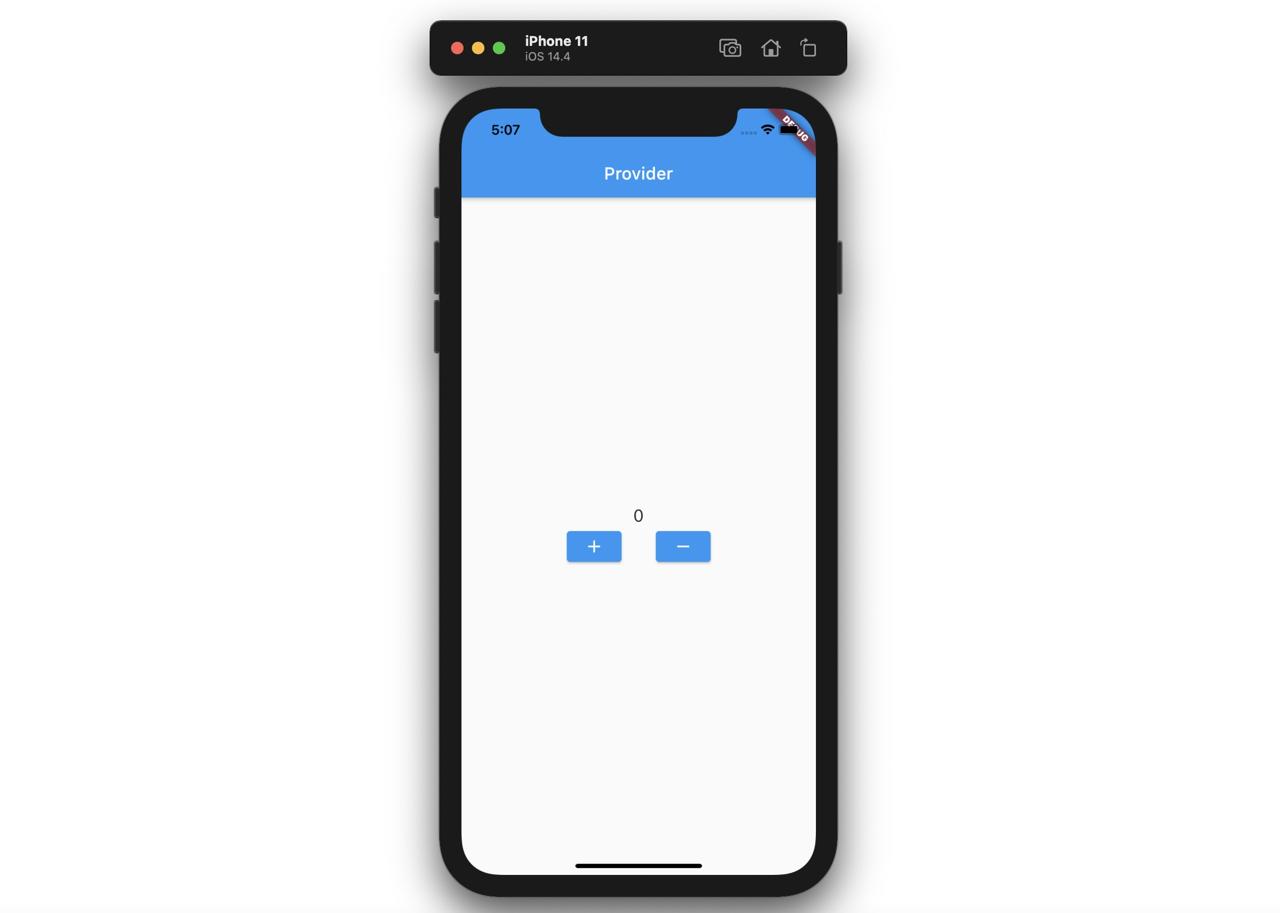
When you press the + button, the counter is increased, and when you press the - button, the number is decreased. It’s very simple app, so let’s see how to use Provider in Flutter via this app.
Provider
First, let’s create a Provider to manage the global state. Create the lib/providers/counts.dart file and modify it like below.
import 'package:flutter/material.dart';

class Counts with ChangeNotifier {
  int _count = 0;
  int get count => _count;

  void add() {
    _count++;
    notifyListeners();
  }

  void remove() {
    _count--;
    notifyListeners();
  }
}
To use Provider, we need to create a class with ChangeNotifier.
import 'package:flutter/material.dart';

class Counts with ChangeNotifier {
  ...
}
And then, define a state variable to share in the app. Also, create the getter to access the variable.
import 'package:flutter/material.dart';

class Counts with ChangeNotifier {
  int _count = 0;
  int get count => _count;
  ...
}
And then, create functions to change the state. In here, I’ve created the add function to increase the value and the remove function to decrease the value.
class Counts with ChangeNotifier {
  ...
  void add() {
    _count++;
    notifyListeners();
  }

  void remove() {
    _count--;
    notifyListeners();
  }
}
Important thing is when the value is changed, we should call the notifyListeners() function to notify the value is changed to the widgets. It’s like to change the state value in the Stateful Widget, we use the setState function to notify the state is changed to the widget. If we don’t call the notifyListeners function, the other widgets can’t recognize the value is changed.
Done! we’ve created a Provider to make a global state in the app.
Main
Next, let’s provider Provider to the shared parent widget of the widgets that use the global state. Open the lib/main.dart file and modify it like below.
import 'package:flutter/material.dart';
import 'package:provider/provider.dart';
import 'package:provider_example/providers/counts.dart';
import 'package:provider_example/widgets/buttons.dart';
import 'package:provider_example/widgets/counter.dart';

void main() {
  runApp(
    MultiProvider(
      providers: [
        ChangeNotifierProvider(create: (_) => Counts()),
      ],
      child: MyApp(),
    ),
  );
}

class MyApp extends StatelessWidget {
  @override
  Widget build(BuildContext context) {
    return MaterialApp(
      title: 'Flutter Demo',
      theme: ThemeData(
        primarySwatch: Colors.blue,
      ),
      home: Home(),
    );
  }
}

class Home extends StatelessWidget {
  @override
  Widget build(BuildContext context) {
    return Scaffold(
      appBar: AppBar(
        title: Text('Provider'),
      ),
      body: ChangeNotifierProvider(
        create: (BuildContext context) => Counts(),
        child: Center(
          child: Column(
            mainAxisAlignment: MainAxisAlignment.center,
            children: [
              Counter(),
              Buttons(),
            ],
          ),
        ),
      ),
    );
  }
}
To use the global state, import the flutter_provider package and the state class that we’ve created.
...
import 'package:provider/provider.dart';
import 'package:provider_example/providers/counts.dart';
import 'package:provider_example/widgets/buttons.dart';
import 'package:provider_example/widgets/counter.dart';
...
Import the widgets which use Provider(we didn’t create it yet.)
...
void main() {
  runApp(
    MultiProvider(
      providers: [
        ChangeNotifierProvider(create: (_) => Counts()),
      ],
      child: MyApp(),
    ),
  );
}
...
In this example, I added Provider to the top widget of the widget tree. Also, when we develop the app normally, we use multiple Providers, so, I used MultiProvider to be able to use multiple Providers.
...
class Home extends StatelessWidget {
  @override
  Widget build(BuildContext context) {
    return Scaffold(
      appBar: AppBar(
        title: Text('Provider'),
      ),
      body: ChangeNotifierProvider(
        create: (BuildContext context) => Counts(),
        child: Center(
          child: Column(
            mainAxisAlignment: MainAxisAlignment.center,
            children: [
              Counter(),
              Buttons(),
            ],
          ),
        ),
      ),
    );
  }
}
...
After that, the screen is configured in the way of developing an ordinary app. Next, let’s develop the Counter and Buttons widgets to use Provider.
Counter
Let’s create the widget which uses Provider. Create the lib/widgets/counter.dart file and modify it like below.
import 'package:flutter/material.dart';
import 'package:provider/provider.dart';
import 'package:provider_example/providers/counts.dart';

class Counter extends StatelessWidget {
  @override
  Widget build(BuildContext context) {
    print('Counter');

    return Text(
      context.watch<Counts>().count.toString(),
      style: TextStyle(
        fontSize: 20,
      ),
    );
  }
}
The Counter is a simple widget that uses the Text widget to show the counter in the screen. At this widget, I used context.watch<Counts>().count to watch the count value of Provider. So, when the value is changed, the value in the screen will be changed.
Buttons
Next, to change the Provider value, let’s create the Buttons widget. Create the lib/widgets/buttons.dart file and modify it like below.
import 'package:flutter/material.dart';
import 'package:provider/provider.dart';
import 'package:provider_example/providers/counts.dart';

class Buttons extends StatelessWidget {
  @override
  Widget build(BuildContext context) {
    return Row(
      mainAxisAlignment: MainAxisAlignment.center,
      children: [
        ElevatedButton(
            onPressed: () {
              context.read<Counts>().add();
            },
            child: Icon(Icons.add)),
        SizedBox(
          width: 40,
        ),
        ElevatedButton(
            onPressed: () {
              context.read<Counts>().remove();
            },
            child: Icon(Icons.remove))
      ],
    );
  }
}
Unlike the Counter widget, The Buttons widget uses context.read<Counts>() to call the add and remove functions to change the count value in Provider.
When the add and remove functions are called in the Buttons widget, the Provider changes the values, and calls the notifyListeners() function to notify the value is changed. After changing the value like this, the widgets, which use context.watch or context.select to use Provider’s value, is re-built and shown up with the new value.
watch, read, select
Provider provides watch, read, select features.
- read: the widget reads the state, but doesn’t watch the changes.
- watch: the widget watches the state changes.
- select: the widget watches a part of the state.
Normally, we use the read to access the function to change the Provider’s state value, and use the watch to use the state value. To show the changed state value, the re-build occurs, but this re-build is high costs. So, like below, we can optimize re-build to use select to watch a part of the state.
Widget build(BuildContext context) {
  final name = context.select((Person p) => p.name);
  return Text(name);
}
Execute
Execute the command below to star the app which we’ve created.
flutter runOr, when you can execute the app via your editor’s debug feature, you can see the screen lik below.

And then, when you press the + button on the screen, you can see the counter is increased. Also, when you press the - button, you can see the number is decreased.
Completed
Done! we’ve see how to use Provider to manage the global state in Flutter. Also, we’ve created a simple app to understand how to use Provider.
Was my blog helpful? Please leave a comment at the bottom. it will be a great help to me!
App promotion
Deku.Deku created the applications with Flutter.If you have interested, please try to download them for free.


