Contents
Outline
Let’s see how to do the integration test to the app which is developed by Flutter. You can see the details about the integration test on the Flutter official document.
- Official document: An introduction to integration testing
This blog referenced the contents of the official document, and summarizes the contents for integration testing. You can see the source code of this blog post on the link below.
- GitHub: Integration Test Example
Install integration_test package
We need to use the integration_test package to do the integration test on Flutter. When you install the Flutter SDK, the integration_test package is also installed, so we don’t need to install it again.
But, we need to modify the pubspec.yaml file to use the integration_test package like the below.
...
dev_dependencies:
  flutter_test:
    sdk: flutter
  integration_test:
    sdk: flutter
...
Configuration
The integration test will install the app on the Android emulator or iOS simulator, or the device, and do test following the test scenario. So, to use the integration_test package to do the integration test on Flutter, we need to configure the setting for each OS.
Android settings
Let’s see how to configure the Android settings for integration_test to do the integration test on Flutter.
- open the
./android/app/build.gradlefile and modify it like the below.
...
defaultConfig {
    ...
    testInstrumentationRunner "androidx.test.runner.AndroidJUnitRunner"
}
...
dependencies {
    ...
    // For integration test
    testImplementation 'junit:junit:4.12'
    // https://developer.android.com/jetpack/androidx/releases/test/#1.2.0
    androidTestImplementation 'androidx.test:runner:1.2.0'
    androidTestImplementation 'androidx.test.espresso:espresso-core:3.2.0'
}
...- Create the
./android/app/src/androidTest/java/com/example/[Project Name]/MainActivityTest.javafile and modify it like the below. (You should change theProject Namepart to your Flutter project name.)
package com.example.[Project Name];

import androidx.test.rule.ActivityTestRule;
import dev.flutter.plugins.integration_test.FlutterTestRunner;
import org.junit.Rule;
import org.junit.runner.RunWith;

@RunWith(FlutterTestRunner.class)
public class MainActivityTest {
  @Rule
  public ActivityTestRule<MainActivity> rule = new ActivityTestRule<>(MainActivity.class, true, false);
}
iOS settings
- Execute the
ios/Runner.xcworkspacefile to open Xcode. (You can execute the command below to open Xcode.)
open ./ios/Runner.xcworkspace- Select
File > New > Target....
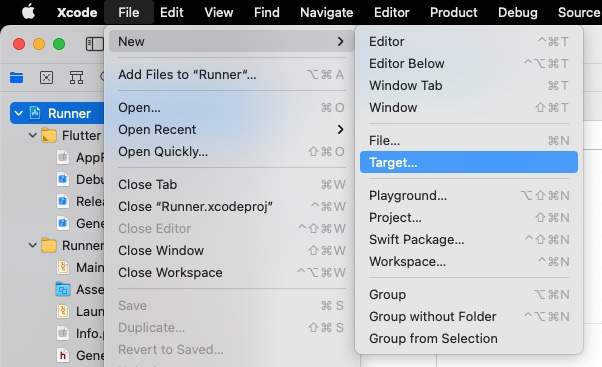
- Search
Unit Testing Bundleand clickNextbutton.
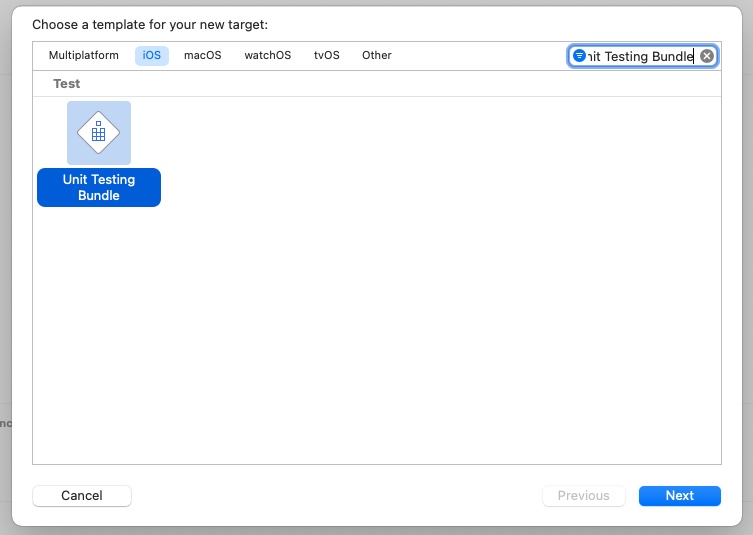
- Insert
RunnerTestsonProduct Name. EnterOrganization Identifier. changeLanguagetoObjective-C. And then, clickFinishto createUnit Testing Bundle.
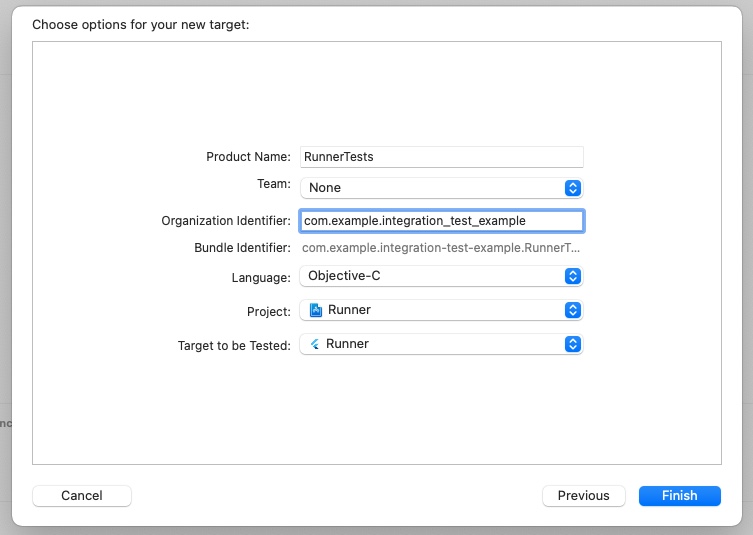
- Select
Runner > Info > Configurationsand set the same value onRunnerandRunnerTestsin theDebug/Release/Profilesection.
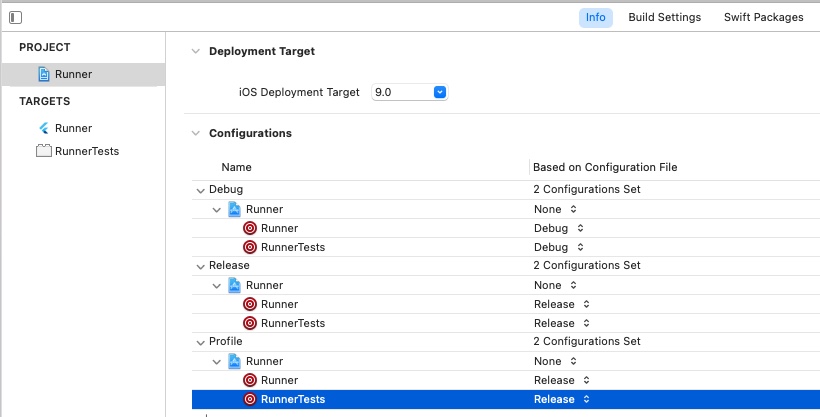
- set the same version on
iOS Deployment TargetinRunner > Build SettingsandiOS Deployment TargetinRunnerTests > Build Settings.


- open the
./ios/Podfilefile and modify it like the below.
platform :ios, '11.0'
...
target 'Runner' do
  ...
  # For integration test
  target 'RunnerTests' do
    inherit! :search_paths
  end
end
...- Execute the command below.
flutter build ios
or
flutter build ios --no-codesign- Open the
RunnerTests.mfile via Xcode and remove all code and add the code below to it.
@import XCTest;
@import integration_test;

INTEGRATION_TEST_IOS_RUNNER(RunnerTests)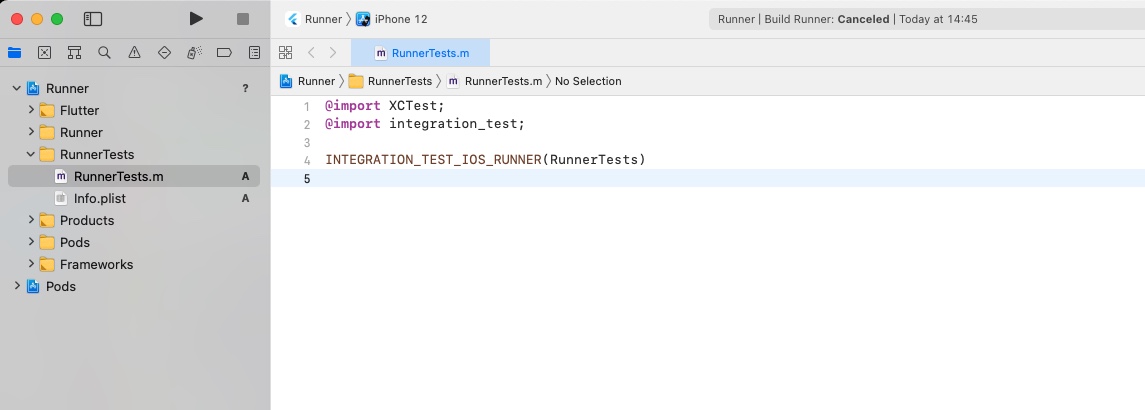
- Select
Product > Testto execute the test.
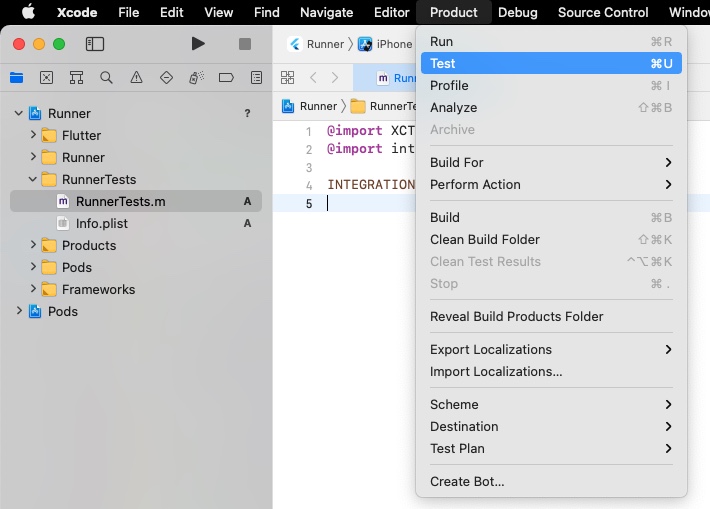
If you don’t have any problem, you can see the app build is succeeded, and the simulator is executed.
Write test code
We’ve configured the setting for each OS. Next, let’s write the integration test code.
Driver
To do the integration test on Flutter, we need to configure Driver. Create the ./test_driver/integration_test.dart file and modify it like the below.
import 'package:integration_test/integration_test_driver.dart';

Future<void> main() => integrationDriver();
Test code
To write the integration test code on Flutter, we need to create the integration_test folder and the _test.dart file in there. In here, create the ./integration_test/main_test.dart file and modify it like the below.
import 'package:flutter/material.dart';
import 'package:flutter_test/flutter_test.dart';
import 'package:integration_test/integration_test.dart';

import 'package:integration_test_example/main.dart' as app;

void main() {
  IntegrationTestWidgetsFlutterBinding.ensureInitialized();

  testWidgets("successful test example", (WidgetTester tester) async {
    app.main();
    await tester.pumpAndSettle();

    expect(find.text('0'), findsOneWidget);

    await tester.tap(find.byType(FloatingActionButton));
    await tester.pumpAndSettle();

    expect(find.text('1'), findsOneWidget);
  });
}
Scroll
When you do the integration test, if the screen has a scroll and if you click the widget which is outside of the screen, the error occurs. So, in this case, we need to scroll the screen to the widget which you want to click.
You can scroll the screen in the integration test like the below.
...
await tester.scrollUntilVisible(find.text('Cancel'), -40);
...
The above integration test code scrolls by 40px until the Cancel is shown.
Execute test code
Next, let’s execute the integration test.
Android integration test
To do the integration test on Android, we need to execute the Android emulator. Execute the command below to get the Android emulator list.
emulator -list-avdsAnd, execute the command below to open the Android emulator. The & mark is an option for executing the command in the background.
emulator -avd [Emulator ID] &After the emulator is executed, execute the command below to do the integration test.
flutter test integration_test/And then, you can see the integration test is started on the emulator. After the test is done successfully, execute the command below to exit the emulator.
adb emu killiOS integration test
Execute the command below to open the iOS simulator which is used recently.
open -a Simulator.appAfter the simulator is opened, execute the command below to do the integration test.
flutter test integration_test/After the test is done successfully, execute the command below to exit the simulator.
killall "iOS Simulator"Completed
Done! we’ve seen how to prepare the integration test, how to write the integration test code, and how to execute the integration test on Flutter. Now, I encourage you to test your app in a real environment!
Was my blog helpful? Please leave a comment at the bottom. it will be a great help to me!
App promotion
Deku.Deku created the applications with Flutter.If you have interested, please try to download them for free.


