Contents
Outline
In this blog post, I will introduce how to use the google_mobile_ads package to show the Admob advertisement.
In this blog post, I will introduce how to show the Admob banner advertisement, and you can see the source code on the link below.
Admob configuration
To use Admob in Flutter, we need to use the Admob service.
Signup Google Admob
Go to the Google Admob site and signup. It’s the same process of the signup/login for the normal service, so I just skip to explain the details.
- Google Admob site: https://www.google.com/admob/
Create Admob
Let’s see how to use Google Admob. After signin to use the Google Admob, you can see the screen like below.
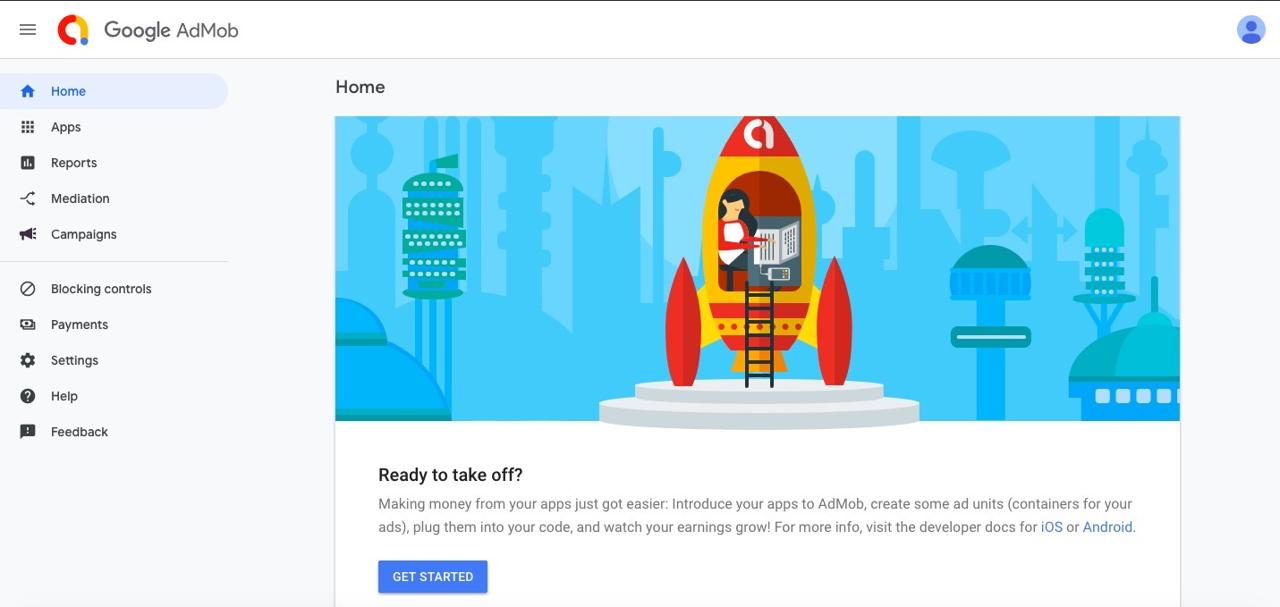
Click the GET STARTED button on the bottom to start using Google Admob
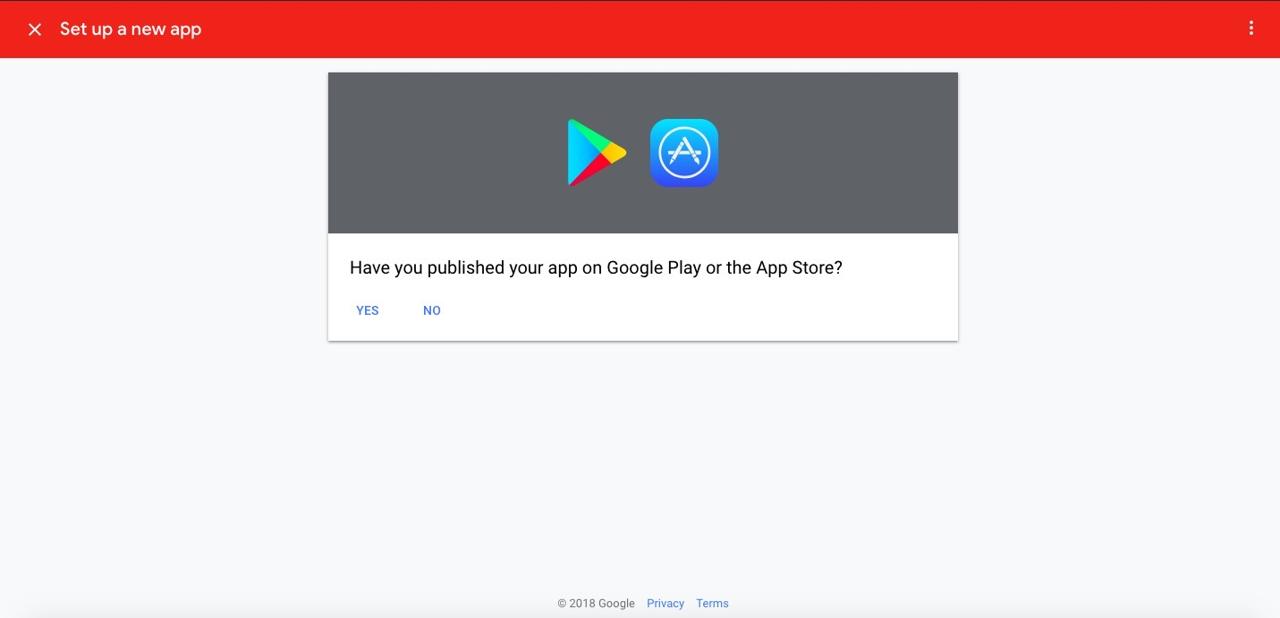
Select whether the app is already registered in the market. We didn’t register, so we select NO here.
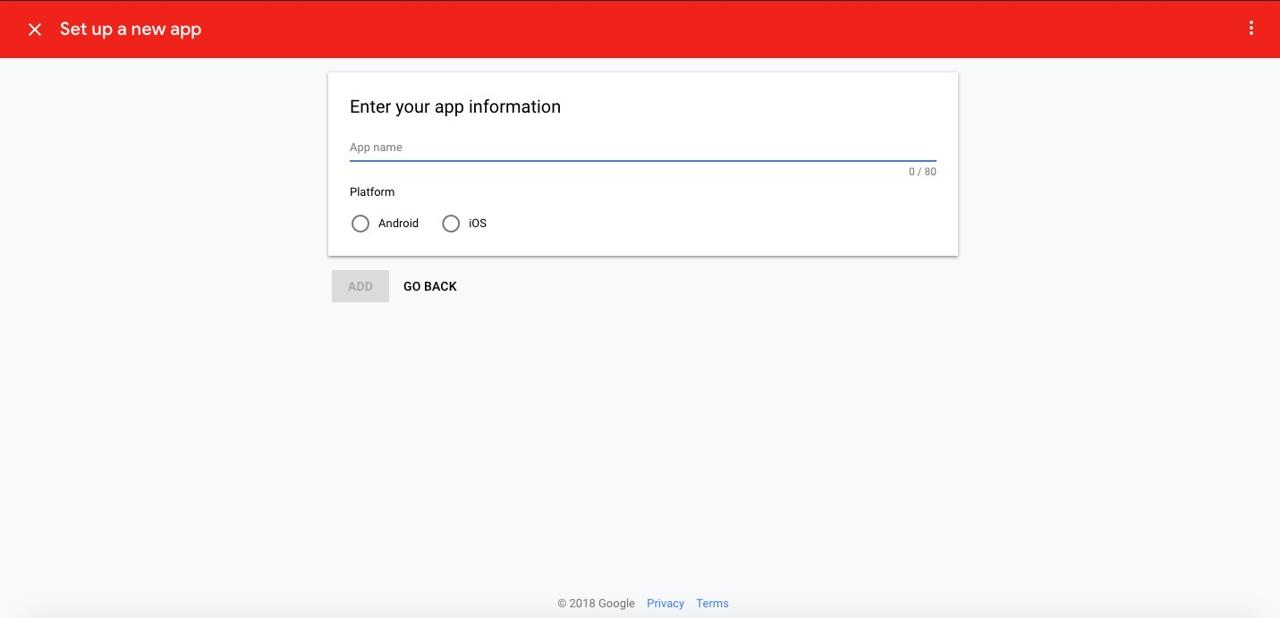
Insert the app name and select the platform to use Google Admob. First, we select iOS here.
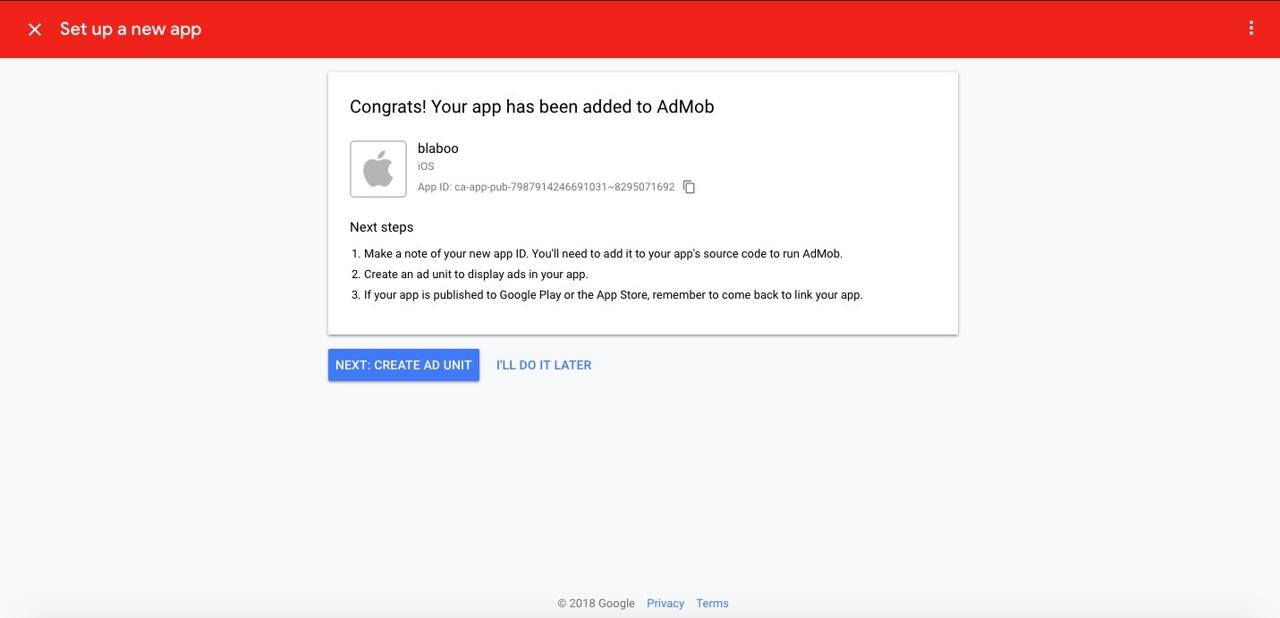
Done! we’ve registered Google Admob. There are details about next step.
- copy
App IDfor setting Flutter - we need to configure Ad Unit in Google Admob.
- after releasing the app to Market, we need to link it in Google Admob.
Click NEXT: CREATE AD UNIT to go to Advertisement configuration.
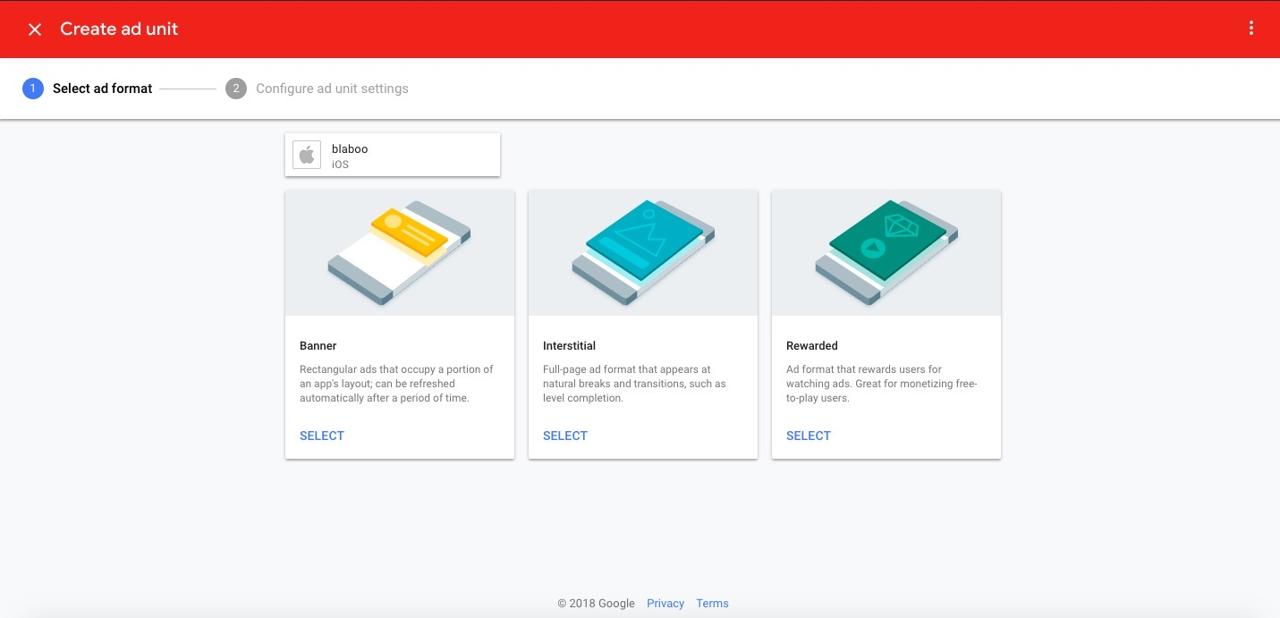
In here, I will show how to use Banner via react-native-firebase, so click SELECT button on the bottom of Banner.
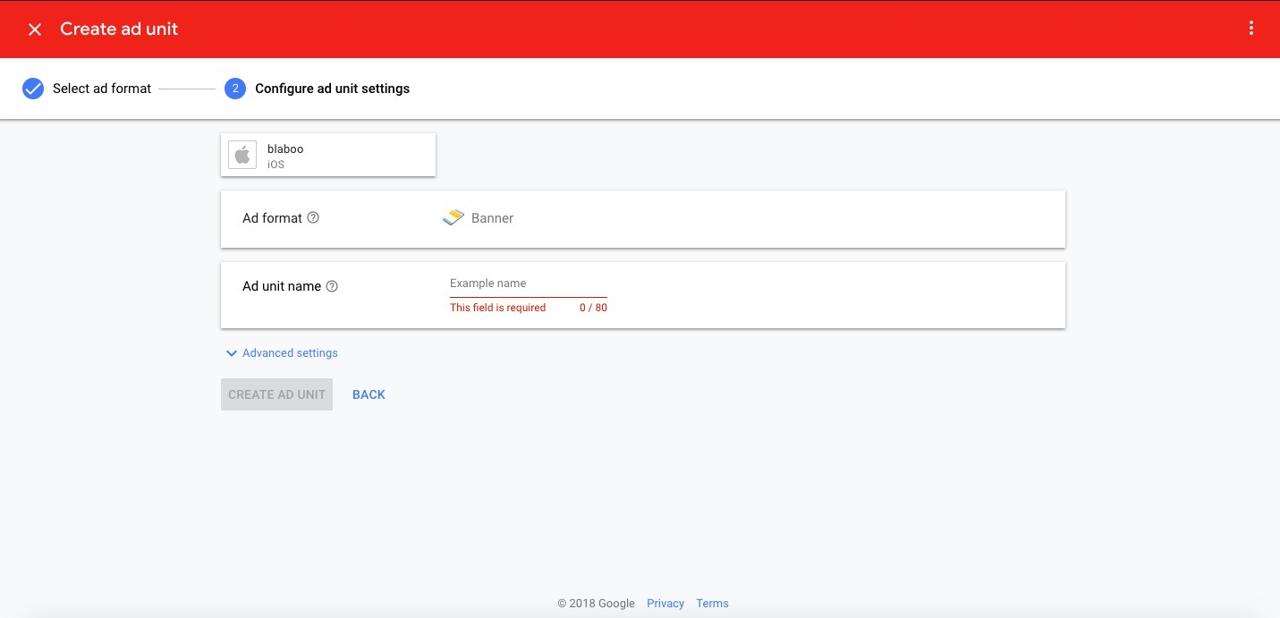
Insert Banner name. This banner name just helps you find and recognize this banner on Google Admob. After inserting, Click CREATE AD UNIT button.
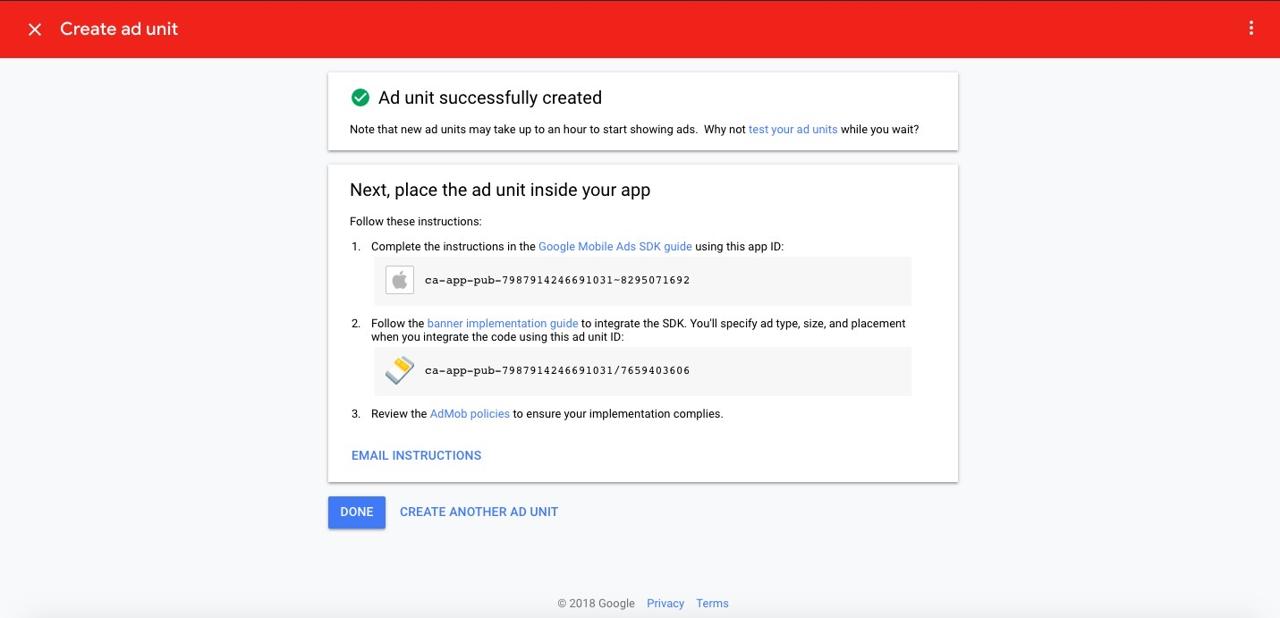
Completed to set Google Admob banner. Copy App ID and ad unit ID.
For Android, create a banner by the same way above, and create App ID and Ad Unit ID, too.
Create project
To show the Admob advertisement by the google_mobile_ads package, let’s create a new Flutter project. Execute the command below to create a Flutter project.
flutter create admob_example
cd admob_example
Install google_mobile_ads package
We need to install the google_mobile_ads package to show the Admob advertisement in Flutter project. Execute the command below to install the google_mobile_ads package.
flutter pub add google_mobile_adsConfigure App ID
Next, to display the Admob advertisement by the google_mobile_ads package, we need to configure the App ID to iOS/Android.
Configure App ID on Android
To configure the Admob App ID to Android, open android/app/src/main/AndroidManifest.xml file and modify it like below.
<manifest xmlns:android="http://schemas.android.com/apk/res/android"
    package="com.example.admob_example">
   <application
        ...>
        <meta-data
              android:name="com.google.android.gms.ads.APPLICATION_ID"
              android:value="[YOUR ANDROID APP ID]"/>
        ...
    </application>
</manifest>
Configure App ID on iOS
To configure Admob App ID to iOS, open ios/Runner/Info.plist file and modify it like below.
<?xml version="1.0" encoding="UTF-8"?>
<!DOCTYPE plist PUBLIC "-//Apple//DTD PLIST 1.0//EN" "http://www.apple.com/DTDs/PropertyList-1.0.dtd">
<plist version="1.0">
<dict>
  ...
  <key>GADApplicationIdentifier</key>
  <string>[YOUR iOS APP ID]</string>
  <key>LSRequiresIPhoneOS</key>
  <true/>
  <key>SKAdNetworkItems</key>
    <array>
      <dict>
        <key>SKAdNetworkIdentifier</key>
        <string>cstr6suwn9.skadnetwork</string>
      </dict>
      <dict>
        <key>SKAdNetworkIdentifier</key>
        <string>4fzdc2evr5.skadnetwork</string>
      </dict>
      <dict>
        <key>SKAdNetworkIdentifier</key>
        <string>2fnua5tdw4.skadnetwork</string>
      </dict>
      <dict>
        <key>SKAdNetworkIdentifier</key>
        <string>ydx93a7ass.skadnetwork</string>
      </dict>
      <dict>
        <key>SKAdNetworkIdentifier</key>
        <string>5a6flpkh64.skadnetwork</string>
      </dict>
      <dict>
        <key>SKAdNetworkIdentifier</key>
        <string>p78axxw29g.skadnetwork</string>
      </dict>
      <dict>
        <key>SKAdNetworkIdentifier</key>
        <string>v72qych5uu.skadnetwork</string>
      </dict>
      <dict>
        <key>SKAdNetworkIdentifier</key>
        <string>c6k4g5qg8m.skadnetwork</string>
      </dict>
      <dict>
        <key>SKAdNetworkIdentifier</key>
        <string>s39g8k73mm.skadnetwork</string>
      </dict>
      <dict>
        <key>SKAdNetworkIdentifier</key>
        <string>3qy4746246.skadnetwork</string>
      </dict>
      <dict>
        <key>SKAdNetworkIdentifier</key>
        <string>3sh42y64q3.skadnetwork</string>
      </dict>
      <dict>
        <key>SKAdNetworkIdentifier</key>
        <string>f38h382jlk.skadnetwork</string>
      </dict>
      <dict>
        <key>SKAdNetworkIdentifier</key>
        <string>hs6bdukanm.skadnetwork</string>
      </dict>
      <dict>
        <key>SKAdNetworkIdentifier</key>
        <string>prcb7njmu6.skadnetwork</string>
      </dict>
      <dict>
        <key>SKAdNetworkIdentifier</key>
        <string>v4nxqhlyqp.skadnetwork</string>
      </dict>
      <dict>
        <key>SKAdNetworkIdentifier</key>
        <string>wzmmz9fp6w.skadnetwork</string>
      </dict>
      <dict>
        <key>SKAdNetworkIdentifier</key>
        <string>yclnxrl5pm.skadnetwork</string>
      </dict>
      <dict>
        <key>SKAdNetworkIdentifier</key>
        <string>t38b2kh725.skadnetwork</string>
      </dict>
      <dict>
        <key>SKAdNetworkIdentifier</key>
        <string>7ug5zh24hu.skadnetwork</string>
      </dict>
      <dict>
        <key>SKAdNetworkIdentifier</key>
        <string>9rd848q2bz.skadnetwork</string>
      </dict>
      <dict>
        <key>SKAdNetworkIdentifier</key>
        <string>n6fk4nfna4.skadnetwork</string>
      </dict>
      <dict>
        <key>SKAdNetworkIdentifier</key>
        <string>kbd757ywx3.skadnetwork</string>
      </dict>
      <dict>
        <key>SKAdNetworkIdentifier</key>
        <string>9t245vhmpl.skadnetwork</string>
      </dict>
      <dict>
        <key>SKAdNetworkIdentifier</key>
        <string>4468km3ulz.skadnetwork</string>
      </dict>
      <dict>
        <key>SKAdNetworkIdentifier</key>
        <string>2u9pt9hc89.skadnetwork</string>
      </dict>
      <dict>
        <key>SKAdNetworkIdentifier</key>
        <string>8s468mfl3y.skadnetwork</string>
      </dict>
      <dict>
        <key>SKAdNetworkIdentifier</key>
        <string>av6w8kgt66.skadnetwork</string>
      </dict>
      <dict>
        <key>SKAdNetworkIdentifier</key>
        <string>klf5c3l5u5.skadnetwork</string>
      </dict>
      <dict>
        <key>SKAdNetworkIdentifier</key>
        <string>ppxm28t8ap.skadnetwork</string>
      </dict>
      <dict>
        <key>SKAdNetworkIdentifier</key>
        <string>424m5254lk.skadnetwork</string>
      </dict>
      <dict>
        <key>SKAdNetworkIdentifier</key>
        <string>uw77j35x4d.skadnetwork</string>
      </dict>
      <dict>
        <key>SKAdNetworkIdentifier</key>
        <string>578prtvx9j.skadnetwork</string>
      </dict>
      <dict>
        <key>SKAdNetworkIdentifier</key>
        <string>4dzt52r2t5.skadnetwork</string>
      </dict>
      <dict>
        <key>SKAdNetworkIdentifier</key>
        <string>e5fvkxwrpn.skadnetwork</string>
      </dict>
      <dict>
        <key>SKAdNetworkIdentifier</key>
        <string>8c4e2ghe7u.skadnetwork</string>
      </dict>
      <dict>
        <key>SKAdNetworkIdentifier</key>
        <string>zq492l623r.skadnetwork</string>
      </dict>
      <dict>
        <key>SKAdNetworkIdentifier</key>
        <string>3qcr597p9d.skadnetwork</string>
      </dict>
    </array>
</dict>
</plist>
how to use google_mobile_ads
Let’s see how to use the google_mobile_ads package to display Admob advertisement. Open the main.dart file and modify it like below.
import 'package:flutter/material.dart';
import 'package:flutter/foundation.dart';
import 'package:google_mobile_ads/google_mobile_ads.dart';

const Map<String, String> UNIT_ID = kReleaseMode
    ? {
        'ios': '[YOUR iOS AD UNIT ID]',
        'android': '[YOUR ANDROID AD UNIT ID]',
      }
    : {
        'ios': 'ca-app-pub-3940256099942544/2934735716',
        'android': 'ca-app-pub-3940256099942544/6300978111',
      };

Future<void> main() async {
  WidgetsFlutterBinding.ensureInitialized();
  MobileAds.instance.initialize();

  runApp(MyApp());
}

class MyApp extends StatelessWidget {
  @override
  Widget build(BuildContext context) {
    return MaterialApp(
      title: 'Flutter Demo',
      theme: ThemeData(
        primarySwatch: Colors.blue,
      ),
      debugShowCheckedModeBanner: false,
      home: Home(),
    );
  }
}

class Home extends StatelessWidget {
  @override
  Widget build(BuildContext context) {
    TargetPlatform os = Theme.of(context).platform;

    BannerAd banner = BannerAd(
      listener: BannerAdListener(
        onAdFailedToLoad: (Ad ad, LoadAdError error) {},
        onAdLoaded: (_) {},
      ),
      size: AdSize.banner,
      adUnitId: UNIT_ID[os == TargetPlatform.iOS ? 'ios' : 'android']!,
      request: AdRequest(),
    )..load();

    return Scaffold(
      appBar: AppBar(
        title: Text('Admob'),
      ),
      body: Center(
        child: Container(
          height: 50,
          child: AdWidget(
            ad: banner,
          ),
        ),
      ),
    );
  }
}
Let’s see the code one by one.
import 'package:flutter/foundation.dart';We shouldn’t use own AD UNIT ID on the development environment to show the Admob advertisement. If you use your AD UNIT ID on the development environment, the traffic on the development environment may be considered fraudulent traffic, and your Admob account can be blocked. So, in this example, I will use kReleaseMode to check the current environment is the debug or release. To use kReleaseMode, we need to import foundation.dart.
import 'package:google_mobile_ads/google_mobile_ads.dart';To use google_mobile_ads, we need to import it.
const Map<String, String> UNIT_ID = kReleaseMode
    ? {
        'ios': '[YOUR iOS AD UNIT ID]',
        'android': '[YOUR ANDROID AD UNIT ID]',
      }
    : {
        'ios': 'ca-app-pub-3940256099942544/2934735716',
        'android': 'ca-app-pub-3940256099942544/6300978111',
      };
If the current environment is release by checking kReleaseMode, we’ll use own AD UNIT ID that we’ve created above. If not, we’ll use the test AD UNIT ID provided by Admob.
Future<void> main() async {
  WidgetsFlutterBinding.ensureInitialized();
  MobileAds.instance.initialize();

  runApp(MyApp());
}
Next, we need to initialize MobileAds to display the Admob advertisement by google_mobile_ads. After checking Flutter is initialized by WidgetsFlutterBinding.ensureInitialized();, call MobileAds.instance.initialize(); to initialize MobileAds.
class MyApp extends StatelessWidget {
  @override
  Widget build(BuildContext context) {
    return MaterialApp(
      title: 'Flutter Demo',
      theme: ThemeData(
        primarySwatch: Colors.blue,
      ),
      debugShowCheckedModeBanner: false,
      home: Home(),
    );
  }
}

class Home extends StatelessWidget {
}
And for the simple example, I created the Stateless widget.
Let’s see the code about how to show the banner advertisement.
@override
Widget build(BuildContext context) {
  TargetPlatform os = Theme.of(context).platform;

  BannerAd banner = BannerAd(
    listener: BannerAdListener(
      onAdFailedToLoad: (Ad ad, LoadAdError error) {},
      onAdLoaded: (_) {},
    ),
    size: AdSize.banner,
    adUnitId: UNIT_ID[os == TargetPlatform.iOS ? 'ios' : 'android']!,
    request: AdRequest(),
  )..load();

  return Scaffold(
    appBar: AppBar(
      title: Text('Admob'),
    ),
    body: Center(
      child: Container(
        height: 50,
        child: AdWidget(
          ad: banner,
        ),
      ),
    ),
  );
}
The AD UNIT ID is different between the platforms, so we need to check which platform Flutter works on. For this, I used TargetPlatform.
TargetPlatform os = Theme.of(context).platform;And then, I created BannerAd provided by google_mobile_ads to create a banner advertisement, and use Cascade operator to call load() function to load the banner when the BannerAd is created.
BannerAd banner = BannerAd(
  listener: BannerAdListener(
    onAdFailedToLoad: (Ad ad, LoadAdError error) {},
    onAdLoaded: (_) {},
  ),
  size: AdSize.banner,
  adUnitId: UNIT_ID[os == TargetPlatform.iOS ? 'ios' : 'android']!,
  request: AdRequest(),
)..load();
At this moment, we can use AdListener to register the callback functions to some events of the Advertisement, and use AdRequest parameters to show the banner more effectively.
Finally, we can show the Advertisement that we’ve created by using AdWidget.
AdWidget(
  ad: banner,
)
In this example, to show the advertisement simply, we’ve used the Stateless widget. If you use Stateful widget, you can dispose the advertisement like below.
@override
void dispose() {
  super.dispose();
  _banner.dispose();
}
Issue
I share my experience about the issue that I’ve faced with google_mobile_ads.
await MobileAds.instance.initialize()
I still use the 0.13.4 version. After this version, in some Android devices, the MobileAds.instance.initialize() function will not be finished. And it makes the app crash.
- Official Repository issue: [Android] Using await MobileAds.instance.initialize() the app fails to load #429
So, I still use the 0.13.4 version like the below.
dependencies:
  ...
  google_mobile_ads: 0.13.4
Ad failed to load : 3
When I develop the app with the test unit id in the emulator to show the banner ads, I got the Ad failed to load : 3 error message and the banner ads won’t show up.
To solve this issue, I use the real unit id instead of the test unit id. When I used real unit id in the emulator, the ads is shown with the Test mode.
The Test mode is shown, so the banner traffic is not considered as fraudulent traffic, I think. So, I still use real unit id when I develop the app.
Even if you try to use the real unit id, you get the same error message. Try to use the real device with the app to make the traffic. The Ad failed to load : 3 message doesn’t mean the error, it just means the ads is not ready to provide. So, your configuration is correct. However, the ads is not ready because of many reasons. And the real traffic also affects the ads to ready, so try to use the real device with the app to make the traffic.
Completed
Done! we’ve seen how to use the google_mobile_ads package to show the Admob advertisement. Next, add the advertisement on your app and earn the money!
Was my blog helpful? Please leave a comment at the bottom. it will be a great help to me!
App promotion
Deku.Deku created the applications with Flutter.If you have interested, please try to download them for free.


