Outline
so far, we’ve add or edit the data by using the administrator page that django provides basically. in this blog, we’ll see how to insert or update the data by using django Form feature.
this blog is a series. if you want to check other blog posts of the series, see the links below.
- django installation
- Start django Project
- Use Models in django
- django Administrator Page
- django Routing
- django ORM
- django View
- django Form
- Upload django project to Heroku
also, this blog series source code is opened on Github. you can see full source code via the link below.
Create Form
create and modify blog/forms.py file like below to use django Form feature.
from django import forms
from .models import Post

class PostCreateForm(forms.ModelForm):
    class Meta:
        model = Post
        fields = ('title', 'content')
from django import forms: load(import) Form that django provides basically.from .models import Post: load(import)PostModel that we’ll add or edit the data via Form.class PostCreateForm(forms.ModelForm):: create a class named PostCreateForm and inherit forms.ModelFormclass Meta:: write contents which we want to use via this Form. in here, we set we’ll use Post Model in this form(model = Post), and we’ll use title and content fields(fields = ('title', 'content')).
Create View
now, we need to create View that we’ll use django Form feature in. we’ve practiced to make View in previous blog post(django View), so we can make it easily.
Create HTML
first, we make a data input web page. create blog/templates/post_create.html file and modify it like below.
{% extends 'blog/layout.html' %}

{% block content %}
    <a href="{% url 'posts' %}">
        Post List
    </a>
    <h1>Create Blog post</h1>
    <form method="POST">
        {% csrf_token %}
        {{ form.as_p }}
        <button type="submit">Save</button>
    </form>
{% endblock %}
{% csrf_token %}: this is the code that protects from CSRF(Cross-site Request Forgery).{{ form.as_p }}: showformparameter as Paragraph(as_p: Paragraph- <p> tag) type. also, we can show as Table(as_table- <table> tag) type, List(as_ul- <ul> tag) type. this feature will showfieldswe made inFormclass above.
Create URL
next, open blog/urls.py file and modify it like below.
from django.urls import path
from . import views

urlpatterns = [
    path('', views.posts, name='posts'),
    path('post/<int:id>/', views.post_detail, name='post_detail'),
    path('post/create/', views.post_create, name='post_create'), # <<<<<<<<<<< here
]
we’ve already seen this part in previous blog post, so I won’t mention it again. if you don’t understand this part, please see previous blog post.
- previous blog post: django View
Create View
lastly, we need to create View for processing the data. open and modify blog/views.py file like below.
from django.shortcuts import render, get_object_or_404, redirect
...
from django.utils import timezone
from .forms import PostCreateForm

...

def post_create(request):
    if request.method == "POST":
        form = PostCreateForm(request.POST)
        if form.is_valid():
            post = form.save(commit=False)
            post.author = request.user
            post.published_at = timezone.now()
            post.save()
            return redirect('post_detail', id=post.id)
    else:
        form = PostCreateForm()
    return render(request, 'blog/post_create.html', {'form': form})
redirect: load(import)Redirectfeature. we’ll use it after storing the data successfully to redirect the web page.from django.utils import timezone: load(import) timezone feature to store current date inpublished_ dataof Post Model.if request.method == "POST": ... else: our functions we defined have basicallyrequestparameter. we can distinguish GET and Post to usemethodin request parameter. if it is POST, we store the data via Form feature.form = PostCreateForm(request.POST): POST data we’ve sent through Form is inrequest.POST. create Form object viaPostCreateFormclass with this data.if form.is_valid():check the data via the validation feature that django provides basically. when we’ve created blog Post Model, we’ve set onlyblank = Trueinpublished_at. so other fields are required fields in Post Model.post = form.save(commit=False): store the data(form.save) via Form object. however, not store in database yet usingcommit=Falseoption.post.author = request.user: we’ve not stored the data in database because we’ll store the data with additionally information. set the user who sentrequestin the data author. we’ve already logged in the administrator page, sorequest.useris the user information that we’ve used to login the administrator page.post.published_at = timezone.now(): additionally, insert current data topublished_atto show this data in the web page.post.save(): finally, store the data in the database.return redirect('post_detail', id=post.id): and redirectpost_detailpage to check the data stored well.if request.method == "POST": ... else: if the request is not POST,form = PostCreateForm(): get Form we’ve created above and show the web page(return render(request, 'blog/post_create.html', {'form': form})).
Create Link
open and modify blog/posts.html file like below to use the page created above.
{% extends 'blog/layout.html' %}

{% block content %}
  <a href="{% url 'post_create' %}">Create Blog Post</a>
  {% for post in posts %}
    ...
  {% endfor %}
{% endblock %}
Check.
open the browser and go to http://127.0.0.1 to check our work.

and then, you can see the screen includes Create Blog Post link like above. click Create Blog Post link to go to the create blog post page.

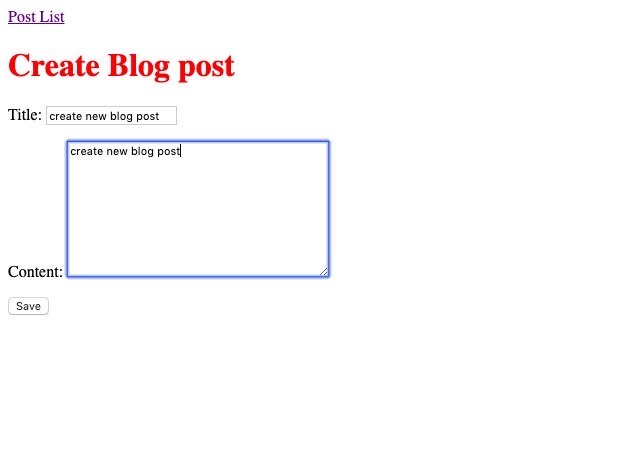
you can see the Form page like above. insert the data that you want to store and click Save button to store them.

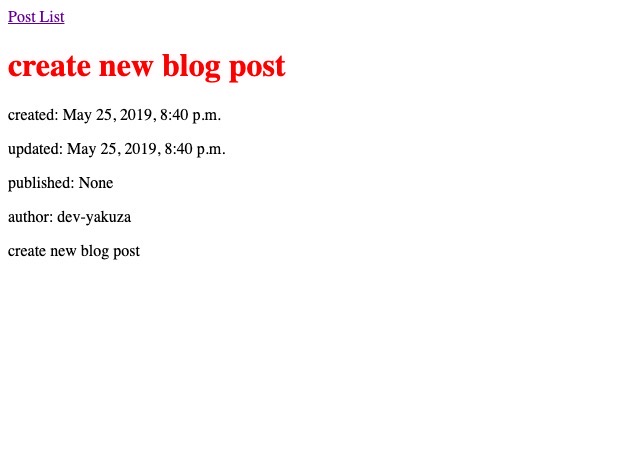
after storing, you can see the detail page because we’ve set the Redirect.
lastly, click Post List link to go to the main page on the top of the screen.

you can see the data stored well in the main page like above.
Completed
in this blog, we’ve seen how to use django Form. also, we’ve seen how to distinguish GET and POST in user Request. now, we can store or modify the data by using user request.
Was my blog helpful? Please leave a comment at the bottom. it will be a great help to me!
App promotion
Deku.Deku created the applications with Flutter.If you have interested, please try to download them for free.


