概要
リアクトネイティブ(React Native)プロジェクトへベクターアイコンを使うためreact-native-vector-icons ライブラリを使って見ましょう。
ライブラリインストール
下記のコマンドでreact-native-vector-iconsをインストールします。
npm install react-native-vector-icons --save
# For Typescript
npm install --save-dev @types/react-native-vector-icons
インストールが完了されたら下記のコマンドでライブラリをプロジェクトへリンクします。
ライブラリリンク
react-native-vector-iconsを使うためインストールしたライブラリをリンクする必要があります。
0.59 以下
下記のコマンドを使ってライブラリをリンクします。
react-native link react-native-vector-icons0.60 以上
0.60以上から手動でリンクする必要があります。
iOS
iOSでreact-native-vector-iconsをリンクするためios/[project].xcworkspaceを選択してXcodeを実行します。

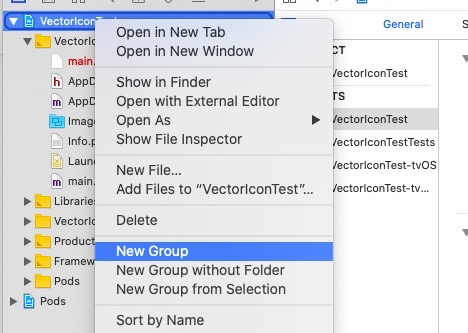
Xcodeが実行されると上のようにプロジェクトを右クリックしてNew Groupメニューを選択して、Fontsの名前でグループを生成します。

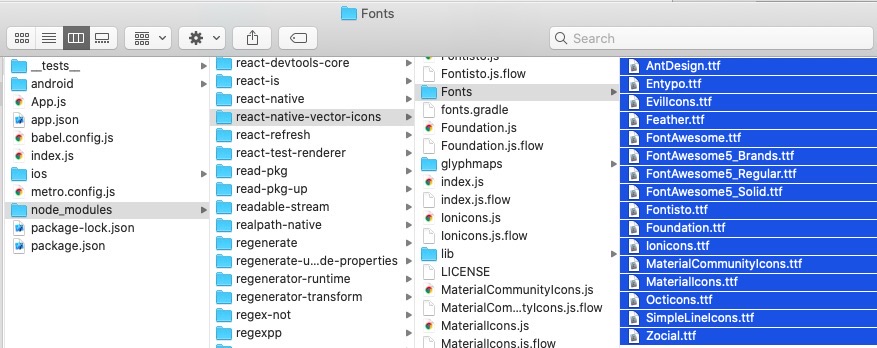
Fontsグループを生成したら、上のようにnode_modules/react-native-vector-icons/Fonts/で移動して下にある全てのフォントをXcodeのFontsグループにドラックします。

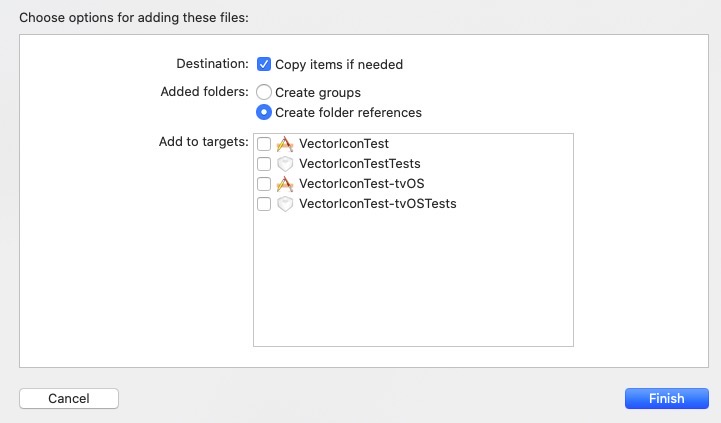
ドラックしたら上のような画面が見えます。Copy items if neededがチェックされた状態で右下のFinishボタンを選択します。
最後にios/[project]/Info.plistファイルを開いて下記の内容を追加します。
<?xml version="1.0" encoding="UTF-8"?>
<!DOCTYPE plist PUBLIC "-//Apple//DTD PLIST 1.0//EN" "http://www.apple.com/DTDs/PropertyList-1.0.dtd">
<plist version="1.0">
<dict>
    ...
  <key>UIViewControllerBasedStatusBarAppearance</key>
  <false/>
  <key>UIAppFonts</key>
  <array>
    <string>AntDesign.ttf</string>
    <string>Entypo.ttf</string>
    <string>EvilIcons.ttf</string>
    <string>Feather.ttf</string>
    <string>FontAwesome.ttf</string>
    <string>FontAwesome5_Brands.ttf</string>
    <string>FontAwesome5_Regular.ttf</string>
    <string>FontAwesome5_Solid.ttf</string>
    <string>Foundation.ttf</string>
    <string>Ionicons.ttf</string>
    <string>MaterialCommunityIcons.ttf</string>
    <string>MaterialIcons.ttf</string>
    <string>Octicons.ttf</string>
    <string>SimpleLineIcons.ttf</string>
    <string>Zocial.ttf</string>
    <string>Fontisto.ttf</string>
  </array>
</dict>Xcodeでcmd + shift + kを押してClean Build Folderを実行します。
Android
アンドロイドはiOSより設定が簡単です。android/app/build.gradleファイルを開いて下記の内容を追加します。
...
apply from: "../../node_modules/react-native/react.gradle"
apply from: "../../node_modules/react-native-vector-icons/fonts.gradle" // add this line
...そしてnode_modules/react-native-vector-icons/Fonts/下にあるフォントファイルをandroid/app/src/main/assets/fontsフォルダへコピーします。(assets/fontsフォルダが無い時はフォルダを生成します。)
最後にアンドロイドプロジェクトをAndroid Studioで開いて自動でGradle syncの実行が終わることを待てます。
アンドロイドプロジェクトをAndroid Studioで開くため下記のコマンドを使うことができます。
# in RN project root folder
open -a /Applications/Android\\ Studio.app ./android
使い方
私たちは基本的使ったことがある場合、ブログを作成します。したがってここには私たちが実際使って分かった内容を追加する予定です。
使い方を詳しく知りたい方は公式サイトを見てください。
- 公式サイト: react-native-vector-icons
Material icons
Material iconを使う方法
...
import Icon from 'react-native-vector-icons/FontAwesome';
...

export default class Home extends React.Component<Props, State> {
    render() {
        return (
            <View>
                <Icon name="home" size={24} color="#ffffff" />
            </View>
        );
    }
}
参考
- 公式サイト: react-native-vector-icons
私のブログが役に立ちましたか?下にコメントを残してください。それは私にとって大きな大きな力になります!
アプリ広報
Dekuが開発したアプリを使ってみてください。Dekuが開発したアプリはFlutterで開発されています。興味がある方はアプリをダウンロードしてアプリを使ってくれると本当に助かります。


