概要
一人で開発した単語勉強アプリがダウンロードは多くなりましたが、DAU(Daily Active User, アクティブユーザー)がそんなに多くないことを見つけました。それでDAU(Daily Active User, アクティブユーザー)を上げるためメッセージ送信(Push Notification)を適用することにしました。しかし、貧乏な開発者なので、サーバーを利用するメッセージ送信(Push Notification)じゃなくアプリ(App)自体からメッセージを送信する方法(Local Push Notification)で実装することにしました。ここで紹介する方法が適用された私のアプリです。もし、興味がある方はダウンロードして見てください。
- 일본어 단어 공부, 일단 공부: https://deku.posstree.com/app/ildangongbu/
- 韓国語単語勉強、カンタン勉強: https://deku.posstree.com/app/kantanbenkyo/
- TOPIK単語勉強、TOPIK単語1/2: https://deku.posstree.com/app/topik12/
- TOPIK単語勉強、TOPIK単語3/4: https://deku.posstree.com/app/topik34/
- TOPIK単語勉強、TOPIK単語5/6: https://deku.posstree.com/app/topik56/
このブログポストではreact-native-push-notificationのライブラリを使ってアプリ(App)自体からメッセージを送信する方法(Local Push Notification)について説明します。
- react-native-push-notification: https://github.com/zo0r/react-native-push-notification
ライブラリインストール
下記のコマンドでreact-native-push-notificationのライブラリをインストールします。
npm install --save react-native-push-notification
0.60以上ライブラリリンク
下記のコマンドでreact-native-push-notificationを使うため追加ライブラリをインストールします。
npm install --save @react-native-community/push-notification-ios
そして下記のコマンドでインストールした@react-native-community/push-notification-iosライブラリをリンクします。
react-native link @react-native-community/push-notification-ios
最後に、下記のコマンドを実行します。
cd ios
pod install
cd ..
0.59以下ライブラリリンク
下記のコマンドでreact-native-push-notificationのライブラリを連結(Link)します。
react-native link react-native-push-notification
上の実行したコマンドの結果を見たら分かると思いますが、アンドロイド(Android)だけ連結(Link)されました。
info Linking "react-native-push-notification" Android dependency
info Android module "react-native-push-notification" has been successfully linked
iOSは下記のリンクを参考して進める必要があります。
- iOS manual Installation: https://facebook.github.io/react-native/docs/linking-libraries-ios#manual-linking
まず、/ios/[project-name].xcworkspaceや/ios/[project-name].xcodeprojを実行してxcodeを起動します。

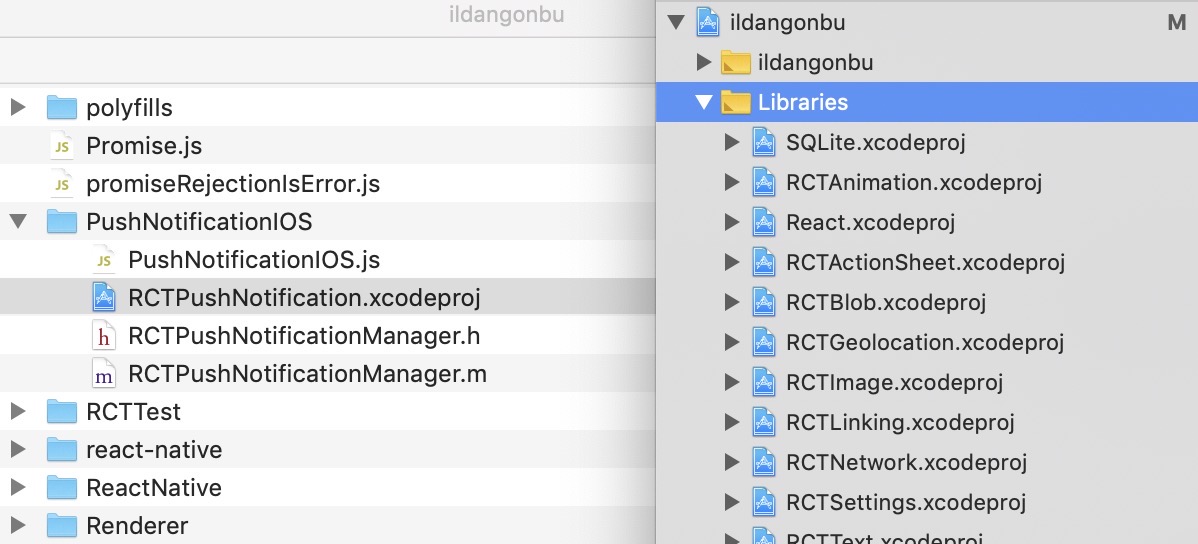
上のようにnode_modules/react-native/libraries/PushNotificationIOS/RCTPushNotification.xcodeprojをxcodeのプロジェクト名下のlibrariesにドラックして追加します。注意点はnode_modulesのreact-native-push-notificationではなくreact-nativeです。
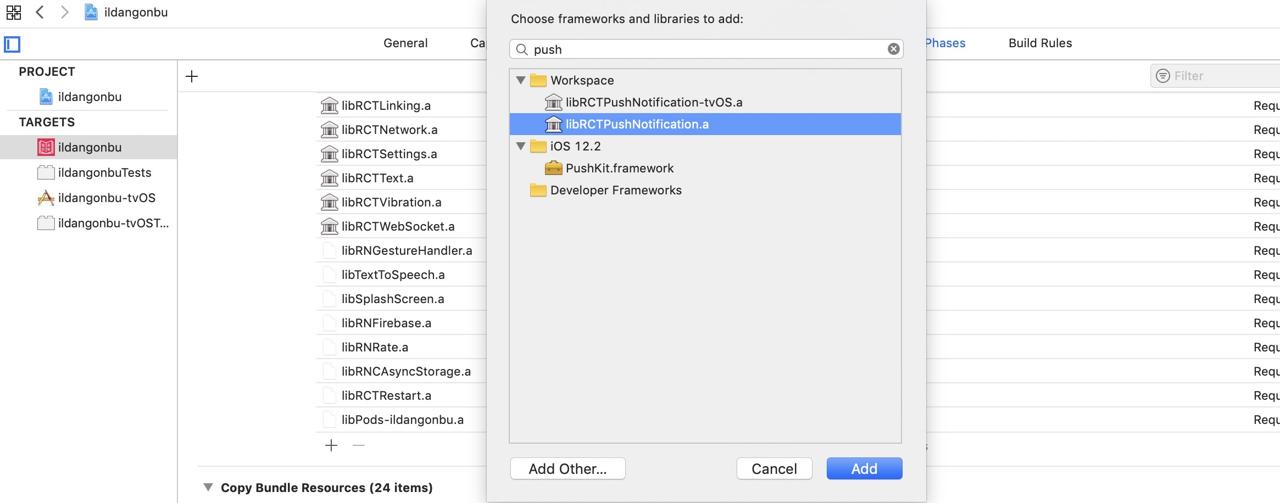
次は下記のようにプロジェクト名 > Build Phases > Link Binary with Librariesを選択します。

下にある+ボタンを押してPushで検索します。検索結果にあるlibRCTPushNotification.aを選択してAddを押して追加します。

アンドロイド権限設定
アンドロイドでlocal push messageを使うためには、./android/app/src/main/AndroidManifest.xmlファイルを開いて下記のように修正します。
<manifest xmlns:android="http://schemas.android.com/apk/res/android"
  package="CHANGE YOUR INFO!!">
    ...
    <uses-permission android:name="android.permission.VIBRATE" />
    <uses-permission android:name="android.permission.RECEIVE_BOOT_COMPLETED"/>

    <application
      android:name=".MainApplication"
      android:label="@string/app_name"
      android:icon="@mipmap/ic_launcher"
      android:allowBackup="false"
      android:theme="@style/AppTheme">

      <meta-data  android:name="com.dieam.reactnativepushnotification.notification_channel_name"
            android:value="CHANGE YOUR INFO!!"/>
      <meta-data  android:name="com.dieam.reactnativepushnotification.notification_channel_description"
                  android:value="CHANGE YOUR INFO!!"/>
      <receiver android:name="com.dieam.reactnativepushnotification.modules.RNPushNotificationPublisher" />
      <receiver android:name="com.dieam.reactnativepushnotification.modules.RNPushNotificationBootEventReceiver">
          <intent-filter>
              <action android:name="android.intent.action.BOOT_COMPLETED" />
          </intent-filter>
      </receiver>
      <service android:name="com.dieam.reactnativepushnotification.modules.RNPushNotificationRegistrationService"/>
      <service
          android:name="com.dieam.reactnativepushnotification.modules.RNPushNotificationListenerService"
          android:exported="false" >
          <intent-filter>
              <action android:name="com.google.firebase.MESSAGING_EVENT" />
          </intent-filter>
      </service>

      <activity
        android:name=".MainActivity"
      ...
</manifest>
上記のように修正したら、CHANGE YOUR INFO!!の部分へ自分の情報を入力します。私は3つ、全てPackage IDで変更して使っています。
react-native-push-notificationの使い方
下記のコードは実際私が使ってるコードです。
import { AppState, PushNotificationIOS } from 'react-native';
import PushNotification from 'react-native-push-notification';

const _handleAppStateChange = nextAppState => {
  if (nextAppState === 'active') {
    _registerLocalNotification();
  }
};

const _registerLocalNotification = () => {
  PushNotification.setApplicationIconBadgeNumber(0);
  PushNotification.cancelAllLocalNotifications();

  const messages = [
    'ちょっと時間を作って韓国語を勉強するのはどうですか?',
    '今日韓国語は勉強しましたか?',
    '韓国語の単語を勉強しましょう',
    '単語の勉強は毎日毎日するのが重要です。',
    '新しい単語や暗記した単語を復習してみてください。',
    '韓国語を勉強する時間です。',
    'テスト機能であなたの実力を試してみてください。',
    '韓国語単語たちがあなたを待っています。',
    '韓国語、難しくないです。勉強して見ましょう。',
    '韓国語マスターになるため!',
  ];
  const message = messages[Math.floor(Math.random() * messages.length)];

  let nextHour = new Date();
  nextHour.setDate(nextHour.getDate() + 1);
  nextHour.setHours(nextHour.getHours() - 1);


  PushNotification.localNotificationSchedule({
    /* Android Only Properties */
    vibrate: true,
    vibration: 300,
    priority: 'hight',
    visibility: 'public',
    importance: 'hight',

    /* iOS and Android properties */
    message, // (required)
    playSound: false,
    number: 1,
    actions: '["OK"]',

    // for production
    repeatType: 'day', // (optional) Repeating interval. Check 'Repeating Notifications' section for more info.
    date: nextHour,

    // test to trigger each minute
    // repeatType: 'minute',
    // date: new Date(Date.now()),

    // test to trigger one time
    // date: new Date(Date.now() + 20 * 1000),
  });
};
export default {
  register: async () => {
    PushNotification.configure({
      onNotification: function(notification) {
        notification.finish(PushNotificationIOS.FetchResult.NoData);
      },
      popInitialNotification: true,
    });

    _registerLocalNotification();

    AppState.addEventListener('change', _handleAppStateChange);
  },
  unregister: () => {
    AppState.removeEventListener('change', _handleAppStateChange);
  },
};
一つずつ詳しく見て見ましょう。
import PushNotification from 'react-native-push-notification';
...
export default {
  register: () => {
    PushNotification.configure({
      onNotification: function(notification) {
        notification.finish(PushNotificationIOS.FetchResult.NoData);
      },
      popInitialNotification: true,
    });
    _registerLocalNotification();
    ...
  },
  ...
};
まず、このソースコードをモジュール化しました。register()のファンクションを実行するとPushNotificationを初期化してアプリ(App)自体お知らせ(Local Push Notification)を登録するファンクションを呼びます。
const _registerLocalNotification = () => {
  PushNotification.setApplicationIconBadgeNumber(0);
  PushNotification.cancelAllLocalNotifications();

  const messages = [
    ...
  ];
  const message = messages[Math.floor(Math.random() * messages.length)];

  let nextHour = new Date();
  nextHour.setDate(nextHour.getDate() + 1);
  nextHour.setHours(nextHour.getHours() - 1);


  PushNotification.localNotificationSchedule({
    /* Android Only Properties */
    vibrate: true,
    vibration: 300,
    priority: 'hight',
    visibility: 'public',
    importance: 'hight',

    /* iOS and Android properties */
    message, // (required)
    playSound: false,
    number: 1,
    actions: '["OK"]',

    // for production
    repeatType: 'day', // (optional) Repeating interval. Check 'Repeating Notifications' section for more info.
    date: nextHour,

    // test to trigger each minute
    // repeatType: 'minute',
    // date: new Date(Date.now()),

    // test to trigger one time
    // date: new Date(Date.now() + 20 * 1000),
  });
};
アプリ(App)自体お知らせ(Local Push Notification)を登録するため_registerLocalNotificationのファンクションを実行すると、
PushNotification.setApplicationIconBadgeNumber(0);
PushNotification.cancelAllLocalNotifications();
バッジ(Badge)を初期化して、既存に登録したお知らせ(Notification)を全て無くします。既存のお知らせ(Notification)を無くした理由はアプリを実行するたびに登録をして重複されて同じメッセージが発信される問題がありました。AsyncStorageを使ってコントロールするかとも思いましたが、ただ全てを無くして新しく登録する方法を採用しました。
...
const messages = [
...
];
const message = messages[Math.floor(Math.random() * messages.length)];

let nextHour = new Date();
nextHour.setDate(nextHour.getDate() + 1);
nextHour.setHours(nextHour.getHours() - 1);
...
お知らせのメッセージをランダムで表示するため変数と、アプリ(App)が実装された時間を基準に次の日同じ時間より1時間早くお知らせを送るように設定しました。
PushNotification.localNotificationSchedule({
    /* Android Only Properties */
    vibrate: true,
    vibration: 300,
    priority: 'hight',
    visibility: 'public',
    importance: 'hight',

    /* iOS and Android properties */
    message, // (required)
    playSound: false,
    number: 1,
    actions: '["OK"]',

    // for production
    repeatType: 'day', // (optional) Repeating interval. Check 'Repeating Notifications' section for more info.
    date: nextHour,

    // test to trigger each minute
    // repeatType: 'minute',
    // date: new Date(Date.now()),

    // test to trigger one time
    // date: new Date(Date.now() + 20 * 1000),
});
アプリ自体お知らせ(Local Push Notification)を登録します。色んなオプションがあります。下記のリンクを参考してください。
私は本番(Production)では
repeatType: 'day', // (optional) Repeating interval. Check 'Repeating Notifications' section for more info.
date: nextHour,
毎日、最後に起動した時間より1時間早くメッセージ(Local Push Notification)を表示するようにしました。テストする時は、
// test to trigger one time
date: new Date(Date.now() + 20 * 1000),
20秒後メッセージ(Local Push Notification)を表示するようにするか
// test to trigger each minute
repeatType: 'minute',
date: new Date(Date.now()),
今から毎分、メッセージを表示してテストしました。
import { AppState, PushNotificationIOS } from 'react-native';
...
const _handleAppStateChange = nextAppState => {
  if (nextAppState === 'active') {
    _registerLocalNotification();
  }
};
...
export default {
  register: async () => {
   ...
    AppState.addEventListener('change', _handleAppStateChange);
  },
  unregister: () => {
    AppState.removeEventListener('change', _handleAppStateChange);
  },
};
AppStateを使ってアプリ(App)がバックグラウンド(Background)から戻ってくる時、アクティブ(Active)になる時をチェックしてアプリ(App)内部お知らせ機能(Local Push Notification)を再登録するようにしました。このようにした理由はアプリのメッセージ(Local Push Notification)をランダムに表示するためです。
アプリ(App)に適用する
上で作ったモジュール化したアプリ(App)内部お知らせ機能(Local Push Notification)を使うためアプリ(App)が実行される時必ず実行されるコンポーネント(Component)に下記のように使っています。
...
import LocalNotification from '~/Util/LocalNotification';
...
export default class LevelScreen extends React.Component<Props, State> {
    ...
    componentWillUnmount() {
        LocalNotification.unregister();
        ...
    }
    componentDidMount() {
        LocalNotification.register();
        ...
    }
}
アンドロイドのic_launcherアイコン
アンドロイド(Android)のお知らせ(Push Notification)を見ると左上に小さいアイコンが表示されることが確認できます。このアイコンを作るためgenerator-rn-toolboxを使いました。
- generator-rn-toolbox: https://github.com/bamlab/generator-rn-toolbox/blob/master/generators/assets/README.md#generate-android-notification-icons
96x96 pxサイズのpngファイルを作って下記のサイズでこのイメージがic_launcherとしてうまく表示されるか確認します。
- icons-notification: http://romannurik.github.io/AndroidAssetStudio/icons-notification.html#source.type=image&source.space.trim=0&source.space.pad=-0.1&name=ic_stat_ic_notification
最後に、下記のコマンドでic_launcherアイコンを生成します。
yo rn-toolbox:assets --android-notification-icon icon.jpg
generator-rn-toolboxのインストールや使い方については以前のブログポストを参考してください。
確認
確認のためアプリ(App)内部お知らせ機能(Local Push Notification)を登録する時、下記のオプションを使いました。
repeatType: 'minute',
date: new Date(Date.now()),
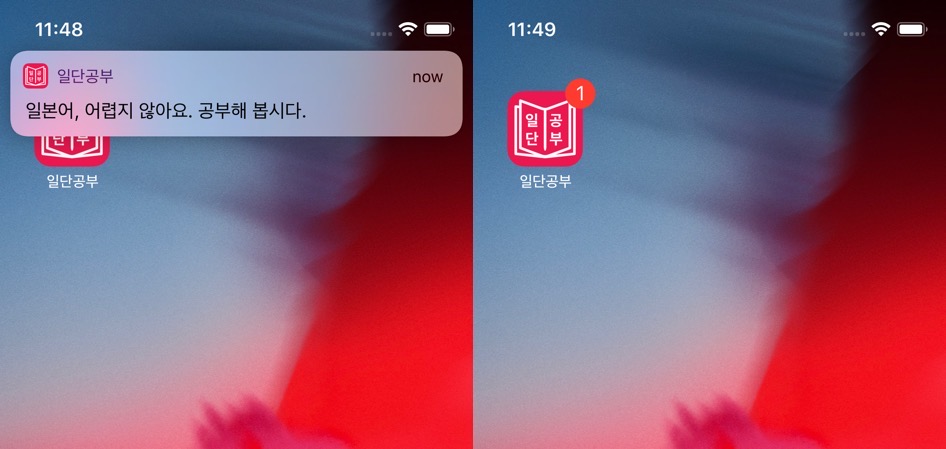
アプリ(App)を実行して、アプリ(App)を無効化(終了やバックグラウンド)すると、1分後下記のようにメッセージ(Local Push Notification)が表示されることが確認できます。

アプリ(App)を必ず実行する必要があることとアプリ(App)を無効化する必要があることを注意してください。
問題点
アプリ(App)を実行する時、アプリ(App)内部お知らせ(Local Push Notification)が登録されます。この時メッセージも一緒に登録されますが、アプリ(App)を再起動させてアプリ(App)内部お知らせ(Local Push Notification)を再登録しないといつも同じメッセージが表示されます。
もっと色んなメッセージを表示したいですが、アプリ(App)を再起動しないユーザーにはいつも同じメッセージが見える不便さがあります。
完了
結構いいライブラリと思います。アプリ(App)内部メッセージ以外も外部メッセージ(Push Notification)も処理することができるみたいです。後でこの貧乏をだ脱出すると、サーバーを使ってメッセージ(Push Notification)も実装して見たいですね。
また, この機能でDAU(Daily Active User, アクティブユーザー)が上がるかイライラさせてアプリ(App)を削除することになるかもうちょっと見てみる必要があります。
私のブログが役に立ちましたか?下にコメントを残してください。それは私にとって大きな大きな力になります!
アプリ広報
Dekuが開発したアプリを使ってみてください。Dekuが開発したアプリはFlutterで開発されています。興味がある方はアプリをダウンロードしてアプリを使ってくれると本当に助かります。


