目次
概要
React Nativeでアプリ内課金を実装するためreact-native-iapを使う方法に関して説明します。
アプリ内商品を生成する
アプリ内課金を実装するためには、まずアプリ内商品を生成する必要があります。各プラットフォームに合わせてアプリ内商品を作る方法について説明します。
iOSのアプリない商品を生成する
契約、税金や金融取引の設定
iOSでアプリ内商品を作るためには、まず、契約、税金や金融取引を設定する必要があります。契約、税金や金融取引App Store Connectへ移動します。
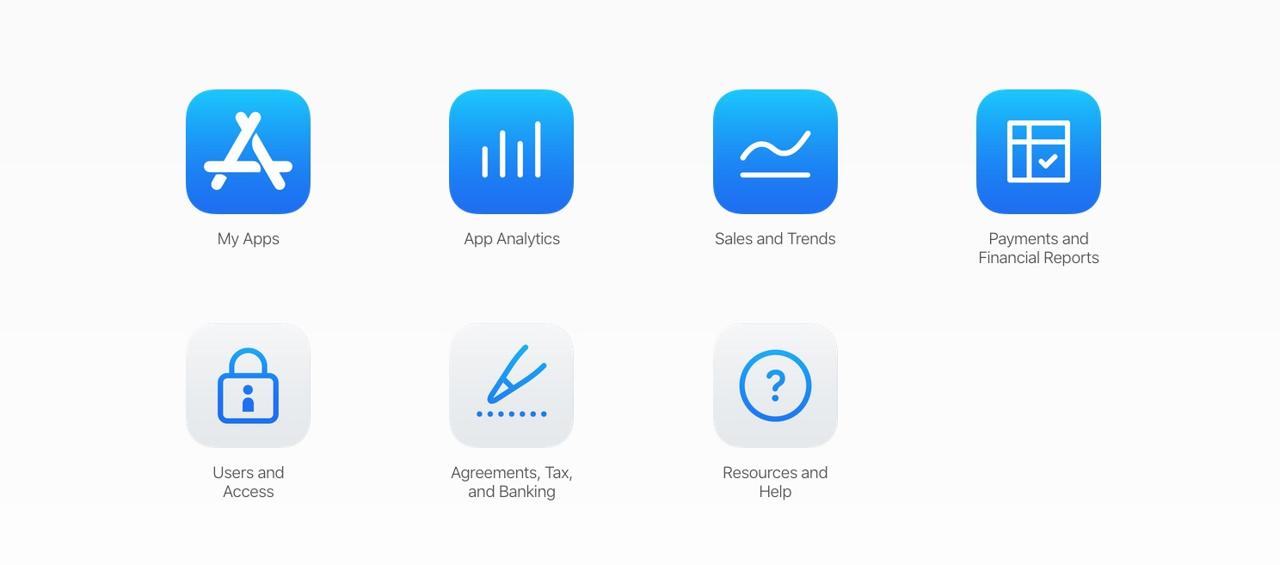
下にある契約、税金や金融取引(Agreements, Tax, and Banking)を選択して移動します。

私はすでに設定したので、上のような画面が表示されますが、皆さんは有料アプリ(Paid Apps)を設定する必要があります。必要な項目をうまく入力したら問題なく設定することができます。
アプリ内の購入アイテム生成
次はアプリ内の購入アイテムを生成する必要があります。アプリ内課金を実装するアプリを選択します。
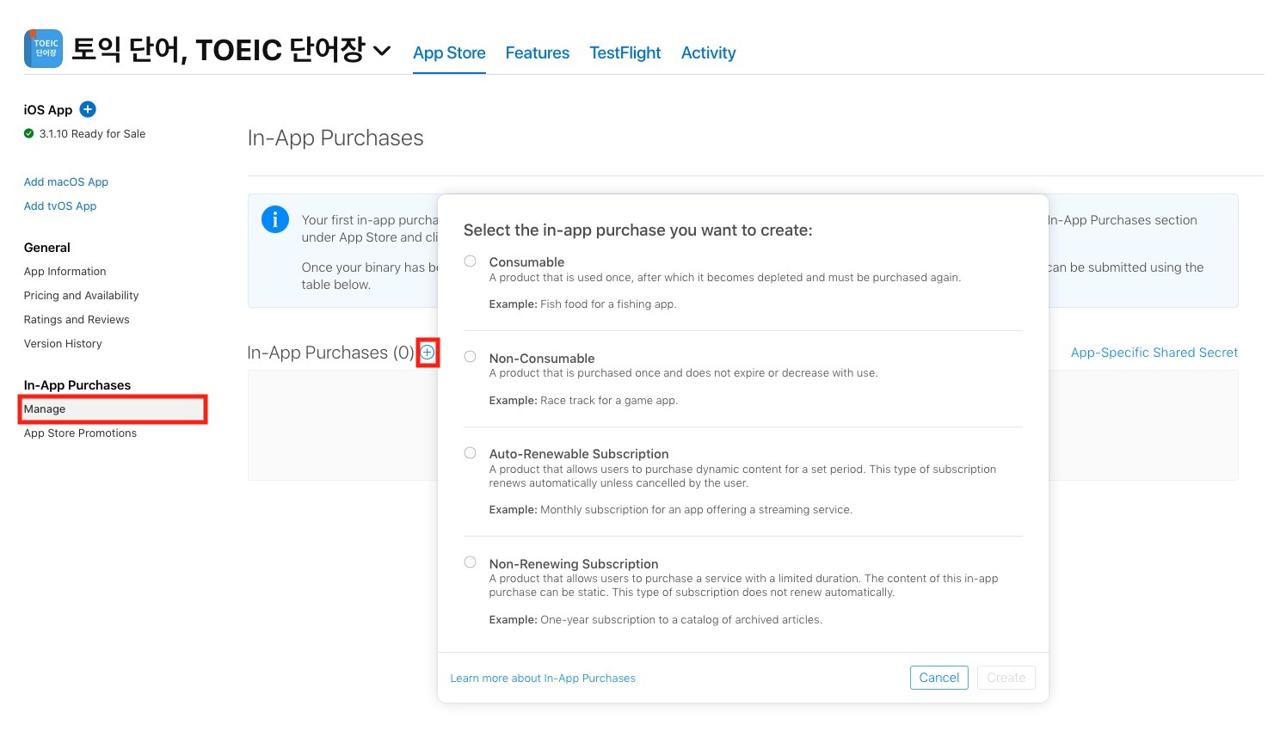
左下のアプリ内課金(In-App Purchases)の管理(Manage)を選択してプラスボタン(+)を押すと、上のように追加する商品を選ぶ画面がでます。
私は私のアプリへ自動更新購読(Auto-Renewable Subscription)を追加し他ので、自動更新購読を中心に説明します。他の商品を追加することになると、このブログポストへ追加します。
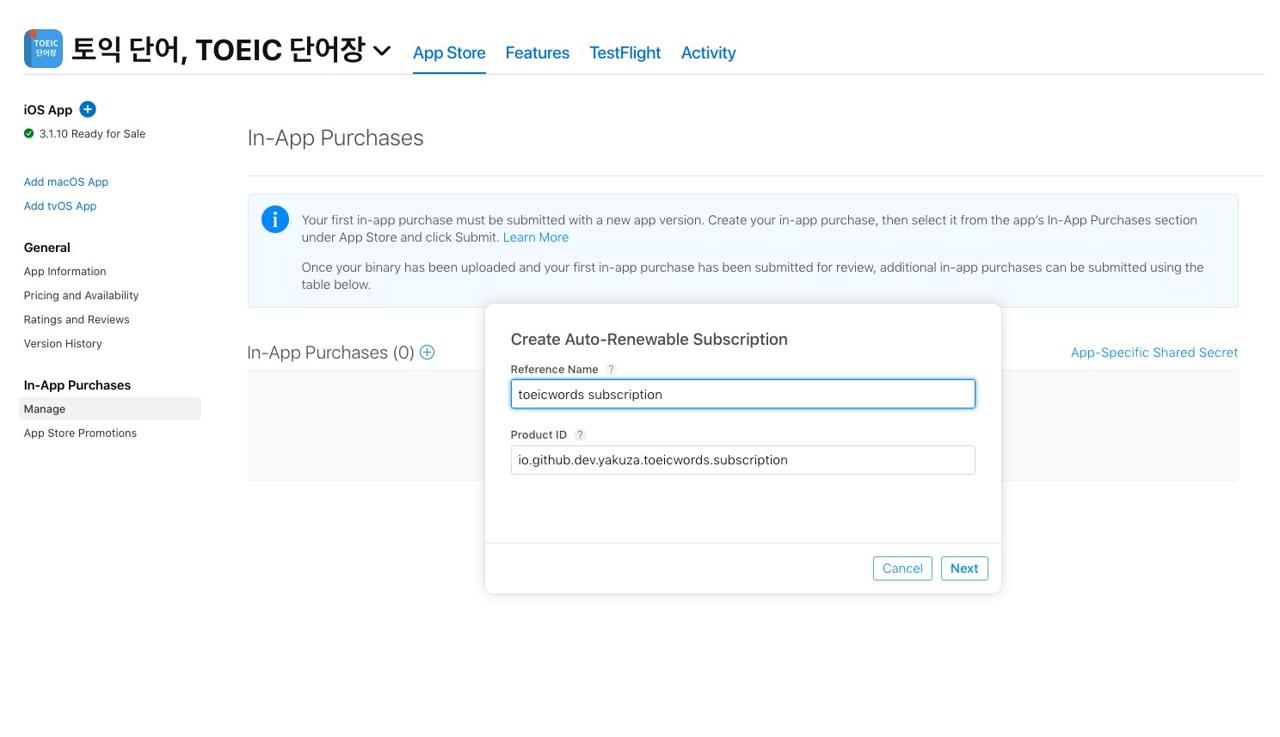
ここで識別情報(Reference Name)はApp Store connectだけ表示される名前なので、自分が分かりやすい名前に設定します。商品ID(Product ID)はアプリ中でアプリ内商品を取ってくる時、使います。
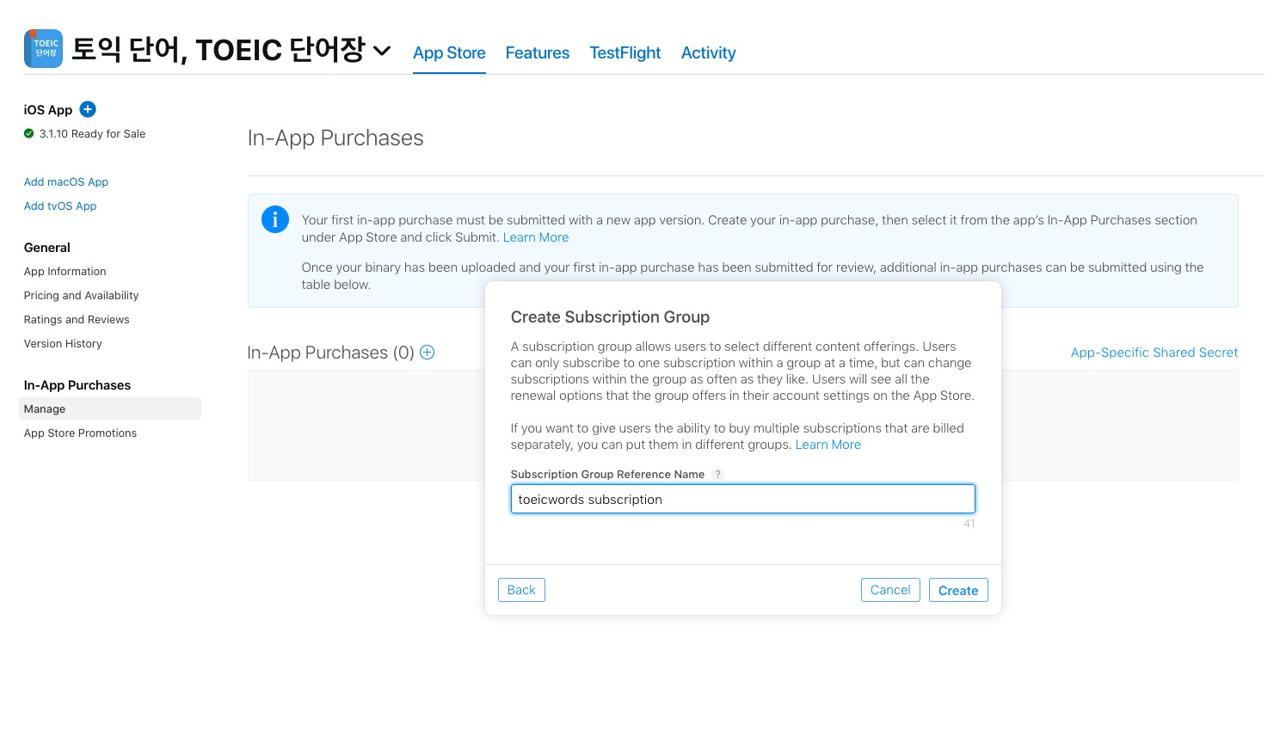
その後、購読グループ識別情報(Subscription Group Reference Name)を入力します。識別情報(Reference Name)と同じように、App Store connect中だけ表示されるので、自分が分かりやすい名前を設定します。
アプリ内課金メタデータを入力する
上のようにアプリ中購入アイテムを生成したら、次はアプリ中購入アイテムのメタデータを入力する必要があります。
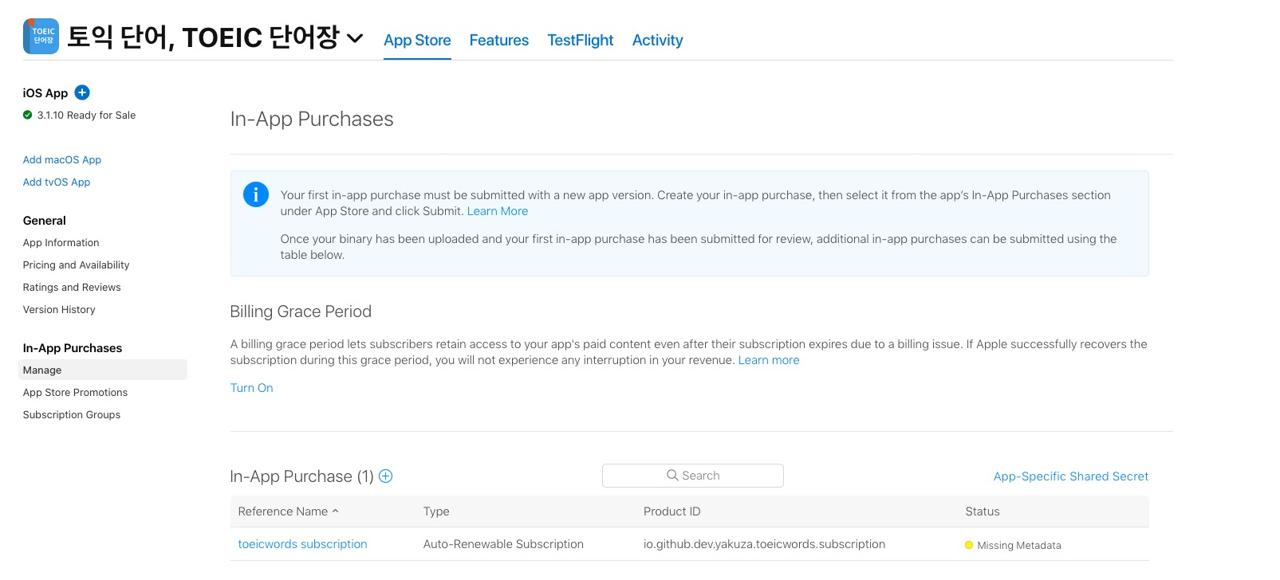
左メニューでまた、アプリ内課金(In-App Purchases)の管理(Manage)を押すと上のようにメタデータ(Metadata)が入力されてないことが確認できます。ここで、識別情報の名前を選択して当該項目の詳細ページへ移動します。
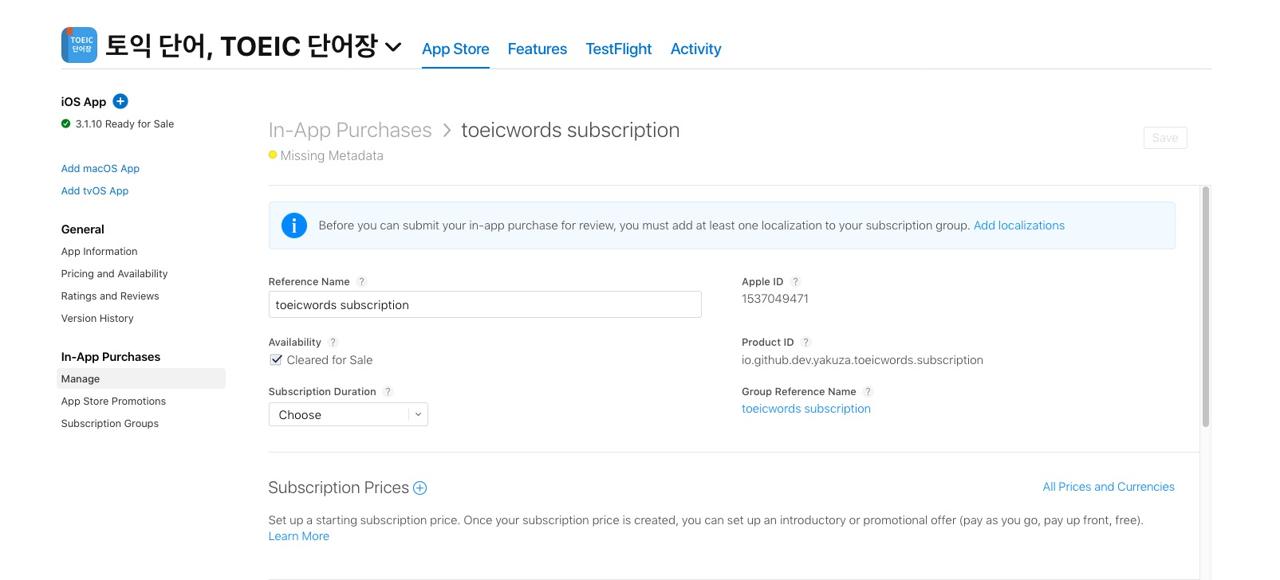
上のような詳細ページへ移動したらアプリ内課金アイテムへ必要な情報を入力します。
- 購読期間(Subscription Duration)
- 購読価格(Subscription Prices)
- App Store情報(App Store Information)のローカリゼーション(Localizations)
- 審査情報
ここでApp store情報はアプリ内でも、アプリストアでも表示される名前と説明なので、注意して作成します。この名前と説明をアプリ中でreact-native-iapを使って取ってきますが、この内容をそのまま表示しないとRejectされる可能性があります。
私はRejectを避けるため、審査情報を詳しく作成しました。どうすれば、購入画面を見ることができるか、購入ページにはどんな内容が含めてあるかを作成しました。
- Title of publication or service
- Length of subscription (time period and/or content/services provided during each subscription period)
- Price of subscription, and price per unit if appropriate
- Payment will be charged to iTunes Account at confirmation of purchase
- Subscription automatically renews unless auto-renew is turned off at least 24-hours before the end of the current period
- Account will be charged for renewal within 24-hours prior to the end of the current period, and identify the cost of the renewal
- Subscriptions may be managed by the user and auto-renewal may be turned off by going to the user’s Account Settings after purchase
- Links to Your Privacy Policy and Terms of Use
- Any unused portion of a free trial period, if offered, will be forfeited when the user purchases a subscription to that publication, where applicable
上の内容でRejectされるので上の内容が含まれているか、どこので確認できるかスクリンショットをと説明を使って詳しく作成しました。
iOSアプリ権限の設定
次はアプリ内でアプリ内課金を使うため必要な権限を設定する必要があります。
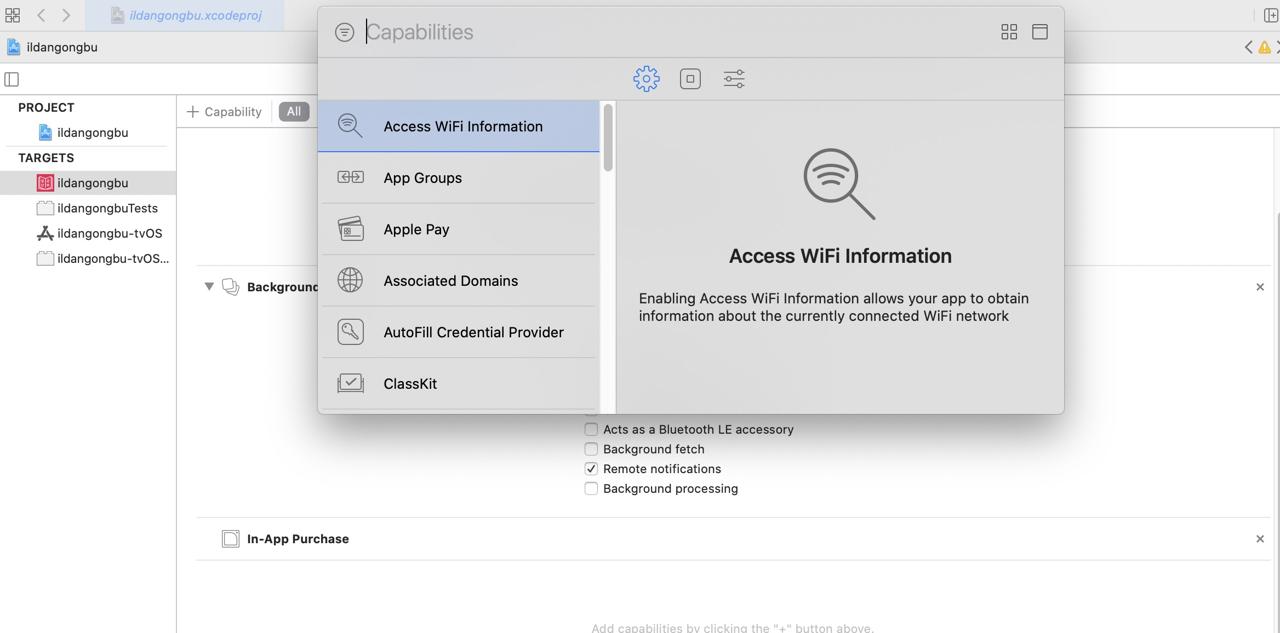
Xcodeでプロジェクトを開いてSigning & CapabilitiesへIn-App Purchaseの権限を追加します。
アンドロイドのアプリ内商品生成
Payments設定
アプリ内課金で収入が発生すると、その収入が入金されるPaymentsの情報を設定する必要があります。Google Play Consoleで設定(Settings) > 開発者アカウント(Developer account) > Payments設定(Payments settings)を選択してPayments情報を設定します。
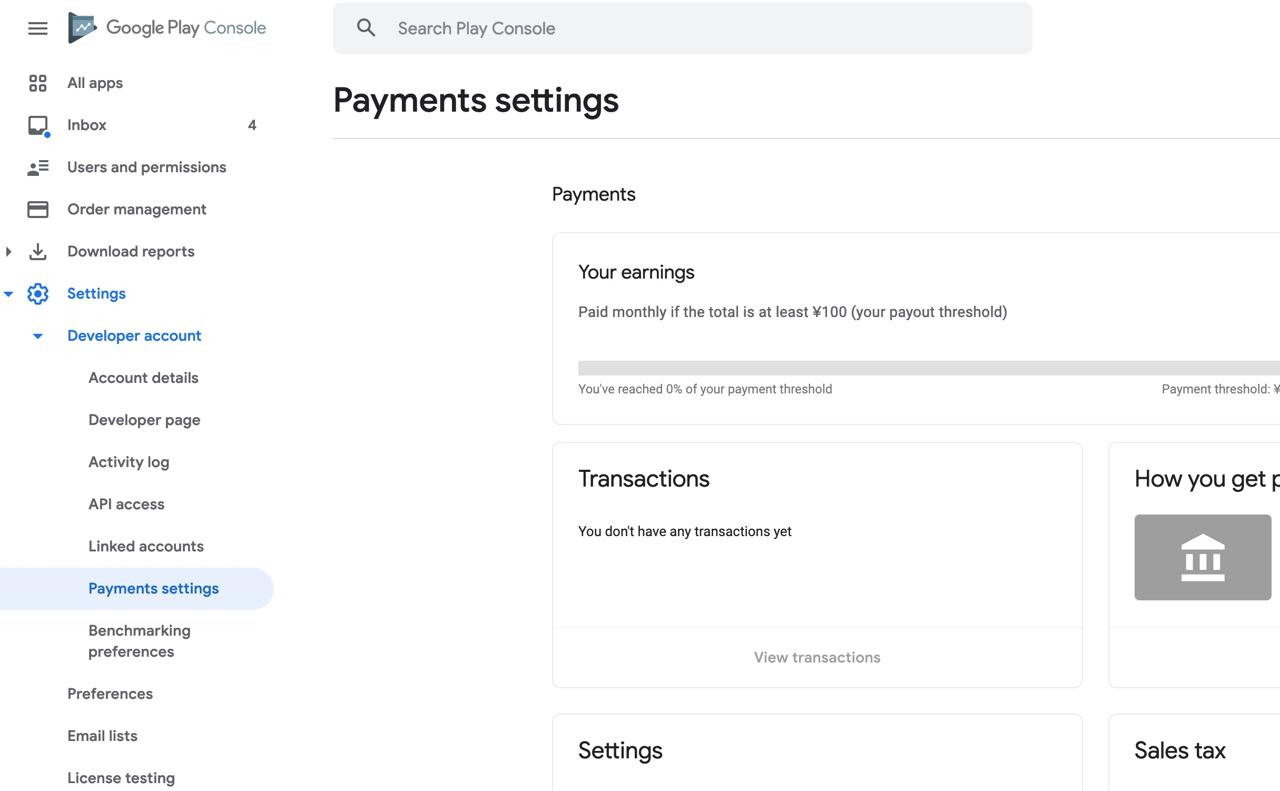
私はGoogle Adsenseを連動してるので、設定したPayments情報を使うことができました。
アンドロイドのアプリ権限設定
アンドロイドでアプリ内課金を生成するためGoogle Play Consoleへ移動したいアプリを選択して、左の購読(Subscriptions)メニューを選択したら下記のような画面が確認できます。
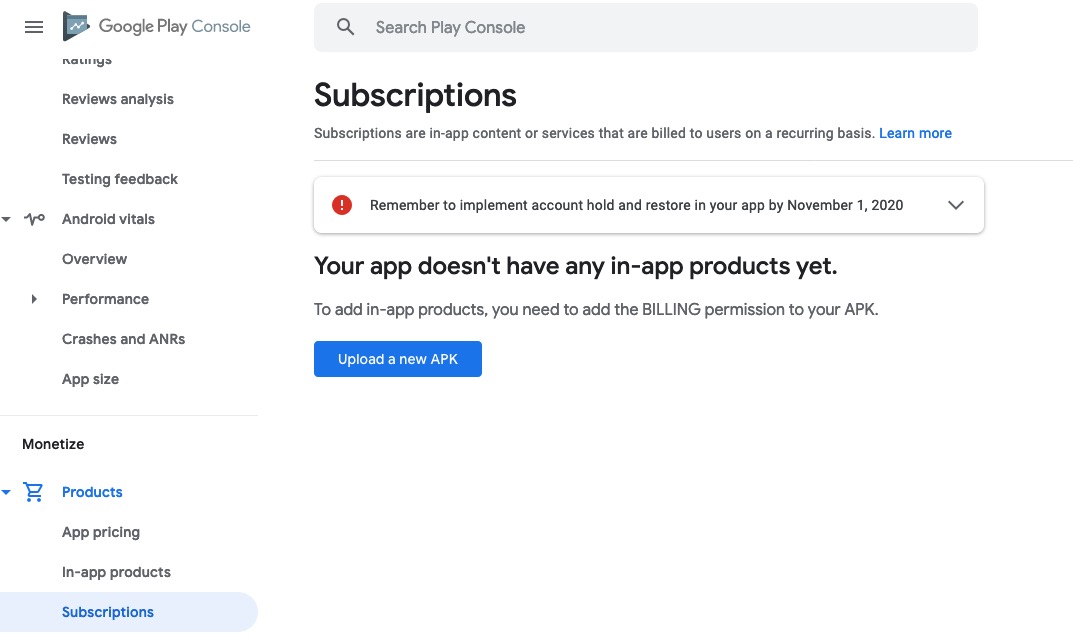
アンドロイドでアプリ内課金を生成するためにはBILLINGの権限が設定されたアプリがGoogle Playへアップロードする必要があります。まず、android/app/src/main/AndroidManifest.xmlのファイルを開いて下記のようにBILLINGの権限を追加します。
<manifest xmlns:android="http://schemas.android.com/apk/res/android"
  package="io.github.dev.yakuza.toeicwords">
  ...
  <uses-permission android:name="com.android.vending.BILLING"/>
  ...
  <application
      android:name=".MainApplication"
このように権限を設定して、ビルドしてGoogle Playへアップロードします。

アップロードが完了されると上のように購読(Subscriptions)メニューが変わったことが確認できます。
アンドロイドでアプリ内課金アイテムを生成する
次は購読(Subscriptions)メニューで購読生成(Create subscription)ボタンを押して購読アイテムを生成します。 이제 구독(Subscriptions) 메뉴에서 구독 만들기(Create subscription) 버튼을 눌러 구독 항목을 생성합니다.

そして購読アイテムへ必要な情報を入力して購読アイテムを生成します。
- 商品ID / Product ID
- 購読詳細情報(名前、説明) / Subscription details(Name, Description)
- 金額(決済期間、基本金額) / Price(Billing period, Default price)
iOSと同じように商品ID(Product ID)はアプリ内課金で使うIDです。私は普通、iOSと同じIDを使います。react-native-iapを使って購読の詳細情報、金額などを取ってくる時使います。(これを表示しない場合Rejectとされるかどうかは知らないですが、私はこの情報をiOSと同じように表示してます。)
コーディング
react-native-iapのインストール
次のコマンドを使ってreact-native-iapをインストールします。
npm install react-native-iap --save
そして次のコマンドを使ってiOSへ必要なライブラリをインストールします。
npx pod-install
JavaScript
下記のコードは実際、私が使ってるコードです。
import React, { createContext, useState, useEffect, useCallback, useRef, useContext } from 'react';
import AsyncStorage from '@react-native-async-storage/async-storage';
import {
  Alert,
  EmitterSubscription,
  Platform,
  Linking,
  ActivityIndicator,
  AppState,
} from 'react-native';
import Styled from 'styled-components/native';
import Icon from 'react-native-vector-icons/MaterialCommunityIcons';
import SplashScreen from 'react-native-splash-screen';

import ENV from '~/env';
import { ThemeContext } from '~/Context';
import { ActionSheet } from '~/Component';

import RNIap, {
  InAppPurchase,
  SubscriptionPurchase,
  finishTransaction,
  purchaseErrorListener,
  purchaseUpdatedListener,
  Subscription,
  PurchaseError,
} from 'react-native-iap';

import { checkReceipt } from './checkReceipt';

let purchaseUpdateSubscription: EmitterSubscription;
let purchaseErrorSubscription: EmitterSubscription;

const itemSubs = Platform.select({
  default: [ENV.subscriptionId],
});

const Container = Styled.View`
`;
const TitleContainer = Styled.View`
  justify-content: center;
  align-items: center;
  padding: 16px;
`;
const Title = Styled.Text`
  font-size: 16px;
  font-weight: bold;
  color: ${({ theme }: { theme: Theme }): string => theme.black};
`;
const SubTitle = Styled.Text`
  font-size: 16px;
  color: ${({ theme }: { theme: Theme }): string => theme.black};
`;
const DescriptionContainer = Styled.View`
  padding: 0 24px;
  width: 100%;
`;
const Description = Styled.Text`
  font-size: 14px;
  color: ${({ theme }: { theme: Theme }): string => theme.black};
`;
const PurchaseButton = Styled.TouchableOpacity`
  margin: 16px;
  padding: 16px;
  border-radius: 10px;
  background-color: ${({ theme }: { theme: Theme }): string => theme.black};
  justify-content: center;
  align-items: center;
`;
const PurchaseLabel = Styled.Text`
  color: ${({ theme }: { theme: Theme }): string => theme.white};
  font-size: 16px;
`;
const Terms = Styled.Text`
  font-size: 12px;
  color: ${({ theme }: { theme: Theme }): string => theme.black};
`;
const Link = Styled.Text`
  color: ${({ theme }: { theme: Theme }): string => theme.primary};
`;
const LoadingContainer = Styled.View`
  position: absolute;
  top: 0;
  left: 0;
  right: 0;
  bottom: 0;
  justify-content: center;
  align-items: center;
`;
const LoadingBackground = Styled.View`
  position: absolute;
  top: 0;
  left: 0;
  right: 0;
  bottom: 0;
  background-color: ${({ theme }: { theme: Theme }): string =>
    theme.isLightTheme ? theme.black : theme.white};
  opacity: 0.8;
`;

interface Props {
  children: JSX.Element | Array<JSX.Element>;
}

const IAPContext = createContext<IAPContext>({
  isSubscription: false,
  subscription: undefined,
  showPurchase: () => {},
});

const IAPProvider = ({ children }: Props): JSX.Element => {
  const [showLoading, setShowLoading] = useState<boolean>(false);
  const [isSubscription, setIsSubscription] = useState<boolean>(false);
  const [subscription, setSubscription] = useState<Subscription | undefined>(undefined);
  const actionSheetRef = useRef<ActionSheet>(null);
  const { theme } = useContext<ThemeContext>(ThemeContext);

  const showPurchase = () => {
    actionSheetRef.current?.open();
  };

  const _checkReceipt = async () => {
    const isValidated = await checkReceipt();

    setIsSubscription(isValidated);
    setTimeout(() => {
      SplashScreen.hide();
    }, 1000);
  };

  const _requestSubscription = () => {
    setShowLoading(true);
    if (subscription) {
      RNIap.requestSubscription(subscription.productId);
    }
  };

  const _restorePurchases = () => {
    setShowLoading(true);
    RNIap.getAvailablePurchases()
      .then((purchases) => {
        console.debug('restorePurchases');
        let receipt = purchases[0].transactionReceipt;
        if (Platform.OS === 'android' && purchases[0].purchaseToken) {
          receipt = purchases[0].purchaseToken;
        }
        AsyncStorage.setItem('receipt', receipt);
        setShowLoading(false);
        setIsSubscription(true);
        Alert.alert(
          ENV.language['restore successful'],
          ENV.language['you have successfully restored your purchase history'],
          [{ text: ENV.language['ok'], onPress: () => actionSheetRef.current?.close() }],
        );
      })
      .catch((err) => {
        console.debug('restorePurchases');
        console.error(err);
        setShowLoading(false);
        setIsSubscription(false);
        AsyncStorage.removeItem('receipt');
        Alert.alert(ENV.language['restore failed'], ENV.language['restore failed reason']);
      });
  };

  const _initIAP = useCallback(async (): Promise<void> => {
    RNIap.clearProductsIOS();

    try {
      const result = await RNIap.initConnection();
      await RNIap.flushFailedPurchasesCachedAsPendingAndroid();
      if (result === false) {
        Alert.alert(ENV.language["couldn't get in-app-purchase information"]);
        return;
      }
    } catch (err) {
      console.debug('initConnection');
      console.error(err.code, err.message);
      Alert.alert(ENV.language['fail to get in-app-purchase information']);
    }

    purchaseUpdateSubscription = purchaseUpdatedListener(
      (purchase: InAppPurchase | SubscriptionPurchase) => {
        console.debug('purchaseUpdatedListener');
        setShowLoading(false);
        setTimeout(() => {
          actionSheetRef.current?.close();
        }, 400);
        const receipt =
          Platform.OS === 'ios' ? purchase.transactionReceipt : purchase.purchaseToken;
        if (receipt) {
          finishTransaction(purchase)
            .then(() => {
              AsyncStorage.setItem('receipt', receipt);
              setIsSubscription(true);
            })
            .catch(() => {
              setIsSubscription(false);
              Alert.alert(
                ENV.language['purchase is failed'],
                ENV.language['the purchase is failed'],
              );
            });
        }
      },
    );

    purchaseErrorSubscription = purchaseErrorListener((error: PurchaseError) => {
      console.debug('purchaseErrorListener');
      console.error(error);
      setShowLoading(false);
      if (error.code !== 'E_USER_CANCELLED') {
        Alert.alert(ENV.language['purchase is failed'], ENV.language['the purchase is failed']);
      }
    });

    const subscriptions = await RNIap.getSubscriptions(itemSubs);
    setSubscription({
      ...subscriptions[0],
    });
  }, []);

  const handleAppStateChange = (nextAppState: string): void => {
    if (nextAppState === 'active') {
      _checkReceipt();
    }
  };

  useEffect(() => {
    _initIAP();
    _checkReceipt();
    AppState.addEventListener('change', handleAppStateChange);

    return (): void => {
      if (purchaseUpdateSubscription) {
        purchaseUpdateSubscription.remove();
      }
      if (purchaseErrorSubscription) {
        purchaseErrorSubscription.remove();
      }
      if (handleAppStateChange) {
        AppState.removeEventListener('change', handleAppStateChange);
      }
    };
  }, []);

  return (
    <IAPContext.Provider
      value={{
        isSubscription,
        subscription,
        showPurchase,
      }}>
      {children}
      <ActionSheet
        ref={actionSheetRef}
        height={Platform.OS === 'ios' ? 380 : 420}
        disableClose={showLoading}
        customStyles={{
          container: {
            backgroundColor: theme.white,
          },
        }}>
        {subscription && (
          <Container>
            <TitleContainer>
              <Title>{subscription.title.split(' (')[0]}</Title>
              <SubTitle>{subscription.description}</SubTitle>
            </TitleContainer>
            <DescriptionContainer>
              <Description>
                <Icon name="information-outline" />{' '}
                {
                  ENV.language[
                    "I'm developing the app alone. So your subscription is a great help to me"
                  ]
                }
              </Description>
              <Description>
                {'  '}
                {ENV.language['Your subscription helps me keep the good words app']}
              </Description>
              <Description>
                {'  '}
                {
                  ENV.language[
                    'Learn vocabulary without ads for the price of a cup of coffee each month'
                  ]
                }
              </Description>
            </DescriptionContainer>
            <PurchaseButton
              onPress={() => {
                _requestSubscription();
              }}>
              <PurchaseLabel>
                {subscription.localizedPrice} / {ENV.language['month']}
              </PurchaseLabel>
            </PurchaseButton>
            <DescriptionContainer>
              <Terms>
                - {ENV.language['Already subscribed?']}{' '}
                <Link onPress={() => _restorePurchases()}>
                  {ENV.language['Restoring purchases']}
                </Link>
              </Terms>
              <Terms>- {ENV.language['cancel the purchase']}</Terms>
              {Platform.OS === 'ios' && (
                <Terms>- {ENV.language['payment is charged to your iTunes account']}</Terms>
              )}
              <Terms>
                - {ENV.language['If you have any question,']}{' '}
                <Link onPress={() => Linking.openURL('https://deku.posstree.com/ko/contact/')}>
                  Contact
                </Link>{' '}
                {ENV.language['us']}
              </Terms>
              <Terms>
                - {ENV.language['see the']}
                <Link onPress={() => Linking.openURL('https://deku.posstree.com/privacy/ko/')}>
                  {ENV.language['terms of use']}
                </Link>{' '}
                {ENV.language['details']}
              </Terms>
            </DescriptionContainer>
          </Container>
        )}
        {showLoading && (
          <LoadingContainer>
            <LoadingBackground />
            <ActivityIndicator color={theme.primary} size="large" />
          </LoadingContainer>
        )}
      </ActionSheet>
    </IAPContext.Provider>
  );
};

export { IAPProvider, IAPContext };
上のソースコードは私のプロジェクトへ依存してる部分が多いなので、そのまま使うことはできません。また、私の決済ロジックはContext APIを使って実装しました。上のコードを一つづつ見て、決済ロジックをどう作ったか確認しましょう。
まず、決済ロジックの大きい流れは初期化, 決済, 決済確認, 復元で分かれています。
初期化
アプリ内課金をするためにはまず、ライブラリを初期化して、購読商品の情報を取ってくる必要があります。
...
const itemSubs = Platform.select({
  default: [ENV.subscriptionId],
});
...
const IAPProvider = ({ children }: Props): JSX.Element => {
  ...
  const _initIAP = useCallback(async (): Promise<void> => {
    RNIap.clearProductsIOS();

    try {
      const result = await RNIap.initConnection();
      await RNIap.flushFailedPurchasesCachedAsPendingAndroid();
      if (result === false) {
        Alert.alert(ENV.language["couldn't get in-app-purchase information"]);
        return;
      }
    } catch (err) {
      console.debug('initConnection');
      console.error(err.code, err.message);
      Alert.alert(ENV.language['fail to get in-app-purchase information']);
    }
    ...
    const subscriptions = await RNIap.getSubscriptions(itemSubs);
    setSubscription({
      ...subscriptions[0],
    });
  }, []);
  ...
  useEffect(() => {
    _initIAP();
    ...
  }, []);

  return (
    ...
  );
};
...
ライブラリを初期化するためには下記のようなコードを使います。
RNIap.clearProductsIOS();

try {
  const result = await RNIap.initConnection();
  await RNIap.flushFailedPurchasesCachedAsPendingAndroid();
  if (result === false) {
    Alert.alert(ENV.language["couldn't get in-app-purchase information"]);
    return;
  }
} catch (err) {
  console.debug('initConnection');
  console.error(err.code, err.message);
  Alert.alert(ENV.language['fail to get in-app-purchase information']);
}
上のコードでclearProductsIOSとflushFailedPurchasesCachedAsPendingAndroidようにプラットフォームに依存してるコードがありますが、あえてPlatform.OSを使ってロジックを分離する必要はありません。
そして購読商品の情報を取ってくるため、商品のIDを設定する必要があります。
const itemSubs = Platform.select({
  default: [ENV.subscriptionId],
});
私はiOSもとアンドロイドも同じIDを使うので、一つを使いましたが、もしiOSとアンドロイドのIDが違う場合は下記のように設定することができます。
const itemSubs = Platform.select({
  ios: [ENV.ios.subscriptionId],
  android: [ENV.android.subscriptionId],
});
このように設定した商品のIDを使って商品の情報を取ってきます。
const subscriptions = await RNIap.getSubscriptions(itemSubs);
setSubscription({
  ...subscriptions[0],
});
そして取ってきた情報をstateへ保存します。私の場合は一つの購読商品しかないのでsubscriptions[0]で最初の商品だけ設定しました。
このように取ってきた情報を下記のように画面に表示します。
...
<Title>{subscription.title.split(' (')[0]}</Title>
<SubTitle>{subscription.description}</SubTitle>
...
<PurchaseLabel>
  {subscription.localizedPrice} / {ENV.language['month']}
</PurchaseLabel>
...
決済
次は取ってきた情報を使って実際決済するところの部分です。
...
let purchaseUpdateSubscription: EmitterSubscription;
let purchaseErrorSubscription: EmitterSubscription;
...
const IAPProvider = ({ children }: Props): JSX.Element => {
  ...
  const _requestSubscription = () => {
    setShowLoading(true);
    if (subscription) {
      RNIap.requestSubscription(subscription.productId);
    }
  };
  ...
  const _initIAP = useCallback(async (): Promise<void> => {
    ...
    purchaseUpdateSubscription = purchaseUpdatedListener(
      (purchase: InAppPurchase | SubscriptionPurchase) => {
       ...
        const receipt =
          Platform.OS === 'ios' ? purchase.transactionReceipt : purchase.purchaseToken;
        if (receipt) {
          finishTransaction(purchase)
            .then(() => {
              AsyncStorage.setItem('receipt', receipt);
              setIsSubscription(true);
            })
            .catch(() => {
              setIsSubscription(false);
              Alert.alert(
                ENV.language['purchase is failed'],
                ENV.language['the purchase is failed'],
              );
            });
        }
      },
    );

    purchaseErrorSubscription = purchaseErrorListener((error: PurchaseError) => {
      console.debug('purchaseErrorListener');
      console.error(error);
      setShowLoading(false);
      if (error.code !== 'E_USER_CANCELLED') {
        Alert.alert(ENV.language['purchase is failed'], ENV.language['the purchase is failed']);
      }
    });
    ...
  }, []);
  ...

  useEffect(() => {
    ...
    return (): void => {
      if (purchaseUpdateSubscription) {
        purchaseUpdateSubscription.remove();
      }
      if (purchaseErrorSubscription) {
        purchaseErrorSubscription.remove();
      }
      ...
    };
  }, []);
  ...
};
...
実際決済が実行されると、決済の成功/失敗の結果を貰うため、リスナー(Listener)を登録する必要があります。
...
let purchaseUpdateSubscription: EmitterSubscription;
let purchaseErrorSubscription: EmitterSubscription;
...
purchaseUpdateSubscription = purchaseUpdatedListener(
  (purchase: InAppPurchase | SubscriptionPurchase) => {
    ...
    const receipt =
      Platform.OS === 'ios' ? purchase.transactionReceipt : purchase.purchaseToken;
    if (receipt) {
      finishTransaction(purchase)
        .then(() => {
          AsyncStorage.setItem('receipt', receipt);
          setIsSubscription(true);
        })
        .catch(() => {
          setIsSubscription(false);
          Alert.alert(
            ENV.language['purchase is failed'],
            ENV.language['the purchase is failed'],
          );
        });
    }
  },
);

purchaseErrorSubscription = purchaseErrorListener((error: PurchaseError) => {
  ...
});
...
useEffect(() => {
  ...
  return (): void => {
    if (purchaseUpdateSubscription) {
      purchaseUpdateSubscription.remove();
    }
    if (purchaseErrorSubscription) {
      purchaseErrorSubscription.remove();
    }
    ...
  };
}, []);
...
決済が成功したらpurchaseUpdatedListenerが実行されてfinishTransactionを使って決済が成功したかを教えてくれます。決済が失敗するときはpurchaseErrorListenerが実行されてユーザに決済が失敗したことをお知らせします。
また、useEffectを使ってコンポーネントがUnmountされる時、リスター(Listener)を消します。
次は上で定義した_requestSubscription関数を決済ボタンと連結します。
<PurchaseButton
  onPress={() => {
    _requestSubscription();
  }}>
  <PurchaseLabel>
    {subscription.localizedPrice} / {ENV.language['month']}
  </PurchaseLabel>
</PurchaseButton>
決済確認
決済が成功したら、これに関する結果を貰えます。このように貰った結果が本当のものかどうかを確認(Validate)する必要があります。iOSはアプリ中またはサーバで確認ができます。アンドロイドはサーバを使って確認ができます。
私はサーバを持ってないので、iOSはアプリ中で、アンドロイドは検証しなくて、決済情報をもう一度取ってくることで決済の結果を確認しました。
iOSはvalidateReceiptIosを使ってアプリで検証ができます。まず、getReceiptIOSで現在の領収書(Receipt)を取ってきて、その領収書(Receipt)が有効かどうかvalidateReceiptIosを使って確認します。
const checkReceiptIOS = async () => {
  let isValidated = false;
  const receipt = await AsyncStorage.getItem('receipt');
  if (receipt) {
    const newReceipt = await getReceiptIOS();
    const validated = await validateReceiptIos(
      {
        'receipt-data': newReceipt,
        password: '****************',
      },
      __DEV__,
    );

    if (validated !== false && validated.status === 0) {
      isValidated = true;
      AsyncStorage.setItem('receipt', newReceipt);
    } else {
      isValidated = false;
      AsyncStorage.removeItem('receipt');
    }
  }
  return isValidated;
};
上のようにvalidateReceiptIosを使って領収書を検証する時、passwordが必要です。このpasswordはApp store connectの共有パスワード(Shared secret)です。
共有パスワードを発行するためにはApp Store connectへ移動してユーザやアクセス(Users and Access)へ移動します。

上にある共有パスワード(Shared secret)を選択して共有パスワードを作ります。ここで発行した共有パスワードは全てのアプリで使うことができます。特定なアプリだけ使いたい場合は次のように共有パスワードを作ることもできます。
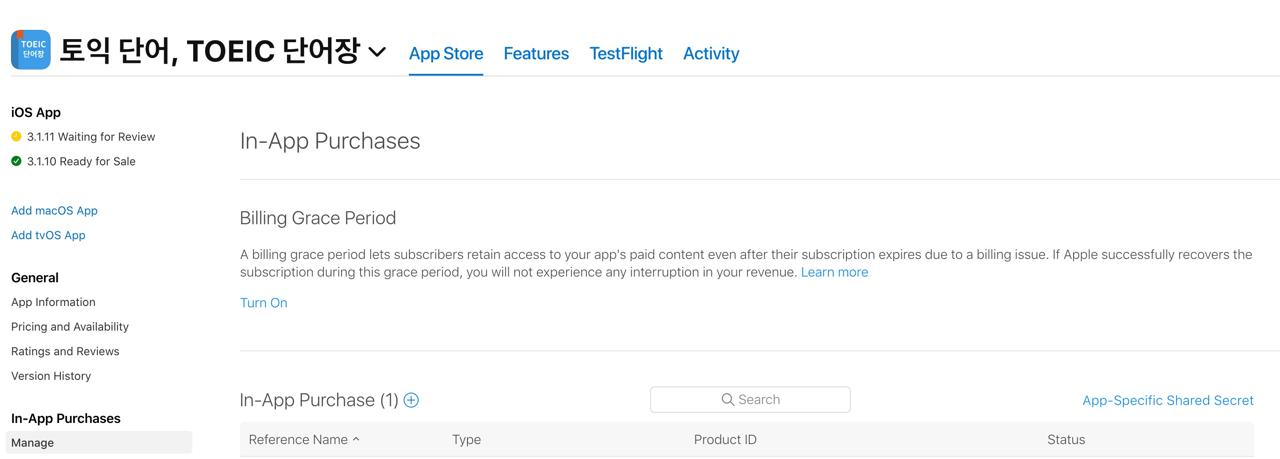
特定したアプリたけ使える共有パスワードを作りたい場合は共有パスワードを作りたいアプリへ移動した後、アプリ内課金(In-App Purchases)の管理(Manage)へ移動します。そしたら右の方にアプリ共有パスワード(App-Specific Shared Secret)を使って特定したアプリだけ使う共有パスワードを生成することがdきます。
アンドロイドはvalidateReceiptAndroidを使って確認できますが、accessTokenを発行するにはサーバが必要です。
const checkReceiptAndroid = async () => {
  let isValidated = false;
  const receipt = await AsyncStorage.getItem('receipt');
  if (receipt) {
    try {
      const purchases = await RNIap.getAvailablePurchases();
      console.debug('checkReceiptAndroid');
      let receipt = purchases[0].transactionReceipt;
      if (Platform.OS === 'android' && purchases[0].purchaseToken) {
        receipt = purchases[0].purchaseToken;
      }
      AsyncStorage.setItem('receipt', receipt);
      isValidated = true;
    } catch (error) {
      isValidated = false;
      AsyncStorage.removeItem('receipt');
    }
  }
  return isValidated;
};
私はサーバがないので、getAvailablePurchasesを使って商品の情報を取ってきて情報があったら有効なユーザと判断してます。
復元
決済をしたユーザがアプリを削除したりなんかの問題で決済連結が切れった場合、getAvailablePurchasesを使って決済を復元することができます。
const _restorePurchases = () => {
  setShowLoading(true);
  RNIap.getAvailablePurchases()
    .then((purchases) => {
      console.debug('restorePurchases');
      let receipt = purchases[0].transactionReceipt;
      if (Platform.OS === 'android' && purchases[0].purchaseToken) {
        receipt = purchases[0].purchaseToken;
      }
      AsyncStorage.setItem('receipt', receipt);
      setShowLoading(false);
      setIsSubscription(true);
      Alert.alert(
        ENV.language['restore successful'],
        ENV.language['you have successfully restored your purchase history'],
        [{ text: ENV.language['ok'], onPress: () => actionSheetRef.current?.close() }],
      );
    })
    .catch((err) => {
      console.debug('restorePurchases');
      console.error(err);
      setShowLoading(false);
      setIsSubscription(false);
      AsyncStorage.removeItem('receipt');
      Alert.alert(ENV.language['restore failed'], ENV.language['restore failed reason']);
    });
};
iOSではこの決済復元の機能がないと、Rejectされるので必ず実装する必要があります。
<Link onPress={() => _restorePurchases()}>
  {ENV.language['Restoring purchases']}
</Link>
このように作った関数を決済復元ボタンと連結します。
テスト
iOS
iOSテストアカウント登録
iOSでテストするためにはアップルアカウントで使ったことがないEmailが必要です。そしてApp store connectへ移動して、ユーザやアクセス(Users and Access)へ移動します。
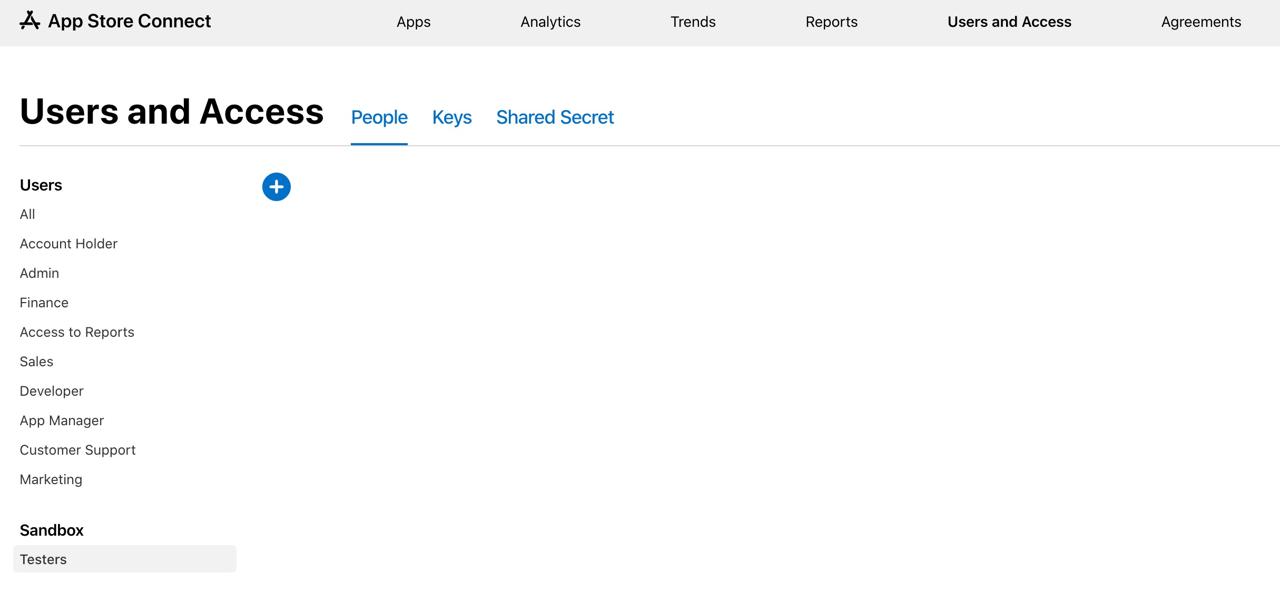
ここで左下にあるSandboxのテスター(Testers)を選択して用意したEmailでSandboxアカウントを作ります。
iOSテスト
シミュレータではアプリ内課金テストができません。開発したアプリをデバイスでテストする必要があります。
一旦、App storeで実際使ってるアカウントをログアウトします。
その後、開発してるアプリをデバイスで実行して、決済ボタンを押します。決済が進むと、上で作ったSandboxアカウントを使ってログインして決済をします。
アンドロイド
アンドロイドテストアカウント登録
アンドロイドはiOSとは違ってGoogleで使ってるアカウントをそのまま使えます。Google Play Consoleへ移動して、設定(Settings) > ライセンステスト(License testing)を選択します。
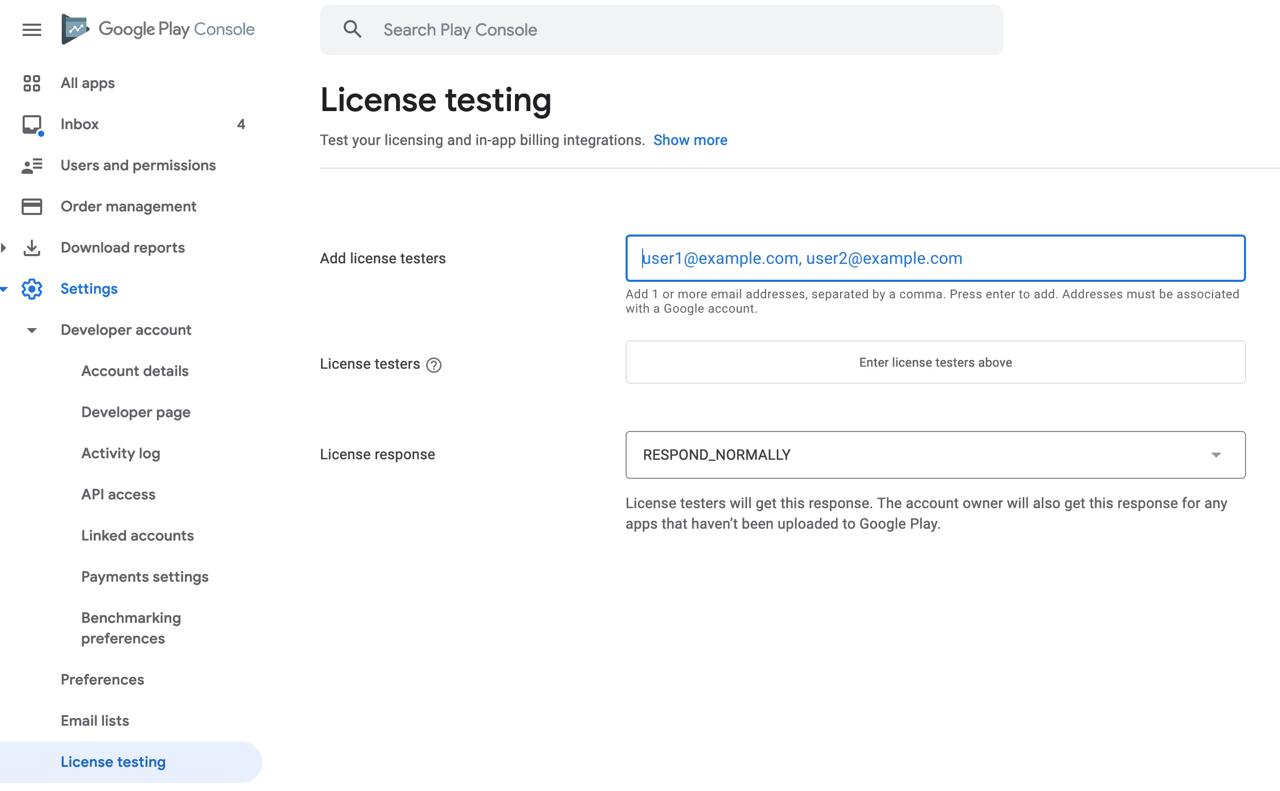
そして使ってるGoogleアカウントを入力して追加します。
アンドロイドテスト
アンドロイドもiOSと同じようにエミュレータではテストができません。iOSとは違って実際つかてるアカウントでテストができるので、特にログアウトする必要はありません。
アンドロイドは更新期間テストと購読期間が終わった場合のテストができます。更新期間については公式サイトを参考してください。
デプロイ
iOSのデプロイ
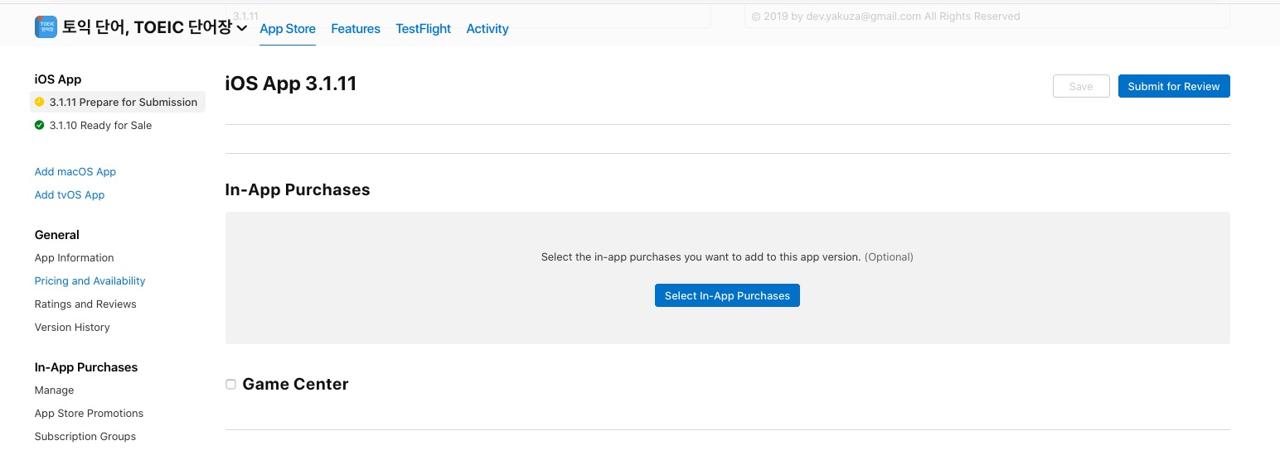
アプリ内課金を含めてアプリをデプロイするためにはアプリをデプロイする時アプリ内課金(In-App Purchases)項目を設定する必要があります。
アンドロイドのデプロイ
アンドロイドはiOSとは違って特に設定をする必要はありません。
完了
これでreact-native-iapを使ってアプリ内課金を実装する方法について見てみました。全ての内容を一つのブログへまとめたので、ブログの内容が長くなりました。
それで私は私が経験した内容だけ共有してるのでアプリ内課金中でも自動更新購読に関して作成しました。一般商品課金などは少し違うので上のロジックを参考して実装してください。
私のブログが役に立ちましたか?下にコメントを残してください。それは私にとって大きな大きな力になります!
アプリ広報
Dekuが開発したアプリを使ってみてください。Dekuが開発したアプリはFlutterで開発されています。興味がある方はアプリをダウンロードしてアプリを使ってくれると本当に助かります。


