目次
概要
このブログポストではReact Nativeで現在位置情報を取得する方法について調べてみます。位置情報を取得するため、使うライブラリはreact-native-geolocation-serviceで、下記のリンクで詳細情報を見ることができます。
ブログを作成しながら作ったソースコードがあります。ソースコードを確認したい方は、下記のリンクを参考してください。
例題ソースコードは下記の内応が適用されています。詳しく知りたい方は下記のリンクを参考してください。
react-native-geolocation-serviceインストール
下記のコマンドでreact-native-geolocation-serviceをインストールしてください。
npm install --save react-native-geolocation-serviceライブラリのリンク
インストールしたライブラいをReact Nativeプロジェクトへリンクする必要があります。
0.60以上
下記のコマンドを使ってiOSへライブラリをリンクします。
cd ios
pod install
React Nativeのプロジェクトでreact-native-geolocation-serviceを使うためSwiftをサポートする必要があります。Swiftをサポートするためios/[project name]xcworkspaceファイルを開いてXcodeを実行します。
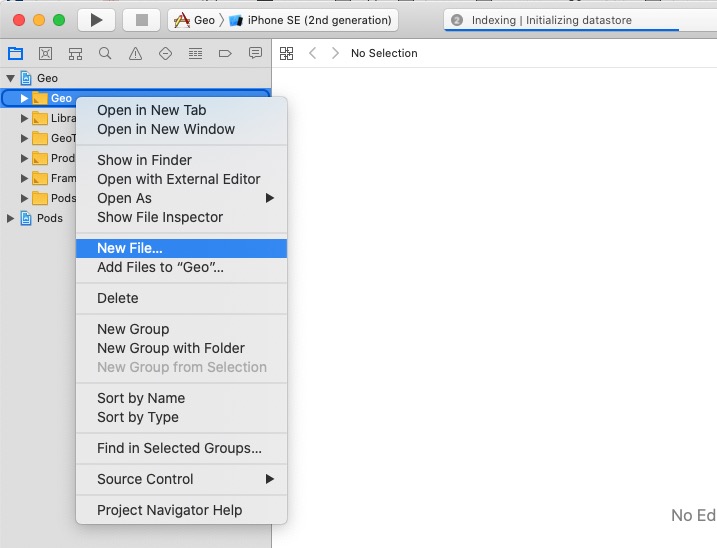
Xcodeを実行したら左上のプロジェクトにあるフォルドをマウスの右クリックしてNew File...を選択します。
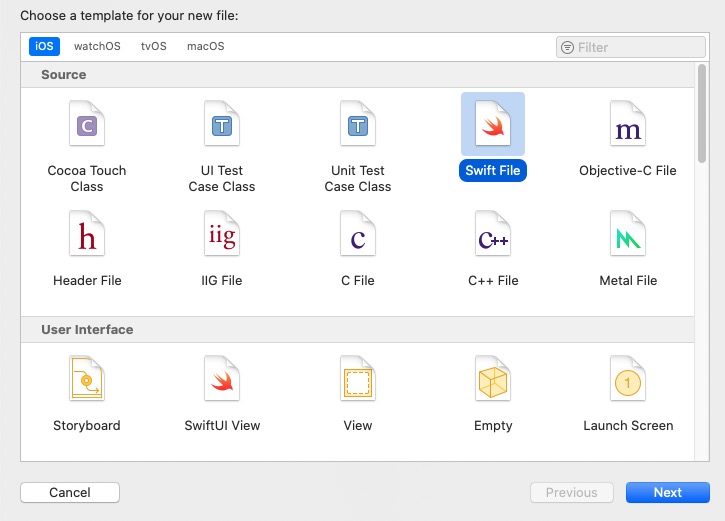
上のような画面が見えてら、Swift Fileを選択して右下のNextを選択します。
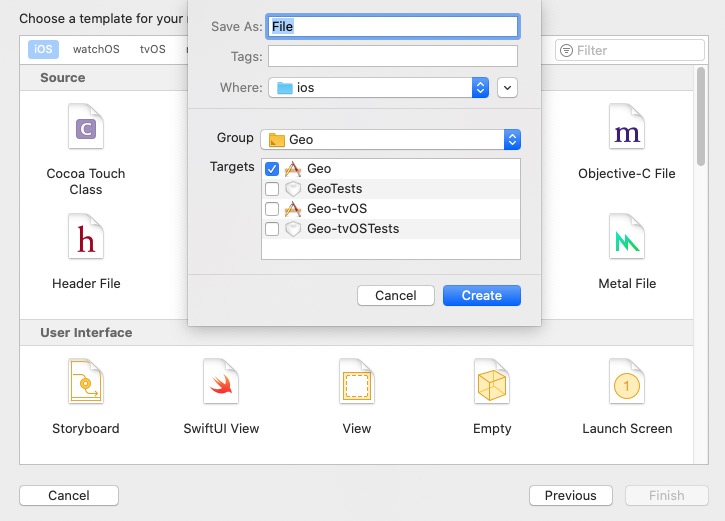
敵とにファイルの名前を決めて、右下のCreateボタンを押します。
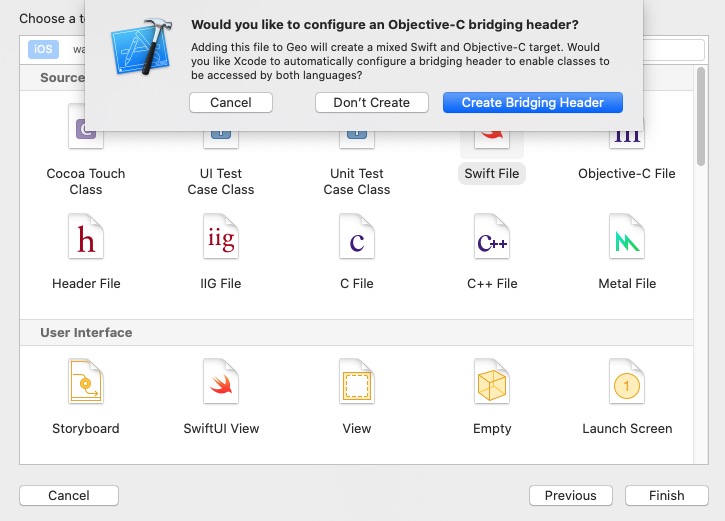
上のような画面が出ると右下のCreate Bridging Headerを選択してSwiftをサポートするようにします。
0.59以下
React Nativeのバージョン0.59以下の場合、公式サイトを参考してリンクしてください。
権限設定
iOS権限設定
iOSで位置情報を使うためには、ios/[Project Name]/info.plistへ下記のように権限を設定する必要があります。
<?xml version="1.0" encoding="UTF-8"?>
<!DOCTYPE plist PUBLIC "-//Apple//DTD PLIST 1.0//EN" "http://www.apple.com/DTDs/PropertyList-1.0.dtd">
<plist version="1.0">
<dict>
  ...
  <key>NSLocationWhenInUseUsageDescription</key>
  <string>Program requires GPS to track cars and job orders</string>
  <key>NSLocationAlwaysUsageDescription</key>
  <string>Program requires GPS to track cars and job orders</string>
  <key>NSLocationAlwaysAndWhenInUseUsageDescription</key>
  <string>Program requires GPS to track cars and job orders</string>
  ...
</dict>
</plist>アプリが起動中だけ、位置情報を取得する場合、NSLocationWhenInUseUsageDescriptionだけ設定すれば大丈夫です。
アプリがバックグラウンドでも位置情報を取得する必要がある場合、NSLocationAlwaysUsageDescriptionとNSLocationAlwaysAndWhenInUseUsageDescriptionも設定する必要があり、下記のようにBackground ModesのLocation updatesを設定する必要があります。
バックグラウンドで位置情報を取得するためXcodeを開いて下記のように+ Capabilityを選択します。

下記のようにCapabilityを検索する画面が出ると、Background Modesを検索して、検索結果をダブルクリックして追加します。
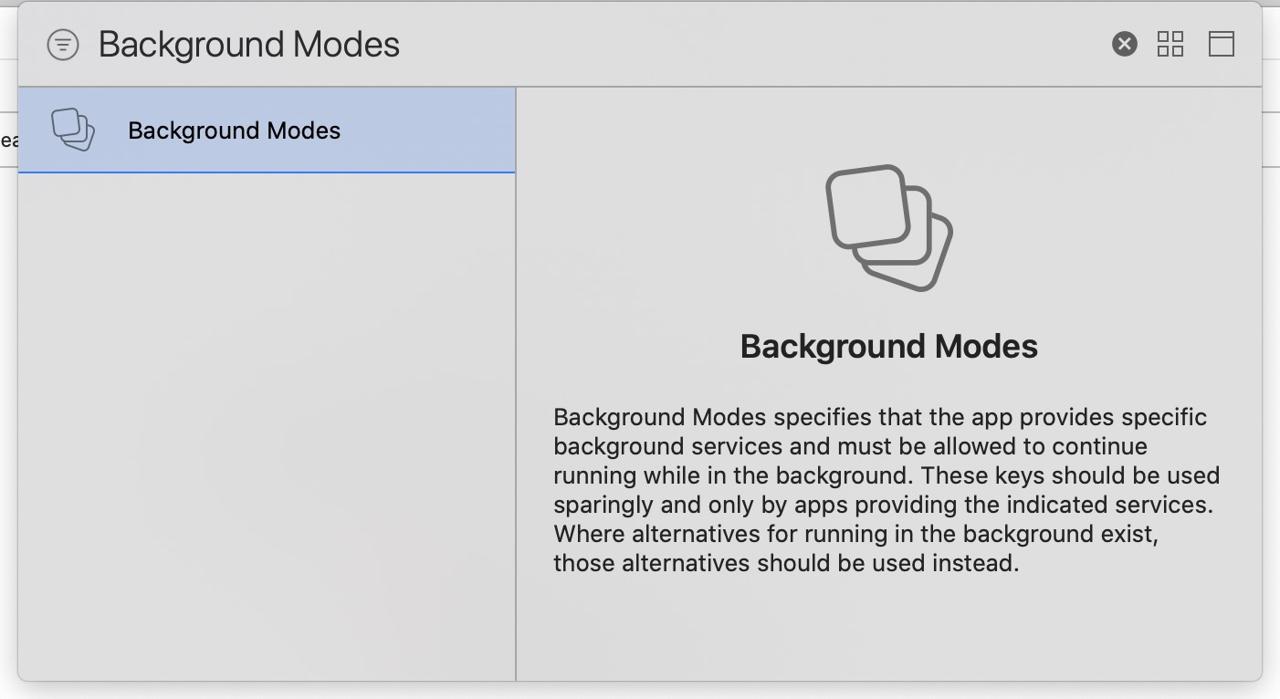
ダブルクリックしてBackground Modesを追加したら、Background ModesのLocation updatesを選択して追加します。

このように設定を完了したら、Javascriptで下記のようにソースコードを修正して権限を取得する必要があります。
import {Platform} from 'react-native';
import Geolocation from 'react-native-geolocation-service';
...
useEffect(() => {
  if (Platform.OS === 'ios') {
    Geolocation.requestAuthorization('always');
  }
}, []);
...
アンドロイド権限設定
アンドロイドで位置情報を使うため、android/app/src/main/AndroidManifest.xmlファイルを開いて下記のように修正します。
<manifest xmlns:android="http://schemas.android.com/apk/res/android"
  package="com.reactnativegeolocationserviceexample">

    ...
    <uses-permission android:name="android.permission.ACCESS_COARSE_LOCATION" />
    <uses-permission android:name="android.permission.ACCESS_FINE_LOCATION" />
    ...

    <application
使い方
react-native-geolocationライブラリを使って、下記のように位置情報を取得することができます。
現在の位置情報を取得
現在位置情報を取得するためには、下記のコードを使います。
Geolocation.getCurrentPosition(
    (position) => {
        console.log(position);
    },
    (error) => {
        // See error code charts below.
        console.log(error.code, error.message);
    },
    { enableHighAccuracy: true, timeout: 15000, maximumAge: 10000 }
);
現在位置情報を画面に表示する例題は下記です。
import React, {useState, useEffect} from 'react';
import Styled from 'styled-components/native';
import Geolocation from 'react-native-geolocation-service';

const Container = Styled.View`
    flex: 1;
    justify-content: center;
    align-items: center;
`;

const Label = Styled.Text`
    font-size: 24px;
`;

interface ILocation {
  latitude: number;
  longitude: number;
}

const CurrentPosition = () => {
  const [location, setLocation] = useState<ILocation | undefined>(undefined);

  useEffect(() => {
    Geolocation.getCurrentPosition(
      position => {
        const {latitude, longitude} = position.coords;
        setLocation({
          latitude,
          longitude,
        });
      },
      error => {
        console.log(error.code, error.message);
      },
      {enableHighAccuracy: true, timeout: 15000, maximumAge: 10000},
    );
  }, []);

  return (
    <Container>
      {location ? (
        <>
          <Label>Latitude: {location.latitude}</Label>
          <Label>Latitude: {location.longitude}</Label>
        </>
      ) : (
        <Label>Loading...</Label>
      )}
    </Container>
  );
};

export default CurrentPosition;
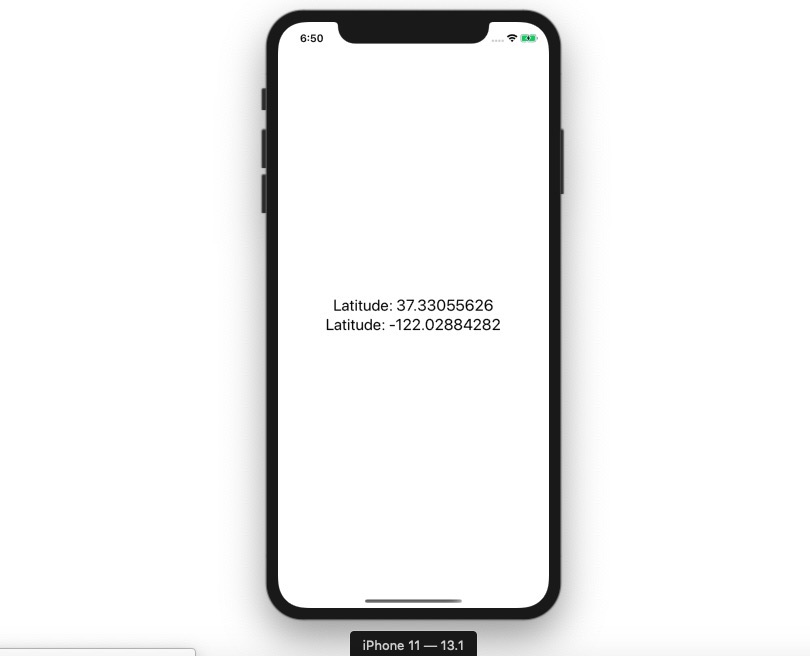
上のソースコードの結果が次になります。
ユーザの位置情報追跡
react-native-geolocation-serviceを使ってユーザの現在位置情報の取得以外にも、ユーザの位置情報を追跡することができます。
ユーザの位置情報追跡にするためのソースコードは下記になります。
_watchId = Geolocation.watchPosition(
  position => {
    const {latitude, longitude} = position.coords;
    setLocation({latitude, longitude});
  },
  error => {
    console.log(error);
  },
  {
    enableHighAccuracy: true,
    distanceFilter: 0,
    interval: 5000,
    fastestInterval: 2000,
  },
);
ユーザの位置情報の追跡が終わったら、下記のコードを使って終了します。
if (_watchId !== null) {
  Geolocation.clearWatch(_watchId);
}
ユーザの位置情報を追跡する全体ソースコードは次になります。
import React, {useState, useEffect} from 'react';
import Styled from 'styled-components/native';
import Geolocation from 'react-native-geolocation-service';

const Container = Styled.View`
    flex: 1;
    justify-content: center;
    align-items: center;
`;

const Label = Styled.Text`
    font-size: 24px;
`;

interface ILocation {
  latitude: number;
  longitude: number;
}

const WatchLocation = () => {
  const [location, setLocation] = useState<ILocation | undefined>(undefined);

  useEffect(() => {
    const _watchId = Geolocation.watchPosition(
      position => {
        const {latitude, longitude} = position.coords;
        setLocation({latitude, longitude});
      },
      error => {
        console.log(error);
      },
      {
        enableHighAccuracy: true,
        distanceFilter: 0,
        interval: 5000,
        fastestInterval: 2000,
      },
    );

    return () => {
      if (_watchId) {
        Geolocation.clearWatch(_watchId);
      }
    };
  }, []);

  return (
    <Container>
      {location ? (
        <>
          <Label>Latitude: {location.latitude}</Label>
          <Label>Latitude: {location.longitude}</Label>
        </>
      ) : (
        <Label>Loading...</Label>
      )}
    </Container>
  );
};

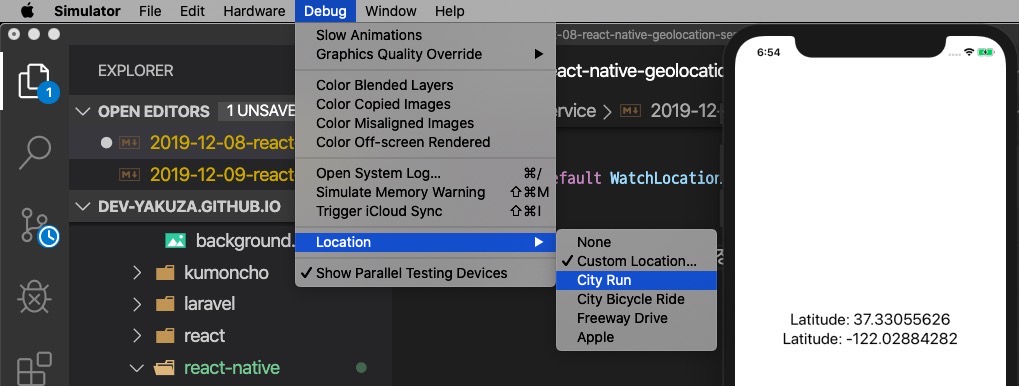
export default WatchLocation;シミュレーターでユーザの位置情報を追跡するためには次の画面ようにDebug > LocationメニューでCity Run, City Bicycle Ride, Freeway Drive中で1つのメニューを選択したら位置情報が更新されることが確認できます。
完了
これでreact-native-geolocation-serviceを使ってユーザの位置情報を取得する方法について見てみました。また、watchPositionを使ってユーザの位置情報を追跡する方法もみてみました。
私のブログが役に立ちましたか?下にコメントを残してください。それは私にとって大きな大きな力になります!
アプリ広報
Dekuが開発したアプリを使ってみてください。Dekuが開発したアプリはFlutterで開発されています。興味がある方はアプリをダウンロードしてアプリを使ってくれると本当に助かります。


