목차
- 목차
- 개요
- 블로그 시리즈
- Release notes란
- Release Drafter
- Release Drafter 설정
- Release notes의 Draft 작성
- Release notes 배포
- 완료
개요
GitHub에서 프로젝트를 관리할 때, GitHub의 Release notes를 사용하여 해당 버전에서 추가된 기능, 수정된 버그, 개선된 사항, 삭제된 기능 등을 기록할 수 있습니다.
이번 블로그 포스트에서는 GitHub Actions중 하나인 Release Drafter를 사용하여 GitHub의 Release notes 작성을 자동화하는 방법에 대해서 알아보겠습니다.
블로그 시리즈
이 블로그는 시리즈로 제작되었습니다. 다음 링크를 통해 다른 블로그 포스트도 확인해 보시기 바랍니다.
- [GitHub Actions] Pull request 제목 검사
- [GitHub Actions] Release notes 자동화
- [GitHub Actions] Pull request의 라벨 검사
Release notes란
Release notes는 소프트웨어 개발에서 새로운 버전이나 업데이트가 출시될 때 사용자 또는 개발자에게 제공되는 문서입니다. 이 문서에는 해당 버전에서 추가된 기능, 수정된 버그, 개선된 사항, 삭제된 기능 등이 기록되게 됩니다. Release notes는 사용자 또는 다른 개발자들이 새로운 버전에 대한 변경 사항을 쉽게 파악할 수 있도록 돕는 역할을 합니다.
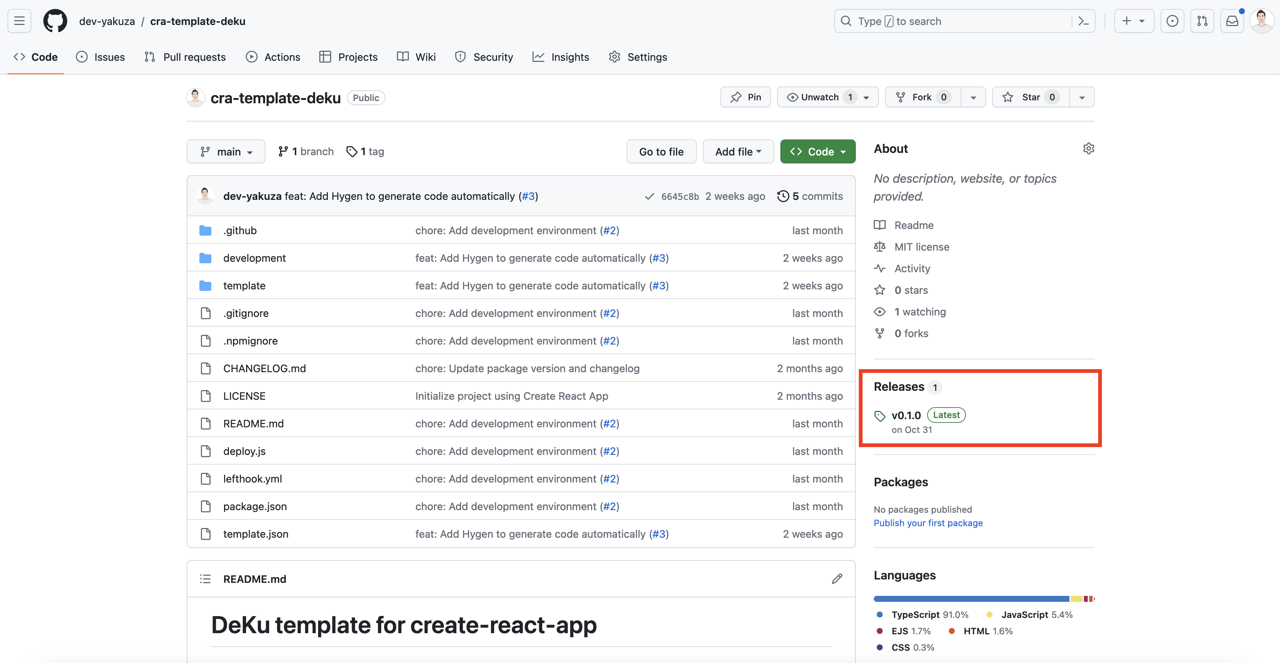
GitHub를 사용한다면 저장소(Repository)에 다음과 같이 Releases 항목을 확인할 수 있습니다.

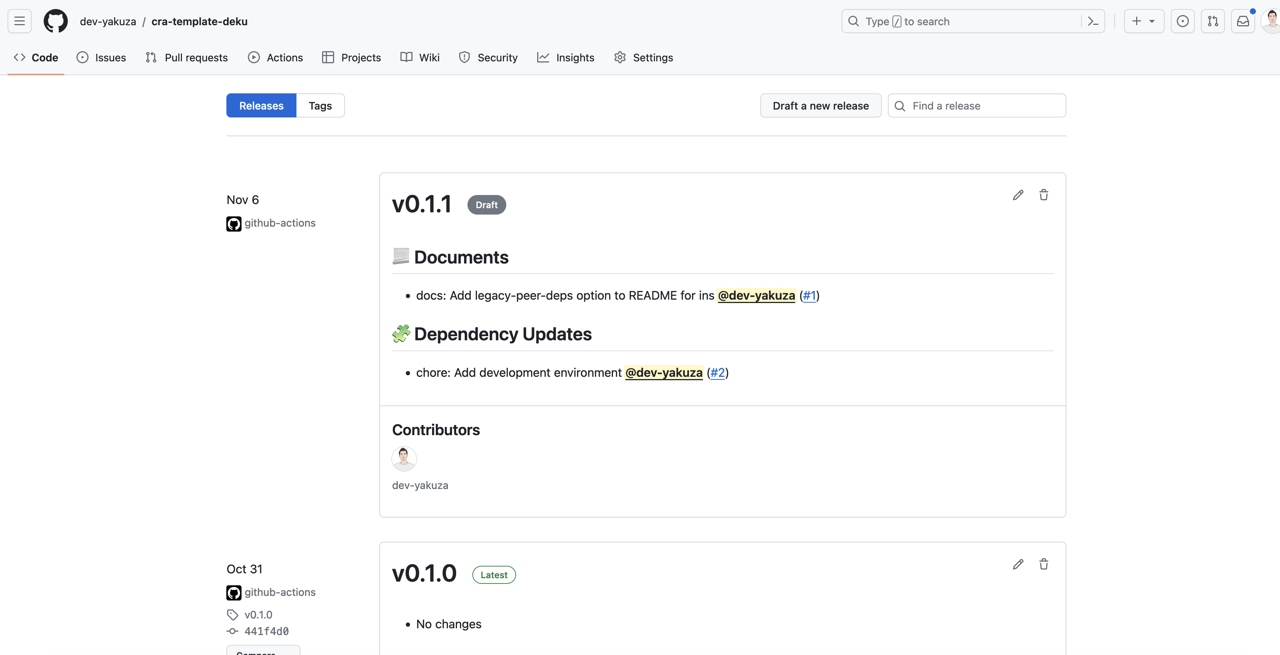
해당 링크를 클릭하면 다음과 같이 Release notes의 상세 화면을 확인할 수 있습니다.

Release Drafter
Release Drafter는 GitHub Actions중 하나로, Pull request의 제목을 사용하여 Release notes를 작성하는 기능을 제공합니다.
Release Drafter 설정
GitHub Actions인 Release Drafter를 사용하기 위해서는 main 브랜치에 Release Drafter 설정 파일을 추가해야 합니다.
이를 위해서 .github/release-drafter.yml 파일을 만들고 다음과 같이 수정합니다.
name-template: 'v$RESOLVED_VERSION'
tag-template: 'v$RESOLVED_VERSION'
version-resolver:
  major:
    labels:
      - 'major'
  minor:
    labels:
      - 'minor'
  patch:
    labels:
      - 'patch'
  default: patch
categories:
  - title: '⚠️ Breaking changes'
    labels:
      - 'breaking change'
  - title: '🚀 Features'
    labels:
      - 'feature'
  - title: '🐛 Bug Fixes'
    labels:
      - 'bug'
  - title: '📃 Documents'
    labels:
      - 'docs'
  - title: '🧩 Dependency Updates'
    labels:
      - 'deps'
      - 'dependencies'
      - 'bump'
      - 'chore'
    collapse-after: 5
  - title: '🔬 Others'
    labels:
      - 'style'
      - 'refactor'
      - 'test'
      - 'ci'
    collapse-after: 5
autolabeler:
  - label: 'breaking change'
    title:
      - '/!:/i'
  - label: 'feature'
    title:
      - '/feat:/i'
  - label: 'bug'
    title:
      - '/fix:/i'
  - label: 'style'
    title:
      - '/style:/i'
  - label: 'refactor'
    title:
      - '/refactor:/i'
  - label: 'test'
    title:
      - '/test:/i'
  - label: 'chore'
    title:
      - '/chore:/i'
  - label: 'docs'
    title:
      - '/docs:/i'
  - label: 'ci'
    title:
      - '/ci:/i'
  - label: 'dependencies'
    title:
      - '/deps:/i'
      - '/dependencies:/i'
      - '/bump:/i'
commitish: main
change-template: '- $TITLE @$AUTHOR (#$NUMBER)'
change-title-escapes: '\<*_&'
template: |
  $CHANGES
좀 더 자세히 살펴보도록 하겠습니다.
name-template: 'v$RESOLVED_VERSION'
tag-template: 'v$RESOLVED_VERSION'
version-resolver:
  major:
    labels:
      - 'major'
  minor:
    labels:
      - 'minor'
  patch:
    labels:
      - 'patch'
default: patchGitHub의 Release notes의 제목을 지정하는 부분입니다. $RESOLVED_VERSION은 GitHub의 labels를 기반으로 버전을 결정할 때 사용됩니다.
version-resolver는 Pull request로 버전을 올리기 위해 사용되는 labels를 지정하는 부분입니다. 만약, 어떠한 label도 지정이 되지 않으면 patch 버전이 올라가게 됩니다.
categories:
  - title: '⚠️ Breaking changes'
    labels:
      - 'breaking change'
  - title: '🚀 Features'
    labels:
      - 'feature'
  - title: '🐛 Bug Fixes'
    labels:
      - 'bug'
  - title: '📃 Documents'
    labels:
      - 'docs'
  - title: '🧩 Dependency Updates'
    labels:
      - 'deps'
      - 'dependencies'
      - 'bump'
      - 'chore'
    collapse-after: 5
  - title: '🔬 Others'
    labels:
      - 'style'
      - 'refactor'
      - 'test'
      - 'ci'
collapse-after: 5categories는 Pull request의 label을 기반으로 Release notes 내용의 카테고리를 지정하는 부분입니다. labels에 지정된 label이 있으면 해당 label에 지정된 카테고리로 Release notes에 기록이 됩니다.
collapse-after 옵션은 지정된 개수 이상의 Pull request가 있을 경우, 해당 카테고리의 내용을 접어서 보여주는 옵션입니다.
autolabeler:
  - label: 'breaking change'
    title:
      - '/!:/i'
  - label: 'feature'
    title:
      - '/feat:/i'
  - label: 'bug'
    title:
      - '/fix:/i'
  - label: 'style'
    title:
      - '/style:/i'
  - label: 'refactor'
    title:
      - '/refactor:/i'
  - label: 'test'
    title:
      - '/test:/i'
  - label: 'chore'
    title:
      - '/chore:/i'
  - label: 'docs'
    title:
      - '/docs:/i'
  - label: 'ci'
    title:
      - '/ci:/i'
  - label: 'dependencies'
    title:
      - '/deps:/i'
      - '/dependencies:/i'
      - '/bump:/i'
Release Drafter는 Pull request의 제목을 기반으로 GitHub의 label을 자동으로 지정해주는 기능을 제공합니다. autolabeler는 Pull request의 제목을 정규식으로 검사하여 label을 지정하는 부분입니다.
commitish: maincommitish는 Release Drafter가 Pull request의 제목을 검사할 브랜치를 지정하는 부분입니다.
change-template: '- $TITLE @$AUTHOR (#$NUMBER)'change-template은 Release notes의 내용을 지정하는 부분입니다. $TITLE은 Pull request의 제목, $AUTHOR은 Pull request를 생성한 사용자, $NUMBER는 Pull request의 번호를 나타냅니다.
change-title-escapes: '\<*_&'change-title-escapes는 Pull request의 제목에서 제외할 문자를 지정하는 부분입니다.
template: |
$CHANGEStemplate은 Release notes의 전체 템플릿을 지정하는 부분입니다. $CHANGES는 change-template에서 지정한 내용을 나타냅니다.
이렇게 작성한 Release Drafter 설정 파일은 Release Drafter 액션이 실행할 때 사용되므로, Release Drafter 액션을 작성하고 실행하기 전에 main 브랜치에 추가되어야 합니다.
Release notes의 Draft 작성
이제 Release Drafter를 사용하는 GitHub Actions를 작성해 봅시다. Release Drafter 액션을 작성하기 위해 .github/workflows/release-drafter.yml 파일을 생성하고 다음과 같이 수정합니다.
name: Release Drafter

on:
  push:
    branches:
      - main
  pull_request:
    types:
      - opened
      - reopened
      - synchronize

permissions:
  contents: read

jobs:
  update_release_draft:
    permissions:
      contents: write
      pull-requests: write
      checks: write
    runs-on: ubuntu-latest
    steps:
      - uses: release-drafter/release-drafter@v5
        env:
          GITHUB_TOKEN: ${{ secrets.GITHUB_TOKEN }}
이 GitHub Actions은 Pull request가 생성되면 autolabeler를 사용하여 Pull request의 제목에 맞는 label을 자동으로 지정하게 됩니다.
그리고 Pull request가 main 브랜치에 merge되면 Release Drafter 액션이 실행되어 Release notes의 Draft를 작성하게 됩니다.
Release notes 배포
지금까지는 Release Drafter를 사용하여 Release notes의 Draft를 작성하는 방법에 대해서 알아보았습니다. 이제 Release notes의 Draft를 Publish하는 방법에 대해서 알아보겠습니다.
Release notes의 Draft를 배포하기 위해 .github/workflows/release.yml 파일을 만들고 다음과 같이 수정합니다.
name: Release

on:
  push:
    tags:
      - 'v[0-9]+.[0-9]+.[0-9]+'

jobs:
  release:
    permissions:
      contents: write
      pull-requests: write
      id-token: write
    runs-on: ubuntu-latest
    steps:
      - name: Get variables
        id: version
        run: echo "::set-output name=version::${GITHUB_REF#refs/tags/v}"

      - uses: actions/checkout@v4
        with:
          ref: v${{ steps.version.outputs.version }}

      - uses: release-drafter/release-drafter@v5
        with:
          tag: v${{ steps.version.outputs.version }}
          name: v${{ steps.version.outputs.version }}
          version: v${{ steps.version.outputs.version }}
          publish: true
        env:
          GITHUB_TOKEN: ${{ secrets.GITHUB_TOKEN }}
이 GitHub Actions는 시맨틱 버전(Semantic Version)의 Git tag에 동작하며, Release Drafter의 publish 옵션을 사용하여 Draft로 작성된 Release notes를 배포하게 됩니다.
완료
이것으로 GitHub Actions의 Release Drafter를 사용하여 Release notes 작성을 자동화하는 방법에 대해서 알아보았습니다.
Release Drafter는 Pull request의 label을 기반으로 동작합니다. 따라서 Pull request에 적절한 label이 설정되었는지 확인하는 것이 중요합니다.
다음 블로그 포스트에서는 PR Labels Checker 액션을 사용하여 Pull request의 label을 검사하는 방법에 대해서 알아보겠습니다.
제 블로그가 도움이 되셨나요? 하단의 댓글을 달아주시면 저에게 큰 힘이 됩니다!
앱 홍보
Deku가 개발한 앱을 한번 사용해보세요.Deku가 개발한 앱은 Flutter로 개발되었습니다.관심있으신 분들은 앱을 다운로드하여 사용해 주시면 정말 감사하겠습니다.


