목차
개요
React Native에서 인앱 결제를 구현하기 위해 react-native-iap를 사용하는 방법에 대해서 알아보려고 합니다.
인앱 상품 생성하기
인앱 결제를 하기 위해서는 우선 인앱 상품을 생성할 필요가 있습니다. 각 플랫폼에 맞게 인앱 상품을 생성하는 방법에 대해서 알아봅시다.
iOS 인앱 상품 생성
계약, 세금 및 금융거래 설정
iOS에서 인앱 상품을 생성하기 위해서는 우선 계약, 세금 및 금융거래를 설정할 필요가 있습니다. 계약, 세금 및 금융 거래를 설정하기 위해서 App Store Connect로 이동합니다.
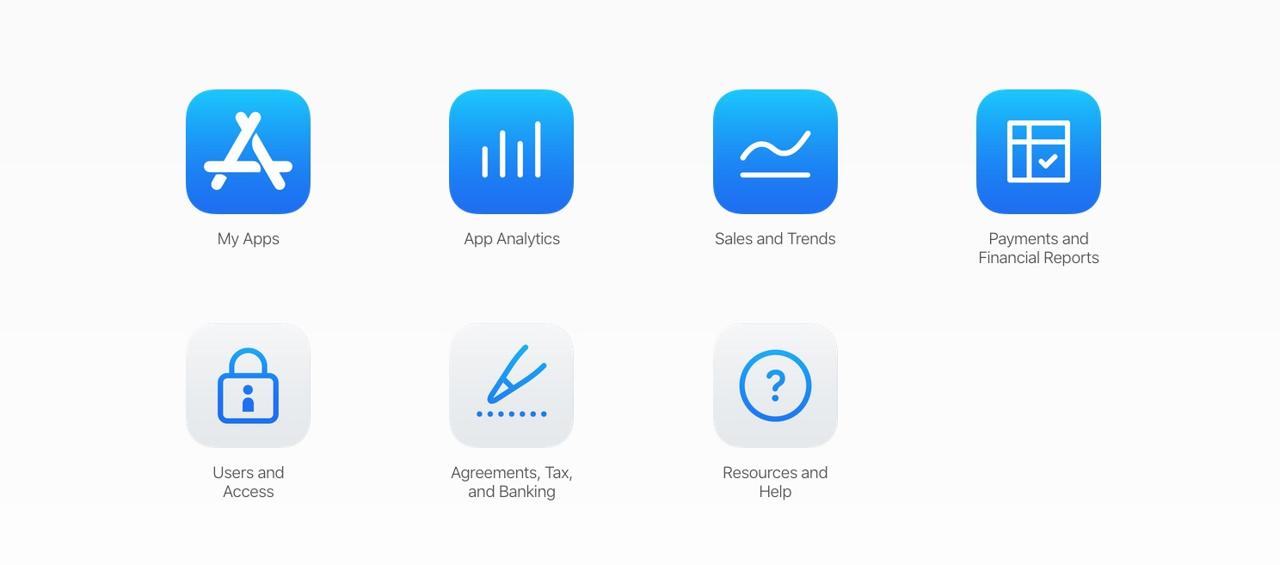
하단에 있는 계약, 세금 및 금융거래(Agreements, Tax, and Banking)을 선택하여 이동합니다.

저는 이미 설정을 하였기 때문에 위와 같은 화면이지만, 여러분은 유료 앱(Paid Apps)을 설정할 필요가 있습니다. 필요한 항목을 잘 입력하시면 큰 문제 없이 설정하실 수 있습니다.
앱 내 구입 항목 생성
이제 앱 내에 구입 항목을 생성할 필요가 있습니다. 인앱 결제를 구현하고자 하는 앱을 선택합니다.
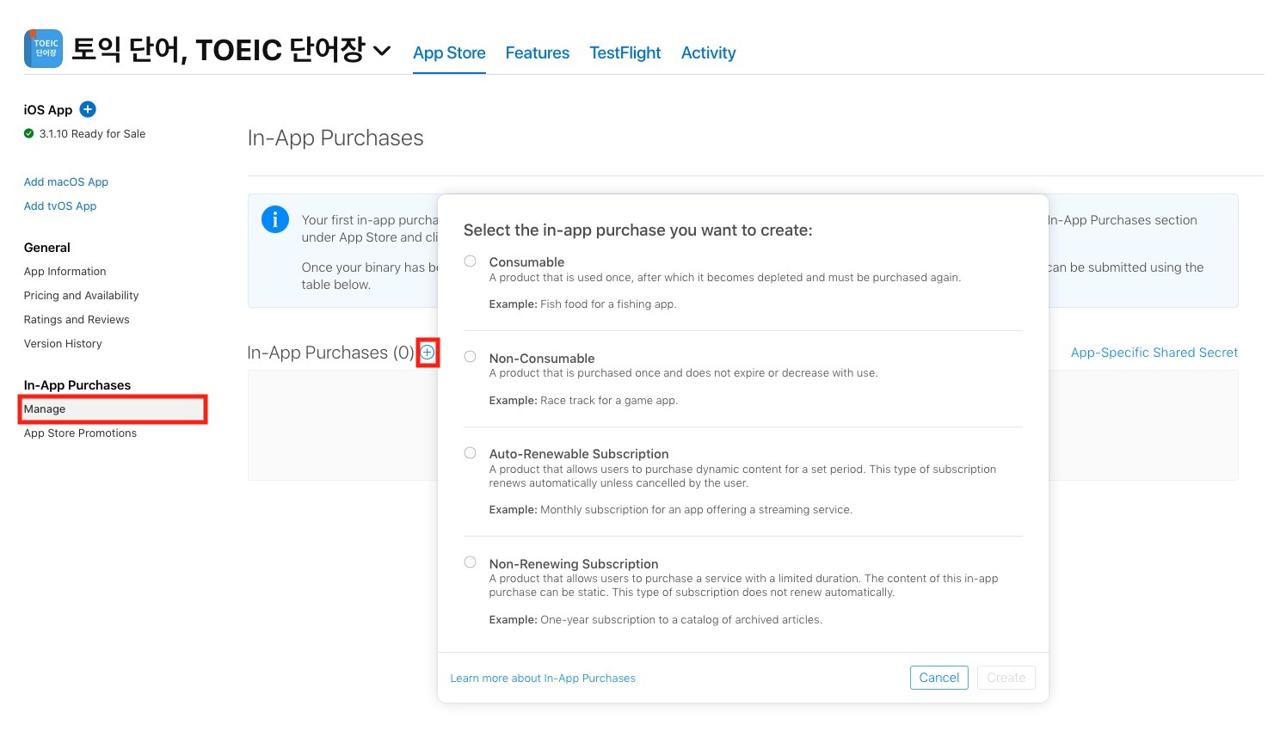
왼쪽 하단의 앱 내 구입(In-App Purchases)의 관리(Manage)를 선택하고 플러스 버튼(+)을 누르면, 위와 같이 추가하고자 하는 상품을 선택할 수 있습니다.
저는 제 앱에 자동 갱신 구독(Auto-Renewable Subscription)을 추가하였으므로, 자동 갱신 구독을 중심으로 설명합니다. 다른 상품을 추가하게 되면, 블로그를 수정하도록 하겠습니다.
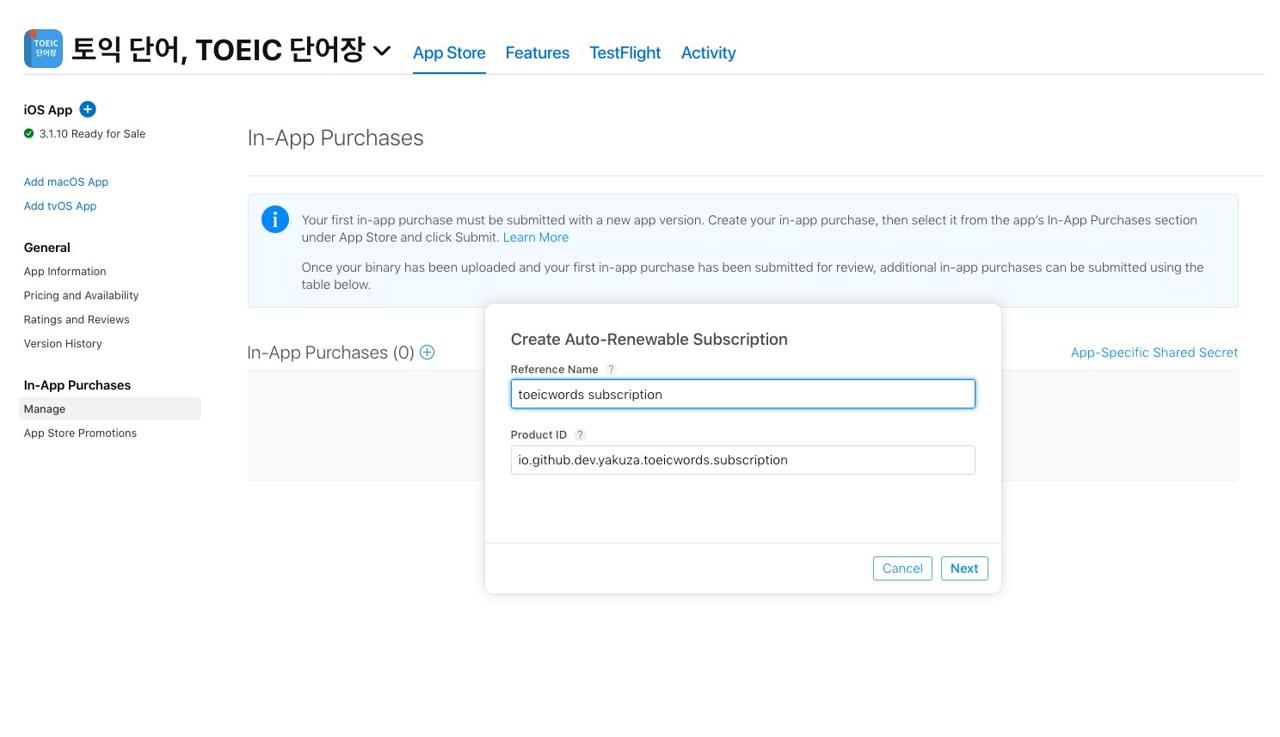
여기서 식별 정보(Reference Name)는 App store connect에만 표시되는 이름이므로 자신이 알아보기 쉬운 이름으로 설정합니다. 제품 ID(Product ID)는 앱에서 인앱 상품을 가져올 때 사용됩니다.
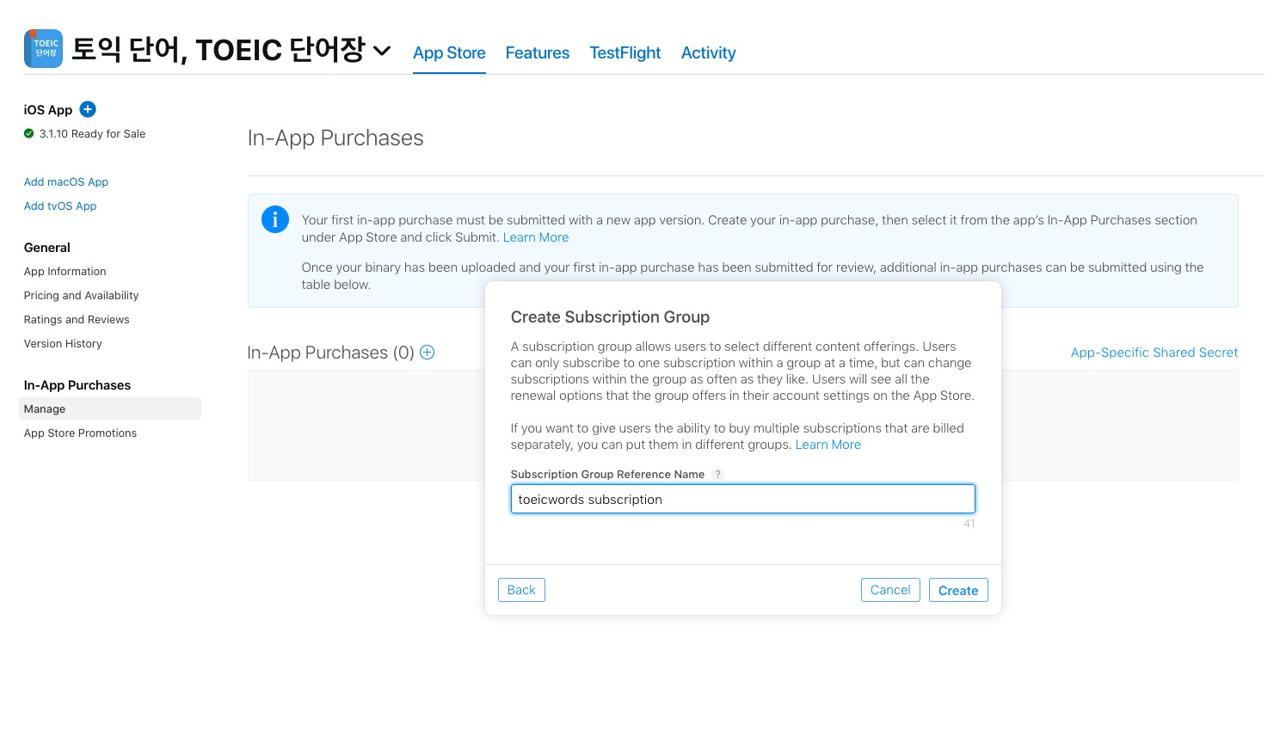
그 다음 구독 그룹 식별 정보(Subscription Group Reference Name)를 입력합니다. 식별 정보(Reference Name)와 마찬가지로, App store connect에만 표시되므로, 자신이 쉽게 알아볼 수 있는 이름으로 설정합니다.
앱 내 구입 메타데이터 입력
위와 같이 앱 내 구입 항목을 생성하였다면 이제 앱 내 구입 항목의 메타데이터를 입력할 필요가 있습니다.
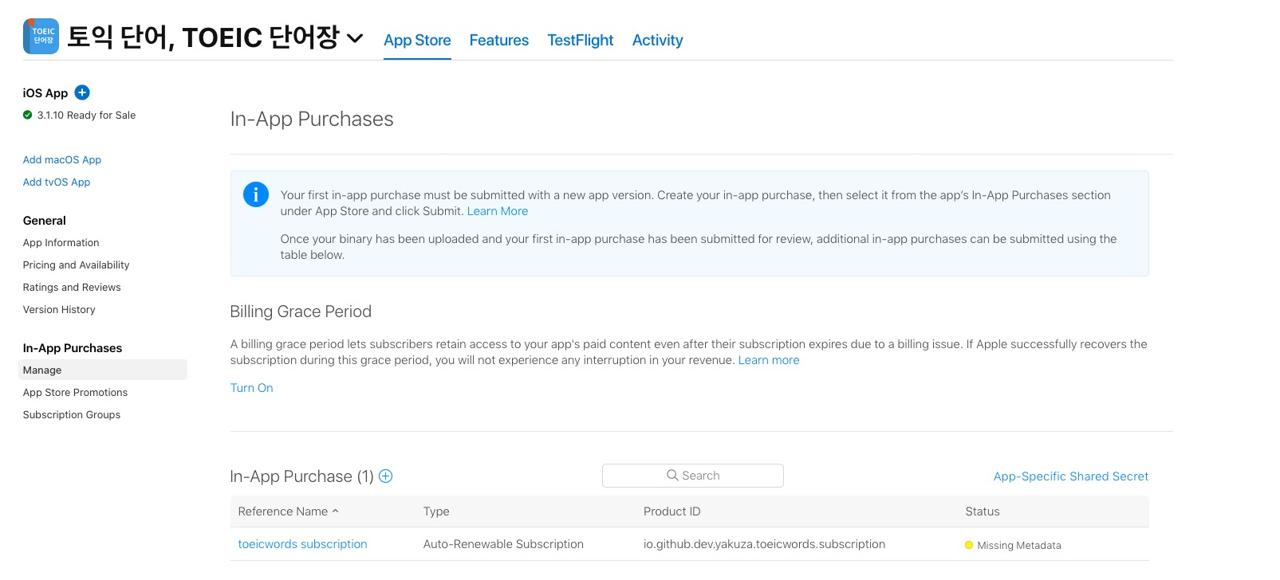
왼쪽 메뉴에서 다시 앱 내 구입(In-App Purchases)의 관리(Manage)를 누르면 위와 같이 메타데이터(Metadata)가 누락된 것을 확인할 수 있습니다. 이제 식별 정보의 이름을 선택하여 해당 항목의 상세 페이지로 이동합니다.
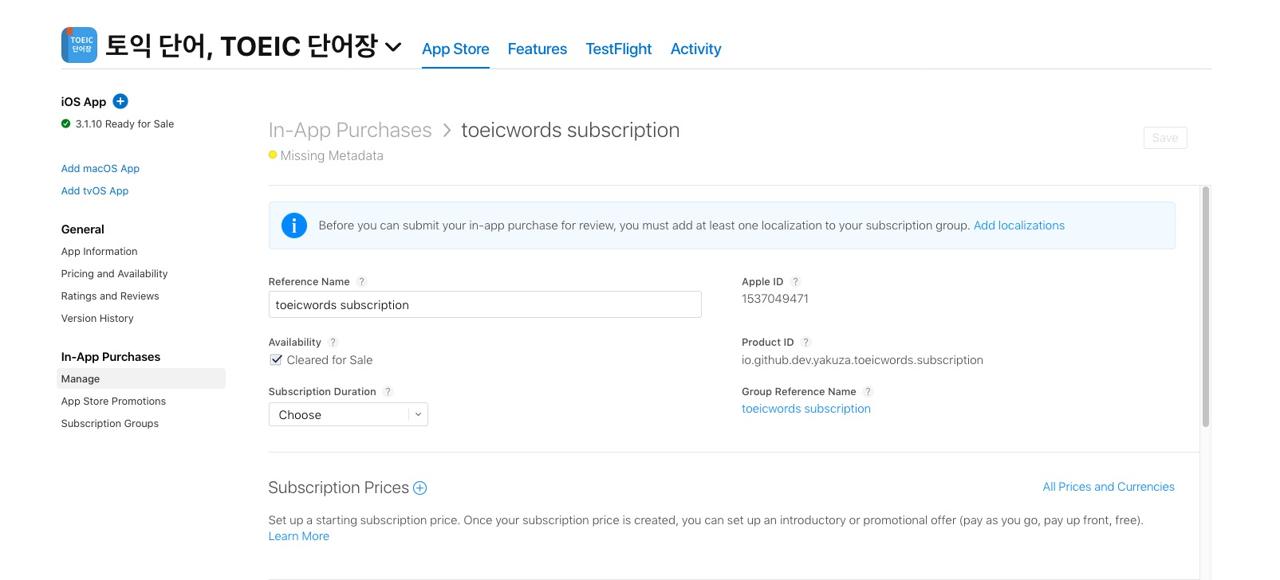
위와 같이 상세 페이지로 이동하면 앱 내 구입 항목에 필요한 정보를 입력해야 합니다.
- 구독 기간(Subscription Duration)
- 구독 가격(Subscription Prices)
- App Store 정보(App Store Information)의 현지화(Localizations)
- 심사 정보
여기서 App Store 정보는 앱내에서도, 앱 스토어에서도 표시되는 이름과 설명이므로 잘 작성합니다. 이 이름과 설명을 앱내에서 react-native-iap를 통해 가져올 수 있는데, 가져온 내용을 그대로 표시해 주지 않으면 리젝(Reject)될 수 있습니다.
저는 리젝(Reject)을 피하고자, 심사 정보를 좀 자세히 작성하였습니다. 어떻게 하면 구매 페이지를 볼 수 있는지, 구매 페이지에는 어떤 내용들이 포함되고 있는지 작성하였습니다.
- Title of publication or service
- Length of subscription (time period and/or content/services provided during each subscription period)
- Price of subscription, and price per unit if appropriate
- Payment will be charged to iTunes Account at confirmation of purchase
- Subscription automatically renews unless auto-renew is turned off at least 24-hours before the end of the current period
- Account will be charged for renewal within 24-hours prior to the end of the current period, and identify the cost of the renewal
- Subscriptions may be managed by the user and auto-renewal may be turned off by going to the user’s Account Settings after purchase
- Links to Your Privacy Policy and Terms of Use
- Any unused portion of a free trial period, if offered, will be forfeited when the user purchases a subscription to that publication, where applicable
위에 내용으로 리젝(Reject)이 되므로 위에 내용을 포함하고 있고, 어디서 확인이 가능한지 스크린 샷과 설명을 통해 설명하였습니다.
iOS 앱 권한 설정
이제 앱내에서 앱 내 구입을 사용하기 위해서는 권한을 설정할 필요가 있습니다.
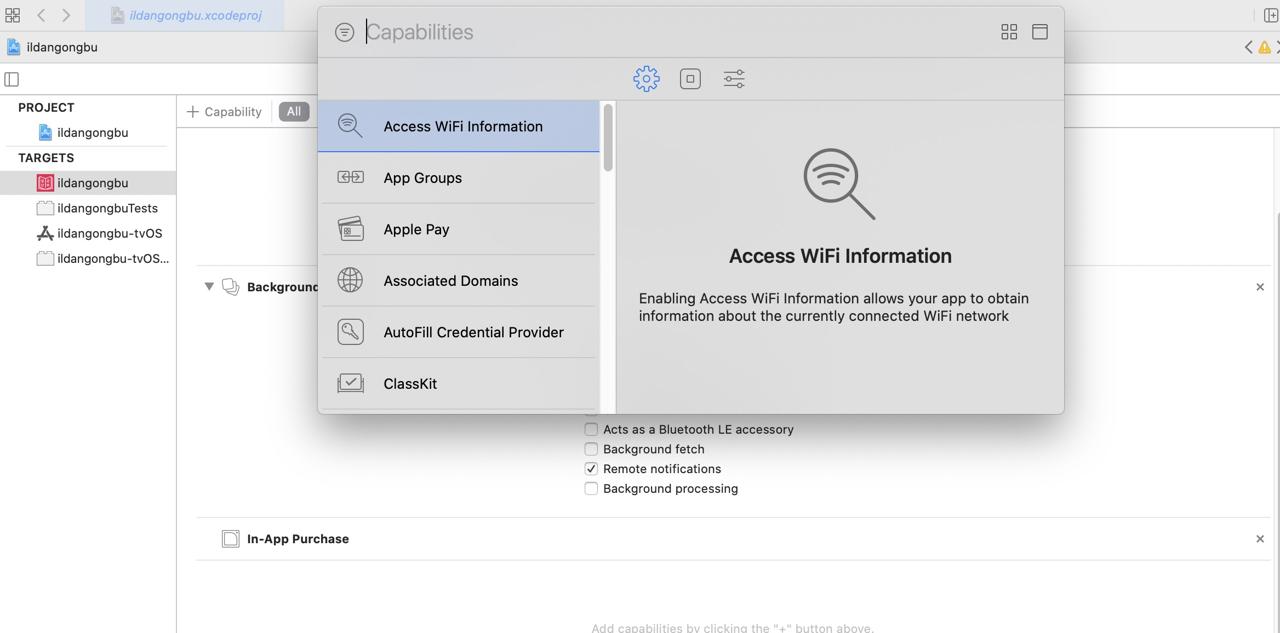
Xcode로 프로젝트를 열고 Signing & Capabilities에 In-App Purchase 권한을 추가합니다.
안드로이드 인앱 상품 생성
Payments 설정
인앱 상품으로 수익이 발생하면, 해당 수익을 입금받을 Payments 정보를 설정해야 합니다. Google Play Console에서 설정(Settings) > 개발자 계정(Developer account) > Payments 설정(Payments settings)를 선택하여 Payments 정보를 설정합니다.
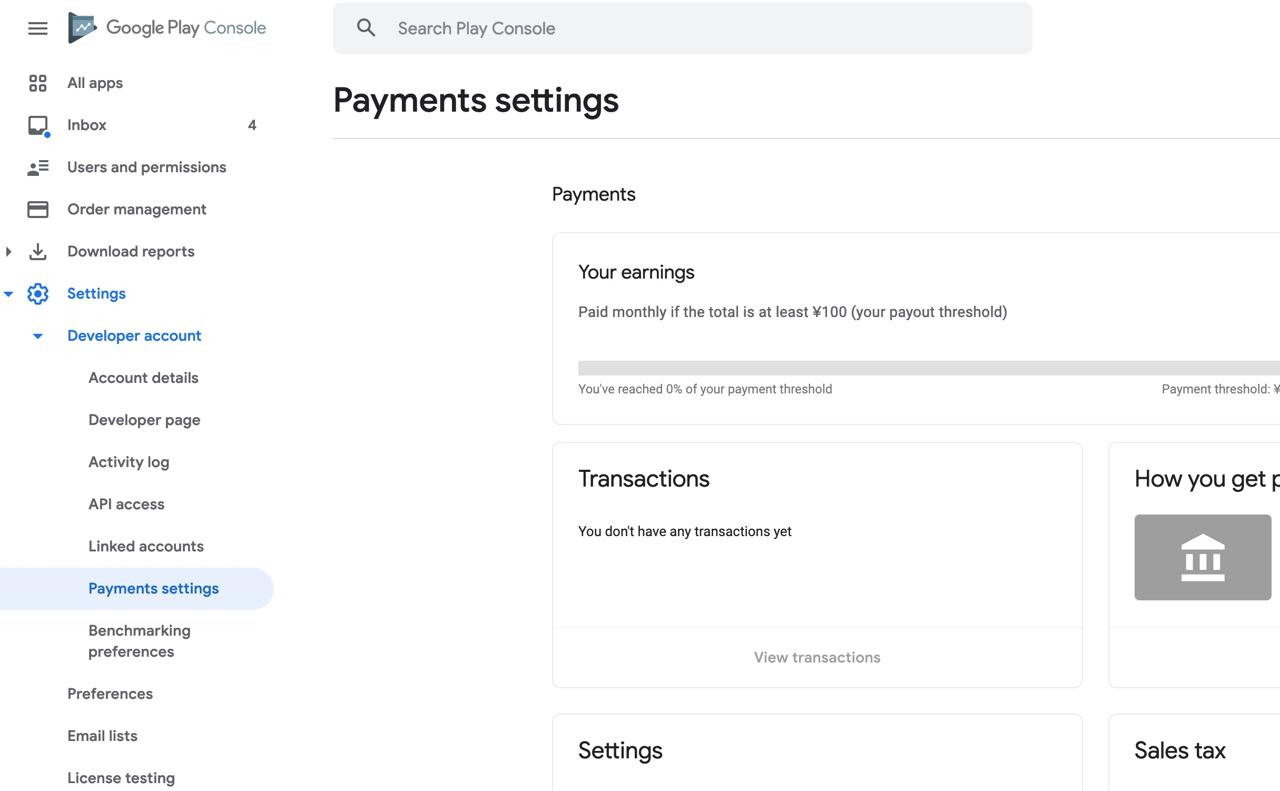
저는 Google Adsense를 연동하고 있었기 때문에, 특별한 설정없이, 사용중인 Payments 정보를 설정할 수 있었습니다.
안드로이드 앱 권한 설정
안드로이드에 인앱 상품을 생성하기 위해 Google Play Console로 이동하고 설정하고자 하는 앱을 선택한 후, 왼쪽의 구독(Subscriptions) 메뉴를 선택하면 다음과 같은 화면을 확인할 수 있습니다.
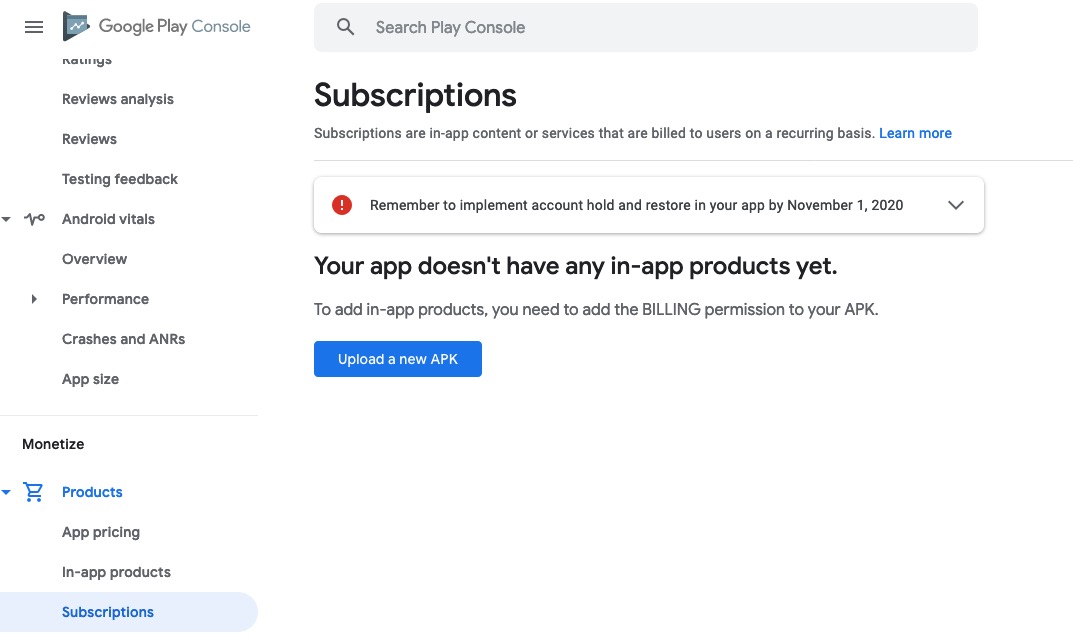
안드로이드에 인앱 상품을 생성하기 위해서는 BILLING 권한이 설정된 앱이 Google Play에 업로드해야 합니다. 우선 android/app/src/main/AndroidManifest.xml 파일을 열고 아래와 같이 BILLING 권한을 추가합니다.
<manifest xmlns:android="http://schemas.android.com/apk/res/android"
  package="io.github.dev.yakuza.toeicwords">
  ...
  <uses-permission android:name="com.android.vending.BILLING"/>
  ...
  <application
      android:name=".MainApplication"
이렇게 권한을 설정하였다면, 일단 빌드하여 Google Play에 업로드 합니다.

업로드를 완료하면 위와 같이 구독(Subscriptions) 메뉴가 바뀐 것을 확인할 수 있습니다.
안드로이드 앱 내 구입 항목 생성
이제 구독(Subscriptions) 메뉴에서 구독 만들기(Create subscription) 버튼을 눌러 구독 항목을 생성합니다.

그리고 구독 항목에 필요한 정보를 입력하여 구독 항목을 생성합니다.
- 제품 ID / Product ID
- 구독 세부정보(이름, 설명) / Subscription details(Name, Description)
- 가격(결제 기간, 기본 가격) / Price(Billing period, Default price)
iOS와 마찬가지로 제품 ID(Product ID)는 앱 내에서 결제할 때 사용하는 ID입니다. 저는 보통 iOS와 동일한 ID를 사용합니다. react-native-iap를 통해 구독 세부정보, 가격등을 가져올 수 있습니다. (이를 표시하지 않으면 리젝(reject)을 당하는지는 모르겠습니다만, 저는 이 정보를 iOS와 마찬가지로 표시합니다.)
코딩
react-native-iap 설치
다음 명령어를 사용하여 react-native-iap를 설치합니다.
npm install react-native-iap --save그리고 다음 명령어를 사용하여 iOS에 필요한 라이브러리를 설치합니다.
npx pod-installJavaScript
아래에 코드는 실제로 제가 사용하는 코드입니다.
import React, { createContext, useState, useEffect, useCallback, useRef, useContext } from 'react';
import AsyncStorage from '@react-native-async-storage/async-storage';
import {
  Alert,
  EmitterSubscription,
  Platform,
  Linking,
  ActivityIndicator,
  AppState,
} from 'react-native';
import Styled from 'styled-components/native';
import Icon from 'react-native-vector-icons/MaterialCommunityIcons';
import SplashScreen from 'react-native-splash-screen';

import ENV from '~/env';
import { ThemeContext } from '~/Context';
import { ActionSheet } from '~/Component';

import RNIap, {
  InAppPurchase,
  SubscriptionPurchase,
  finishTransaction,
  purchaseErrorListener,
  purchaseUpdatedListener,
  Subscription,
  PurchaseError,
} from 'react-native-iap';

import { checkReceipt } from './checkReceipt';

let purchaseUpdateSubscription: EmitterSubscription;
let purchaseErrorSubscription: EmitterSubscription;

const itemSubs = Platform.select({
  default: [ENV.subscriptionId],
});

const Container = Styled.View`
`;
const TitleContainer = Styled.View`
  justify-content: center;
  align-items: center;
  padding: 16px;
`;
const Title = Styled.Text`
  font-size: 16px;
  font-weight: bold;
  color: ${({ theme }: { theme: Theme }): string => theme.black};
`;
const SubTitle = Styled.Text`
  font-size: 16px;
  color: ${({ theme }: { theme: Theme }): string => theme.black};
`;
const DescriptionContainer = Styled.View`
  padding: 0 24px;
  width: 100%;
`;
const Description = Styled.Text`
  font-size: 14px;
  color: ${({ theme }: { theme: Theme }): string => theme.black};
`;
const PurchaseButton = Styled.TouchableOpacity`
  margin: 16px;
  padding: 16px;
  border-radius: 10px;
  background-color: ${({ theme }: { theme: Theme }): string => theme.black};
  justify-content: center;
  align-items: center;
`;
const PurchaseLabel = Styled.Text`
  color: ${({ theme }: { theme: Theme }): string => theme.white};
  font-size: 16px;
`;
const Terms = Styled.Text`
  font-size: 12px;
  color: ${({ theme }: { theme: Theme }): string => theme.black};
`;
const Link = Styled.Text`
  color: ${({ theme }: { theme: Theme }): string => theme.primary};
`;
const LoadingContainer = Styled.View`
  position: absolute;
  top: 0;
  left: 0;
  right: 0;
  bottom: 0;
  justify-content: center;
  align-items: center;
`;
const LoadingBackground = Styled.View`
  position: absolute;
  top: 0;
  left: 0;
  right: 0;
  bottom: 0;
  background-color: ${({ theme }: { theme: Theme }): string =>
    theme.isLightTheme ? theme.black : theme.white};
  opacity: 0.8;
`;

interface Props {
  children: JSX.Element | Array<JSX.Element>;
}

const IAPContext = createContext<IAPContext>({
  isSubscription: false,
  subscription: undefined,
  showPurchase: () => {},
});

const IAPProvider = ({ children }: Props): JSX.Element => {
  const [showLoading, setShowLoading] = useState<boolean>(false);
  const [isSubscription, setIsSubscription] = useState<boolean>(false);
  const [subscription, setSubscription] = useState<Subscription | undefined>(undefined);
  const actionSheetRef = useRef<ActionSheet>(null);
  const { theme } = useContext<ThemeContext>(ThemeContext);

  const showPurchase = () => {
    actionSheetRef.current?.open();
  };

  const _checkReceipt = async () => {
    const isValidated = await checkReceipt();

    setIsSubscription(isValidated);
    setTimeout(() => {
      SplashScreen.hide();
    }, 1000);
  };

  const _requestSubscription = () => {
    setShowLoading(true);
    if (subscription) {
      RNIap.requestSubscription(subscription.productId);
    }
  };

  const _restorePurchases = () => {
    setShowLoading(true);
    RNIap.getAvailablePurchases()
      .then((purchases) => {
        console.debug('restorePurchases');
        let receipt = purchases[0].transactionReceipt;
        if (Platform.OS === 'android' && purchases[0].purchaseToken) {
          receipt = purchases[0].purchaseToken;
        }
        AsyncStorage.setItem('receipt', receipt);
        setShowLoading(false);
        setIsSubscription(true);
        Alert.alert(
          ENV.language['restore successful'],
          ENV.language['you have successfully restored your purchase history'],
          [{ text: ENV.language['ok'], onPress: () => actionSheetRef.current?.close() }],
        );
      })
      .catch((err) => {
        console.debug('restorePurchases');
        console.error(err);
        setShowLoading(false);
        setIsSubscription(false);
        AsyncStorage.removeItem('receipt');
        Alert.alert(ENV.language['restore failed'], ENV.language['restore failed reason']);
      });
  };

  const _initIAP = useCallback(async (): Promise<void> => {
    RNIap.clearProductsIOS();

    try {
      const result = await RNIap.initConnection();
      await RNIap.flushFailedPurchasesCachedAsPendingAndroid();
      if (result === false) {
        Alert.alert(ENV.language["couldn't get in-app-purchase information"]);
        return;
      }
    } catch (err) {
      console.debug('initConnection');
      console.error(err.code, err.message);
      Alert.alert(ENV.language['fail to get in-app-purchase information']);
    }

    purchaseUpdateSubscription = purchaseUpdatedListener(
      (purchase: InAppPurchase | SubscriptionPurchase) => {
        console.debug('purchaseUpdatedListener');
        setShowLoading(false);
        setTimeout(() => {
          actionSheetRef.current?.close();
        }, 400);
        const receipt =
          Platform.OS === 'ios' ? purchase.transactionReceipt : purchase.purchaseToken;
        if (receipt) {
          finishTransaction(purchase)
            .then(() => {
              AsyncStorage.setItem('receipt', receipt);
              setIsSubscription(true);
            })
            .catch(() => {
              setIsSubscription(false);
              Alert.alert(
                ENV.language['purchase is failed'],
                ENV.language['the purchase is failed'],
              );
            });
        }
      },
    );

    purchaseErrorSubscription = purchaseErrorListener((error: PurchaseError) => {
      console.debug('purchaseErrorListener');
      console.error(error);
      setShowLoading(false);
      if (error.code !== 'E_USER_CANCELLED') {
        Alert.alert(ENV.language['purchase is failed'], ENV.language['the purchase is failed']);
      }
    });

    const subscriptions = await RNIap.getSubscriptions(itemSubs);
    setSubscription({
      ...subscriptions[0],
    });
  }, []);

  const handleAppStateChange = (nextAppState: string): void => {
    if (nextAppState === 'active') {
      _checkReceipt();
    }
  };

  useEffect(() => {
    _initIAP();
    _checkReceipt();
    AppState.addEventListener('change', handleAppStateChange);

    return (): void => {
      if (purchaseUpdateSubscription) {
        purchaseUpdateSubscription.remove();
      }
      if (purchaseErrorSubscription) {
        purchaseErrorSubscription.remove();
      }
      if (handleAppStateChange) {
        AppState.removeEventListener('change', handleAppStateChange);
      }
    };
  }, []);

  return (
    <IAPContext.Provider
      value={{
        isSubscription,
        subscription,
        showPurchase,
      }}>
      {children}
      <ActionSheet
        ref={actionSheetRef}
        height={Platform.OS === 'ios' ? 380 : 420}
        disableClose={showLoading}
        customStyles={{
          container: {
            backgroundColor: theme.white,
          },
        }}>
        {subscription && (
          <Container>
            <TitleContainer>
              <Title>{subscription.title.split(' (')[0]}</Title>
              <SubTitle>{subscription.description}</SubTitle>
            </TitleContainer>
            <DescriptionContainer>
              <Description>
                <Icon name="information-outline" />{' '}
                {
                  ENV.language[
                    "I'm developing the app alone. So your subscription is a great help to me"
                  ]
                }
              </Description>
              <Description>
                {'  '}
                {ENV.language['Your subscription helps me keep the good words app']}
              </Description>
              <Description>
                {'  '}
                {
                  ENV.language[
                    'Learn vocabulary without ads for the price of a cup of coffee each month'
                  ]
                }
              </Description>
            </DescriptionContainer>
            <PurchaseButton
              onPress={() => {
                _requestSubscription();
              }}>
              <PurchaseLabel>
                {subscription.localizedPrice} / {ENV.language['month']}
              </PurchaseLabel>
            </PurchaseButton>
            <DescriptionContainer>
              <Terms>
                - {ENV.language['Already subscribed?']}{' '}
                <Link onPress={() => _restorePurchases()}>
                  {ENV.language['Restoring purchases']}
                </Link>
              </Terms>
              <Terms>- {ENV.language['cancel the purchase']}</Terms>
              {Platform.OS === 'ios' && (
                <Terms>- {ENV.language['payment is charged to your iTunes account']}</Terms>
              )}
              <Terms>
                - {ENV.language['If you have any question,']}{' '}
                <Link onPress={() => Linking.openURL('https://deku.posstree.com/ko/contact/')}>
                  Contact
                </Link>{' '}
                {ENV.language['us']}
              </Terms>
              <Terms>
                - {ENV.language['see the']}
                <Link onPress={() => Linking.openURL('https://deku.posstree.com/privacy/ko/')}>
                  {ENV.language['terms of use']}
                </Link>{' '}
                {ENV.language['details']}
              </Terms>
            </DescriptionContainer>
          </Container>
        )}
        {showLoading && (
          <LoadingContainer>
            <LoadingBackground />
            <ActivityIndicator color={theme.primary} size="large" />
          </LoadingContainer>
        )}
      </ActionSheet>
    </IAPContext.Provider>
  );
};

export { IAPProvider, IAPContext };
위에 소스 코드는 제 프로젝트에 의존되는 부분들이 많기 때문에 그대로 사용하실 수 없습니다. 또한 저는 결제 로직을 Context API를 사용하여 구현하였습니다. 위에 코드를 하나하나 살펴보면서 결제 로직을 어떻게 만드는지 확인해 봅시다.
우선 결제 로직의 큰 흐름은 초기화, 결제, 결제 확인, 복원으로 나눌 수 있습니다.
초기화
인앱 결제를 위해서는 우선 라이브러리를 초기화하고, 구독 상품의 정보를 가져올 필요가 있습니다.
...
const itemSubs = Platform.select({
  default: [ENV.subscriptionId],
});
...
const IAPProvider = ({ children }: Props): JSX.Element => {
  ...
  const _initIAP = useCallback(async (): Promise<void> => {
    RNIap.clearProductsIOS();

    try {
      const result = await RNIap.initConnection();
      await RNIap.flushFailedPurchasesCachedAsPendingAndroid();
      if (result === false) {
        Alert.alert(ENV.language["couldn't get in-app-purchase information"]);
        return;
      }
    } catch (err) {
      console.debug('initConnection');
      console.error(err.code, err.message);
      Alert.alert(ENV.language['fail to get in-app-purchase information']);
    }
    ...
    const subscriptions = await RNIap.getSubscriptions(itemSubs);
    setSubscription({
      ...subscriptions[0],
    });
  }, []);
  ...
  useEffect(() => {
    _initIAP();
    ...
  }, []);

  return (
    ...
  );
};
...
라이브러리를 초기화하기 위해서는 아래와 같은 코드를 사용합니다.
RNIap.clearProductsIOS();

try {
  const result = await RNIap.initConnection();
  await RNIap.flushFailedPurchasesCachedAsPendingAndroid();
  if (result === false) {
    Alert.alert(ENV.language["couldn't get in-app-purchase information"]);
    return;
  }
} catch (err) {
  console.debug('initConnection');
  console.error(err.code, err.message);
  Alert.alert(ENV.language['fail to get in-app-purchase information']);
}
위에서 clearProductsIOS와 flushFailedPurchasesCachedAsPendingAndroid같이 플랫폼에 의존하는 코드가 있지만 굳이 Platform.OS를 사용하여 로직을 분리할 필요없습니다.
그리고 구독 상품의 정보를 가져오기 위해서는 상품 ID를 설정할 필요가 있습니다.
const itemSubs = Platform.select({
  default: [ENV.subscriptionId],
});
저는 iOS와 안드로이드 모두 같은 ID를 사용하기 때문에 하나로 사용했지만, 만약 iOS와 안드로이드가 다른 경우는 아래와 같이 설정할 수 있습니다.
const itemSubs = Platform.select({
  ios: [ENV.ios.subscriptionId],
  android: [ENV.android.subscriptionId],
});
이렇게 설정한 상품 ID를 사용하여 상품의 정보를 가져옵니다.
const subscriptions = await RNIap.getSubscriptions(itemSubs);
setSubscription({
  ...subscriptions[0],
});
그리고 가져온 정보를 state에 저장합니다. 저의 경우는 하나의 구독 상품만을 사용하기 때문에 subscriptions[0]로 첫번째 상품만을 설정하였습니다.
이렇게 가져온 정보를 아래와 같이 화면에 표시합니다.
...
<Title>{subscription.title.split(' (')[0]}</Title>
<SubTitle>{subscription.description}</SubTitle>
...
<PurchaseLabel>
  {subscription.localizedPrice} / {ENV.language['month']}
</PurchaseLabel>
...
결제
다음은 가져온 상품 정보를 사용하여 실제 결제를 실행하는 부분입니다.
...
let purchaseUpdateSubscription: EmitterSubscription;
let purchaseErrorSubscription: EmitterSubscription;
...
const IAPProvider = ({ children }: Props): JSX.Element => {
  ...
  const _requestSubscription = () => {
    setShowLoading(true);
    if (subscription) {
      RNIap.requestSubscription(subscription.productId);
    }
  };
  ...
  const _initIAP = useCallback(async (): Promise<void> => {
    ...
    purchaseUpdateSubscription = purchaseUpdatedListener(
      (purchase: InAppPurchase | SubscriptionPurchase) => {
       ...
        const receipt =
          Platform.OS === 'ios' ? purchase.transactionReceipt : purchase.purchaseToken;
        if (receipt) {
          finishTransaction(purchase)
            .then(() => {
              AsyncStorage.setItem('receipt', receipt);
              setIsSubscription(true);
            })
            .catch(() => {
              setIsSubscription(false);
              Alert.alert(
                ENV.language['purchase is failed'],
                ENV.language['the purchase is failed'],
              );
            });
        }
      },
    );

    purchaseErrorSubscription = purchaseErrorListener((error: PurchaseError) => {
      console.debug('purchaseErrorListener');
      console.error(error);
      setShowLoading(false);
      if (error.code !== 'E_USER_CANCELLED') {
        Alert.alert(ENV.language['purchase is failed'], ENV.language['the purchase is failed']);
      }
    });
    ...
  }, []);
  ...

  useEffect(() => {
    ...
    return (): void => {
      if (purchaseUpdateSubscription) {
        purchaseUpdateSubscription.remove();
      }
      if (purchaseErrorSubscription) {
        purchaseErrorSubscription.remove();
      }
      ...
    };
  }, []);
  ...
};
...
실제 결제가 이루어진 후, 결제 성공 여부와 실패 여부를 전달 받기 위해서, 리스너(Listener)를 등록할 필요가 있습니다.
...
let purchaseUpdateSubscription: EmitterSubscription;
let purchaseErrorSubscription: EmitterSubscription;
...
purchaseUpdateSubscription = purchaseUpdatedListener(
  (purchase: InAppPurchase | SubscriptionPurchase) => {
    ...
    const receipt =
      Platform.OS === 'ios' ? purchase.transactionReceipt : purchase.purchaseToken;
    if (receipt) {
      finishTransaction(purchase)
        .then(() => {
          AsyncStorage.setItem('receipt', receipt);
          setIsSubscription(true);
        })
        .catch(() => {
          setIsSubscription(false);
          Alert.alert(
            ENV.language['purchase is failed'],
            ENV.language['the purchase is failed'],
          );
        });
    }
  },
);

purchaseErrorSubscription = purchaseErrorListener((error: PurchaseError) => {
  ...
});
...
useEffect(() => {
  ...
  return (): void => {
    if (purchaseUpdateSubscription) {
      purchaseUpdateSubscription.remove();
    }
    if (purchaseErrorSubscription) {
      purchaseErrorSubscription.remove();
    }
    ...
  };
}, []);
...
결제 성공시에는 purchaseUpdatedListener이 호출되며 finishTransaction을 사용하여 결제가 잘 이루어졌음을 알림니다. 결제가 실패하였을 때는 purchaseErrorListener가 호출되며 사용자에게 결제가 실패되었음을 알림니다.
또한 useEffect을 사용하여 컴포넌트가 Unmount될 때, 리스너(Listener)를 제거합니다.
이제 위에서 정의한 _requestSubscription 함수를 결제 버튼과 연결합니다.
<PurchaseButton
  onPress={() => {
    _requestSubscription();
  }}>
  <PurchaseLabel>
    {subscription.localizedPrice} / {ENV.language['month']}
  </PurchaseLabel>
</PurchaseButton>
결제 확인
결제가 성공했다면, 이에 대한 결과값을 받아 올 수 있습니다. 이렇게 받아온 결과가 제대로된 결과인지 확인(Validate)할 필요가 있습니다. iOS는 앱 자체 또는 서버에서 확인이 가능하며, 안드로이드는 서버를 통해서 확인이 가능합니다.
저는 서버를 가지고 있지 않기 때문에, iOS는 앱 자체 검증으로, 안드로이드는 검증을 하지 않고, 결제 정보를 한번 더 가져옴으로써 결제를 확인하였습니다.
iOS는 validateReceiptIos을 사용하여 앱 자체에서 검증이 가능합니다. 우선 getReceiptIOS으로 현재 영수증(Receipt)을 가져오고 그 영수증(Receipt)이 유효한지 validateReceiptIos을 통해 확인합니다.
const checkReceiptIOS = async () => {
  let isValidated = false;
  const receipt = await AsyncStorage.getItem('receipt');
  if (receipt) {
    const newReceipt = await getReceiptIOS();
    const validated = await validateReceiptIos(
      {
        'receipt-data': newReceipt,
        password: '****************',
      },
      __DEV__,
    );

    if (validated !== false && validated.status === 0) {
      isValidated = true;
      AsyncStorage.setItem('receipt', newReceipt);
    } else {
      isValidated = false;
      AsyncStorage.removeItem('receipt');
    }
  }
  return isValidated;
};
위와 같이 validateReceiptIos을 통해 영수증을 검증할때, password가 필요합니다. 이 password는 App store connect의 공유 암호(Shared secret)입니다.
공유 암호(Shared secret)를 발급받기 위해서는 App store connect로 이동한 후 사용자 및 액세스(Users and Access)로 이동합니다.

상단에 공유 암호(Shared secret)를 선택하고 공유 암호를 생성합니다. 여기서 발급한 공유 암호는 모든 앱에서 사용이 가능합니다. 특정 앱에만 한정한 공유 암호를 생성할 수도 있습니다.
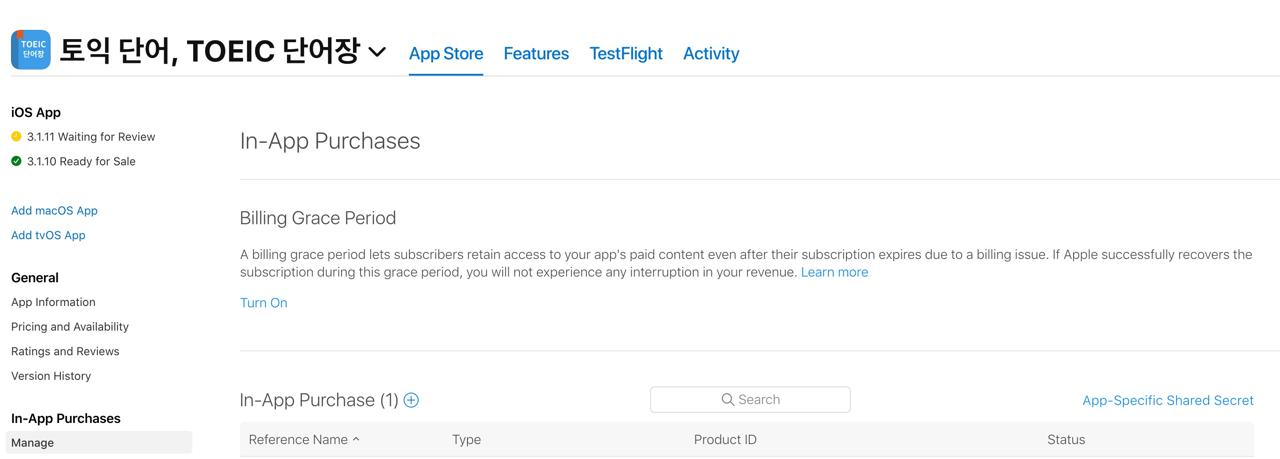
특정 앱에서만 사용 가능한 공유 암호를 생성하기 위해서는 공유 암호를 생성하고자 하는 앱으로 이동 한 후, 앱 내 구입(In-App Purchases)의 관리(Manage)로 이동합니다. 그럼 오른쪽에 앱 공유 암호(App-Specific Shared Secret)을 통해 특정 앱에서만 사용 가능한 공유 암호를 생성할 수 있습니다.
안드로이드는 validateReceiptAndroid을 통해 확인이 가능합니다. 하지만 accessToken을 발급받기 위해서는 서버가 필요합니다.
const checkReceiptAndroid = async () => {
  let isValidated = false;
  const receipt = await AsyncStorage.getItem('receipt');
  if (receipt) {
    try {
      const purchases = await RNIap.getAvailablePurchases();
      console.debug('checkReceiptAndroid');
      let receipt = purchases[0].transactionReceipt;
      if (Platform.OS === 'android' && purchases[0].purchaseToken) {
        receipt = purchases[0].purchaseToken;
      }
      AsyncStorage.setItem('receipt', receipt);
      isValidated = true;
    } catch (error) {
      isValidated = false;
      AsyncStorage.removeItem('receipt');
    }
  }
  return isValidated;
};
저는 서버를 사용하지 않기 때문에, getAvailablePurchases을 통해 상품 정보를 가져와 정보가 있으면 유효한 사용자라고 판단하도록 했습니다.
복원
결제를 한 사용자가 앱을 지우거나 어떤 문제가 있어 결제 연결이 해제된 경우, getAvailablePurchases을 통해 결제를 복원할 수 있습니다.
const _restorePurchases = () => {
  setShowLoading(true);
  RNIap.getAvailablePurchases()
    .then((purchases) => {
      console.debug('restorePurchases');
      let receipt = purchases[0].transactionReceipt;
      if (Platform.OS === 'android' && purchases[0].purchaseToken) {
        receipt = purchases[0].purchaseToken;
      }
      AsyncStorage.setItem('receipt', receipt);
      setShowLoading(false);
      setIsSubscription(true);
      Alert.alert(
        ENV.language['restore successful'],
        ENV.language['you have successfully restored your purchase history'],
        [{ text: ENV.language['ok'], onPress: () => actionSheetRef.current?.close() }],
      );
    })
    .catch((err) => {
      console.debug('restorePurchases');
      console.error(err);
      setShowLoading(false);
      setIsSubscription(false);
      AsyncStorage.removeItem('receipt');
      Alert.alert(ENV.language['restore failed'], ENV.language['restore failed reason']);
    });
};
iOS에서는 결제 복원 기능을 지원하지 않으면, 리젝(Reject)될 수 있으므로 꼭 구현해 주어야 합니다.
<Link onPress={() => _restorePurchases()}>
  {ENV.language['Restoring purchases']}
</Link>
이렇게 만든 함수를 결제 복원 버튼과 연결합니다.
테스트
iOS
iOS 테스트 계정 등록
iOS에서 테스트를 위해서는 애플 계정으로 사용한 적이 없는 Email이 필요합니다. 그리고 App store connect로 이동한 후, 사용자 및 액세스(Users and Access)로 이동합니다.
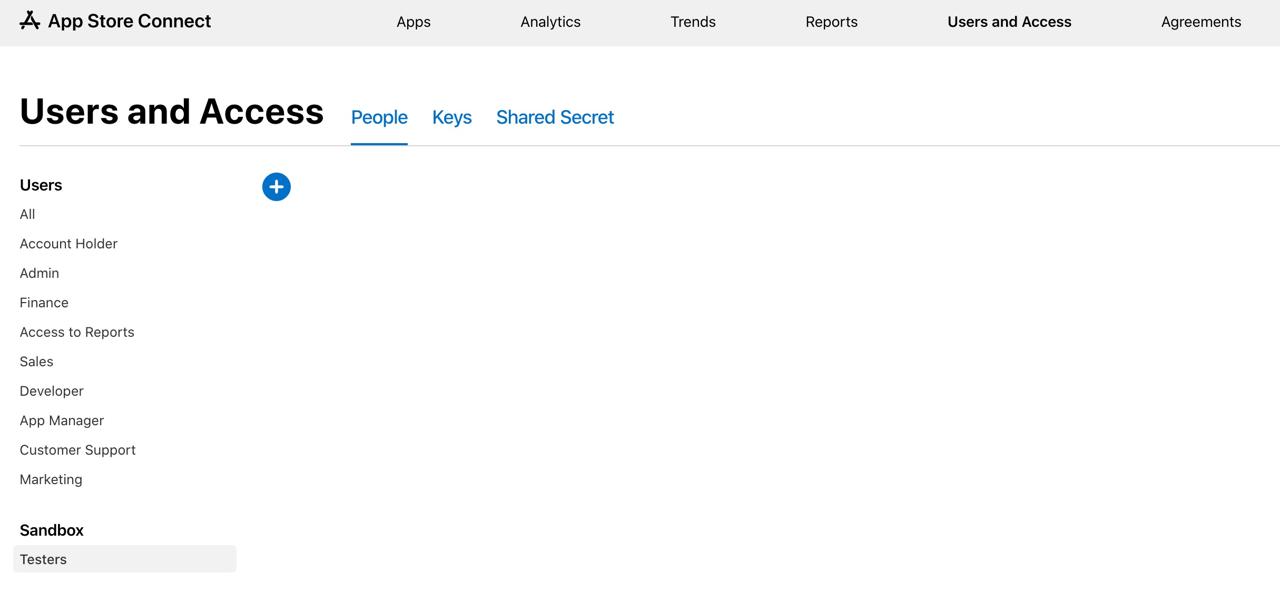
그리고 왼쪽 하단에 있는 Sandbox의 테스터(Testers)를 선택하고 준비한 email로 Sandbox 계정을 생성합니다.
iOS 테스트
시뮬레이터에서는 인앱 결제 테스트를 할 수 없습니다. 개발한 앱을 디바이스에서 테스트해야 합니다.
일단, App store에서 실제로 사용하고 있는 계정을 로그아웃합니다.
그 이후, 개발중인 앱을 디바이스에서 실행하고, 결제 버튼을 선택합니다. 결제가 진행될 때, 위에서 만든 Sandbox 계정을 사용하여 로그인 하여 결제합니다.
안드로이드
안드로이드 테스트 계정 등록
안드로이드는 iOS와 달리 구글에서 사용하는 계정을 그대로 사용할 수 있습니다. Google Play Console로 이동한 후, 설정(Settings) > 라이선스 테스트(License testing)을 선택합니다.
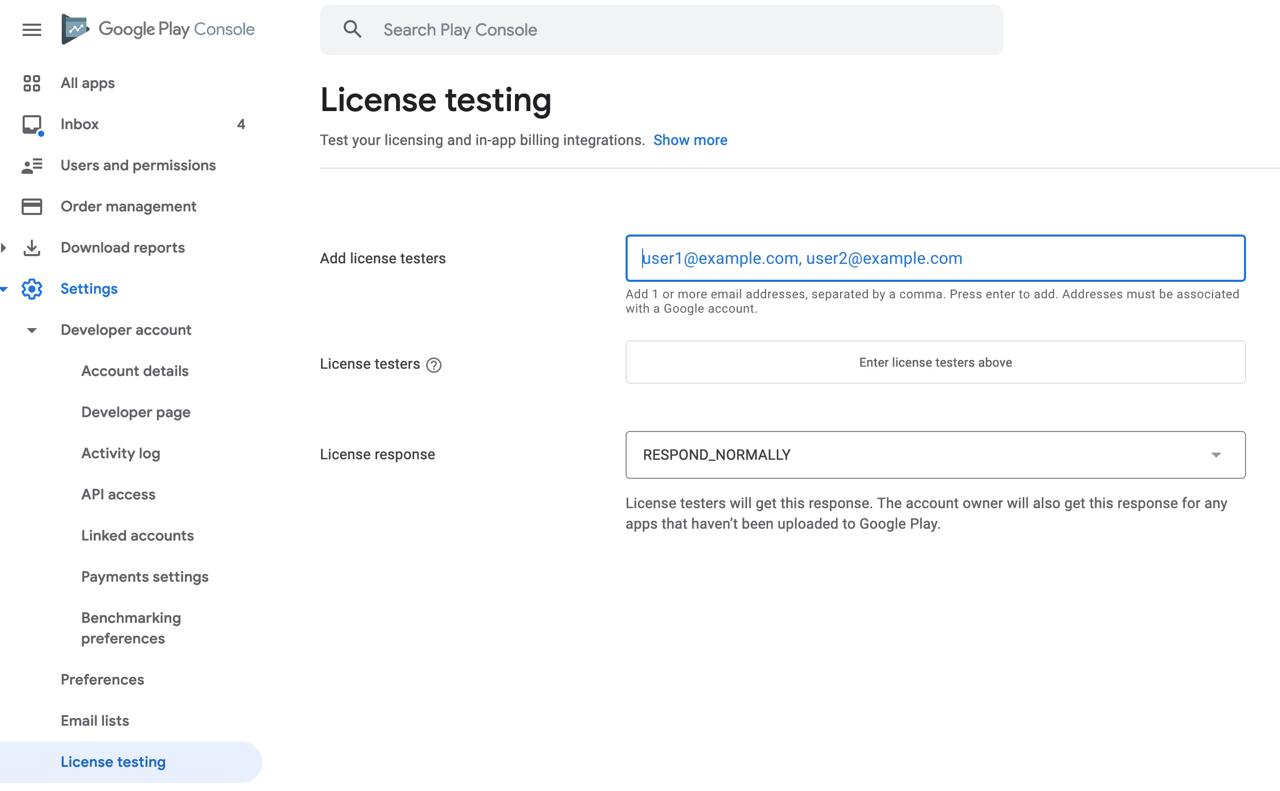
그리고 사용하고 있는 구글 계정을 입력하여 추가합니다.
안드로이드 테스트
안드로이드도 iOS와 마찬가지로 에뮬레이터에서 테스트를 할 수 없습니다. iOS와는 다르게 실제 사용하는 계정으로 테스트 할 수 있으므로 특별히 로그아웃을 할 필요는 없습니다.
안드로이드는 갱신 기간 테스트와 구독이 완료되었을 경우를 테스트할 수 있습니다. 갱신 기간에 관해서는 공식 사이트를 참고하시기 바랍니다.
배포
iOS 배포
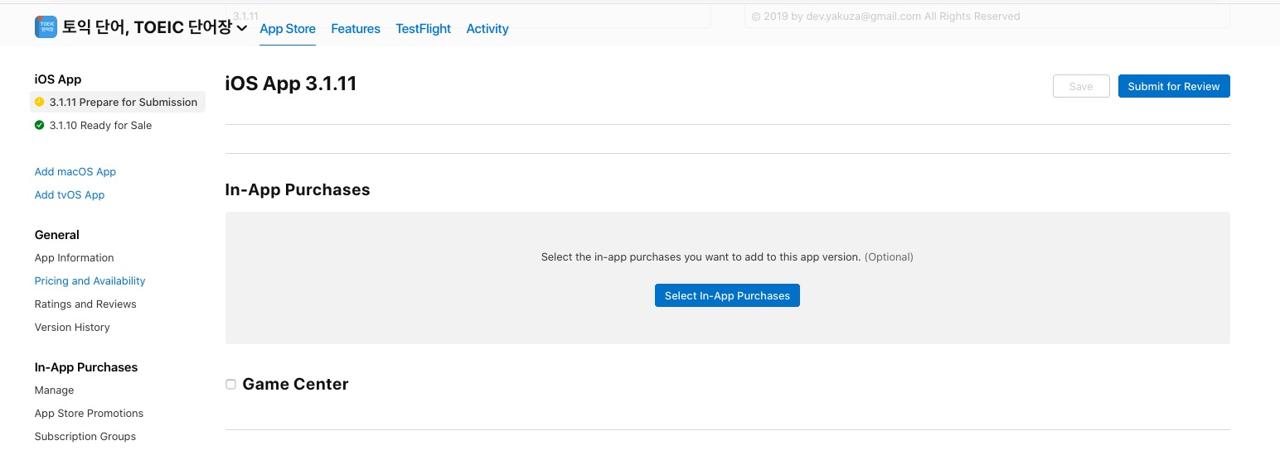
인앱 결제를 포함한 앱을 배포하기 위해서는 앱을 배포할 때 앱 내 구입(In-App Purchases) 항목을 설정해야 합니다.
안드로이드 배포
안드로이드는 iOS와 다르게 특별한 설정없이 앱을 배포하시면 됩니다.
완료
이것으로 react-native-iap를 사용하여 인앱 결제를 구현하는 방법에 대해서 알아보았습니다. 모든 내용을 한 블로그에 담으려다보니 블로그가 많이 길어졌습니다.
그리고 저는 제가 해본 경험을 공유하다보니 인앱 결제중에서도 자동 갱신 구독에 관해서만 작성하였네요. 일반 상품 구매등은 조금 다르므로 위에 로직을 참고해서 구현하시기 바랍니다.
제 블로그가 도움이 되셨나요? 하단의 댓글을 달아주시면 저에게 큰 힘이 됩니다!
앱 홍보
Deku가 개발한 앱을 한번 사용해보세요.Deku가 개발한 앱은 Flutter로 개발되었습니다.관심있으신 분들은 앱을 다운로드하여 사용해 주시면 정말 감사하겠습니다.


