개요
장고(django)로 개발하다보면 기본적으로 제공되는 유저 모델(User Model)은 로그인할 때 username으로 로그인해야 합니다. 또한 서비스를 개발할 때, 성별, 생년월일 또는 프로필 사진 등, 다양한 유저 정보를 등록하게 만들고 싶을 때가 있습니다. 이번 블로그 포스트에서는 장고(django)에서 커스텀 유저 모델(Custom User Model)을 사용하는 방법에 대해서 알아보도록 하겠습니다. 이 블로그에 내용은 django 공식 홈페이지의 자료를 바탕으로 만들었습니다.
이 블로그에서 사용하는 소스코드는 github에 공개되어 있습니다. 아래에 링크를 통해 확인 가능합니다.
장고(django) 프로젝트 준비
아래에 명령어를 통해 장고(django) 프로젝트를 생성합니다.
django-admin startproject django_custom_user_model
아래에 블로그를 참고하여 데이터베이스 연동만 합니다.(python manage.py migrate은 하지 않습니다.)
아래에 명령어로 장고(django)에 새로운 account 앱을 생성합니다.
python manage.py startapp account
그리고 django_custom_user_model/settings.py를 열고 아래와 같이 새롭게 추가한 앱(App)을 등록합니다.
...
INSTALLED_APPS = [
    ...
    'account',
]
...
커스텀 유저 모델(Custom User Model) 생성
커스텀 유저 모델(Custom User Model)을 만들기 위해 account/models.py를 열고 아래와 같이 수정합니다.
from django.db import models
from django.contrib.auth.models import (BaseUserManager, AbstractBaseUser)


class UserManager(BaseUserManager):
    def create_user(self, email, date_of_birth, password=None):
        if not email:
            raise ValueError('Users must have an email address')

        user = self.model(
            email=self.normalize_email(email),
            date_of_birth=date_of_birth,
        )

        user.set_password(password)
        user.save(using=self._db)
        return user

    def create_superuser(self, email, date_of_birth, password):
        user = self.create_user(
            email,
            password=password,
            date_of_birth=date_of_birth,
        )
        user.is_admin = True
        user.save(using=self._db)
        return user


class User(AbstractBaseUser):
    email = models.EmailField(
        verbose_name='email',
        max_length=255,
        unique=True,
    )
    date_of_birth = models.DateField()
    is_active = models.BooleanField(default=True)
    is_admin = models.BooleanField(default=False)

    objects = UserManager()

    USERNAME_FIELD = 'email'
    REQUIRED_FIELDS = ['date_of_birth']

    def __str__(self):
        return self.email

    def has_perm(self, perm, obj=None):
        return True

    def has_module_perms(self, app_label):
        return True

    @property
    def is_staff(self):
        return self.is_admin
좀 더 자세히 살펴보도록 하겠습니다.
...
from django.contrib.auth.models import (BaseUserManager, AbstractBaseUser)
...
class UserManager(BaseUserManager):
...
class User(AbstractBaseUser):
...
커스텀 유저 모델(Custom User Model)를 만들기 위해서는 두 클래스(BaseUserManager, AbstractBaseUser)를 구현해야 합니다. BaseUserManager 클래스는 유저를 생성할 때 사용하는 헬퍼(Helper) 클래스이며, 실제 모델(Model)은 AbstractBaseUser을 상속받아 생성하는 클래스입니다.
헬퍼(Helper) 클래스인 class UserManager(BaseUserManager):는 두 가지 함수를 가지고 있습니다.
create_user(*username_field*, password=None, **other_fields)create_superuser(*username_field*, password, **other_fields)
여기서 알 수 있듯이 첫번째 파라메터가 username 파라메터입니다. 우리는 username 대신 email을 사용할 예정이므로 이 파라메터에 username이 아닌 email을 전달합니다. 나머지 부분은 데이터를 생성하는 부분이므로 자세한 설명은 생략하도록 하겠습니다.
이제 실제 모델(Model)인 class User(AbstractBaseUser):을 살펴보도록 하겠습니다.
...
email = models.EmailField(
    verbose_name='email',
    max_length=255,
    unique=True,
)
date_of_birth = models.DateField()
is_active = models.BooleanField(default=True)
is_admin = models.BooleanField(default=False)
...
이 모델은 email, date_of_birth, is_active, is_admin 필드를 가지고 있습니다. is_active, is_admin 필드는 장고(django)의 유저 모델(User Model)의 필수 필드입니다.
...
objects = UserManager()

USERNAME_FIELD = 'email'
...
User 모델을 생성하기 위해 꼭 필요한 부분입니다. 우리가 만든 헬퍼 클래스를 사용하도록 설정하였으며(objects = UserManage()), username 필드를 email로 사용하도록 설정하였습니다.(USERNAME_FIELD = 'email')
def has_perm(self, perm, obj=None):
    return True

def has_module_perms(self, app_label):
    return True

@property
def is_staff(self):
    return self.is_admin
커스텀 유저 모델(Custom User Model)을 기본 유저 모델(Model)로 사용하기 위해서 구현 해야하는 부분입니다.
def has_perm(self, perm, obj=None):: True를 반환하여 권한이 있음을 알립니다. Object를 반환하는 경우 해당 Object로 사용 권한을 확인하는 절차가 필요합니다.def has_module_perms(self, app_label):: True를 반환하여 주어진 앱(App)의 모델(Model)에 접근 가능하도록 합니다.def is_staff(self):: True가 반환되면 장고(django)의 관리자 화면에 로그인 할 수 있습니다.
관리자 페이지 수정
장고(django)의 관리자 페이지를 통해 유저를 관리하기 위해 관리자 페이지를 수정하도록 하겠습니다.
폼(Form) 생성
장고(django)의 관리자 페이지에서 사용하는 폼(Form)을 수정하기 위해 자체적으로 우리의 커스텀 유저 모델(Custom User Model)에 맞는 폼(Form)을 생성합니다. account/forms.py를 생성하고 아래와 같이 수정합니다.
from django import forms
from django.contrib.auth.forms import ReadOnlyPasswordHashField

from .models import User


class UserCreationForm(forms.ModelForm):
    password1 = forms.CharField(label='Password', widget=forms.PasswordInput)
    password2 = forms.CharField(
        label='Password confirmation', widget=forms.PasswordInput)

    class Meta:
        model = User
        fields = ('email', 'date_of_birth')

    def clean_password2(self):
        password1 = self.cleaned_data.get("password1")
        password2 = self.cleaned_data.get("password2")
        if password1 and password2 and password1 != password2:
            raise forms.ValidationError("Passwords don't match")
        return password2

    def save(self, commit=True):
        user = super().save(commit=False)
        user.set_password(self.cleaned_data["password1"])
        if commit:
            user.save()
        return user


class UserChangeForm(forms.ModelForm):
    password = ReadOnlyPasswordHashField()

    class Meta:
        model = User
        fields = ('email', 'password', 'date_of_birth',
                  'is_active', 'is_admin')

    def clean_password(self):
        return self.initial["password"]
좀 더 자세히 살펴보도록 하겠습니다.
from django import forms
from django.contrib.auth.forms import ReadOnlyPasswordHashField

from .models import User

class UserCreationForm(forms.ModelForm):
...
class UserChangeForm(forms.ModelForm):
...
우리는 사용자 생성 폼(Form)과 사용자 수정 폼(Form)을 만들어야 합니다.
class UserCreationForm(forms.ModelForm):
    password1 = forms.CharField(label='Password', widget=forms.PasswordInput)
    password2 = forms.CharField(
        label='Password confirmation', widget=forms.PasswordInput)

    class Meta:
        model = User
        fields = ('email', 'date_of_birth')

    def clean_password2(self):
        password1 = self.cleaned_data.get("password1")
        password2 = self.cleaned_data.get("password2")
        if password1 and password2 and password1 != password2:
            raise forms.ValidationError("Passwords don't match")
        return password2

    def save(self, commit=True):
        user = super().save(commit=False)
        user.set_password(self.cleaned_data["password1"])
        if commit:
            user.save()
        return user
사용자 생성 폼(Form)은 password1와 password2를 가지고 있으며
class Meta:
    model = User
    fields = ('email', 'date_of_birth')
기본적으로 우리가 만든 User 모델의 email과 date_of_birth를 가지고 있습니다. 그리고 def clean_password2(self):을 통해 password2이 password1과 일치하는지 검증합니다. 마지막으로 def save(self, commit=True):를 통해 데이터를 저장합니다.
사용자 정보 수정 폼(Form)은 좀 더 간단합니다.
class UserChangeForm(forms.ModelForm):
    password = ReadOnlyPasswordHashField()

    class Meta:
        model = User
        fields = ('email', 'password', 'date_of_birth',
                  'is_active', 'is_admin')

    def clean_password(self):
        return self.initial["password"]
사용자 암호를 ReadOnlyPasswordHashField()으로 가져와서 화면에 표시해 줄 예정입니다.(수정 못함)
class Meta:
    model = User
    fields = ('email', 'password', 'date_of_birth',
                'is_active', 'is_admin')
또한 사용자의 email, password, date_of_birth, is_active, is_admin 필드를 가져오고, 저장할 때 def clean_password(self):를 통해 password를 그대로 다시 저장하도록 하였습니다.
관리자 페이지에 적용
이제 위에서 만든 폼(Form)을 장고(django)의 관리자 페이지에 적용해 보도록 하겠습니다. account/admin.py를 열고 아래와 같이 수정합니다.
from django.contrib import admin
from django.contrib.auth.models import Group
from django.contrib.auth.admin import UserAdmin as BaseUserAdmin

from .forms import UserChangeForm, UserCreationForm
from .models import User


class UserAdmin(BaseUserAdmin):
    form = UserChangeForm
    add_form = UserCreationForm

    list_display = ('email', 'date_of_birth', 'is_admin')
    list_filter = ('is_admin',)
    fieldsets = (
        (None, {'fields': ('email', 'password')}),
        ('Personal info', {'fields': ('date_of_birth',)}),
        ('Permissions', {'fields': ('is_admin',)}),
    )

    add_fieldsets = (
        (None, {
            'classes': ('wide',),
            'fields': ('email', 'date_of_birth', 'password1', 'password2')}
         ),
    )
    search_fields = ('email',)
    ordering = ('email',)
    filter_horizontal = ()


admin.site.register(User, UserAdmin)
admin.site.unregister(Group)
좀 더 자세히 살펴보도록 하겠습니다.
class UserAdmin(BaseUserAdmin):
    form = UserChangeForm
    add_form = UserCreationForm
관리자 화면의 사용자 변경 폼(Form)과 사용자 추가 폼(Form)을 우리가 생성한 폼(Form)으로 설정하였습니다.
list_display = ('email', 'date_of_birth', 'is_admin')
list_filter = ('is_admin',)
fieldsets = (
    (None, {'fields': ('email', 'password')}),
    ('Personal info', {'fields': ('date_of_birth',)}),
    ('Permissions', {'fields': ('is_admin',)}),
)

add_fieldsets = (
    (None, {
        'classes': ('wide',),
        'fields': ('email', 'date_of_birth', 'password1', 'password2')}
        ),
)
우리가 만든 커스텀 유저 모델(Custom User Model)이 관리자 화면에 어떻게 표시할지를 설정하였습니다.
admin.site.register(User, UserAdmin)
admin.site.unregister(Group)
우리가 생성한 커스텀 유저 모델(Custom User Model)과 관리자 폼(Form)을 사용하도록 등록하였으며, 장고(django)에서 기본적으로 제공하는 Group은 사용하지 않도록 설정하였습니다.
커스텀 유저 모델 등록
이제 우리가 만든 커스텀 유저 모델(Custom User Model)을 유저 인증 모델(Authentication User Model)로 등록하여 장고(django)에서 인증에 사용될 기본 모델(Model)을 설정해야 합니다. django_custom_user_model/settings.py을 열고 아래와 같이 수정합니다.
...
AUTH_USER_MODEL = 'account.User'
테이블 생성
우리는 장고(django) 프로젝트 준비 항목에서 데이터베이스와 연동은 했지만 테이블은 생성하지 않았습니다. 그 이유는 장고(django)에서 제공하는 기본 유저 모델(User Model)이 아니라 우리가 생성한 커스텀 유저 모델(Custom User Model)을 사용하게 하기 위해서였습니다. 아래에 명령어로 우리의 커스텀 유저 모델(Custom User Model)로 테이블을 생성할 준비를 합니다.
python manage.py makemigrations account
그리고 아래에 명령어를 통해 테이블을 생성합니다.
python manage.py migrate
확인
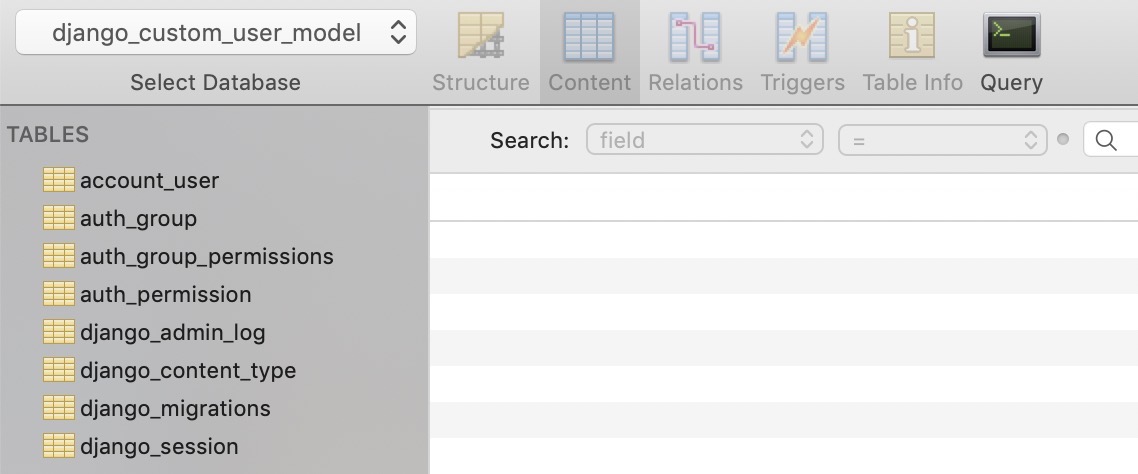
이제 우리가 만든 커스텀 유저 모델(Custom User Model)이 잘 적용되었는지 확인해 보도록 하겠습니다. 우선 데이터베이스 툴(database tool)로 우리가 생성한 테이블들을 확인해 봅니다.

이전과 다르게 auth_user 테이블이 생성되지 않은 것을 확인할 수 있습니다. 이제 아래에 명령어를 통해 장고(django)의 superuser를 생성해 봅시다.
python manage.py createsuperuser
그러면 이전과 다르게 아래와 같이 우리가 설정한 내용으로 superuser를 생성하는 것을 확인할 수 있습니다.
Email: [email protected]
Date of birth: 2019-06-06
Password:
Password (again):
Superuser created successfully.
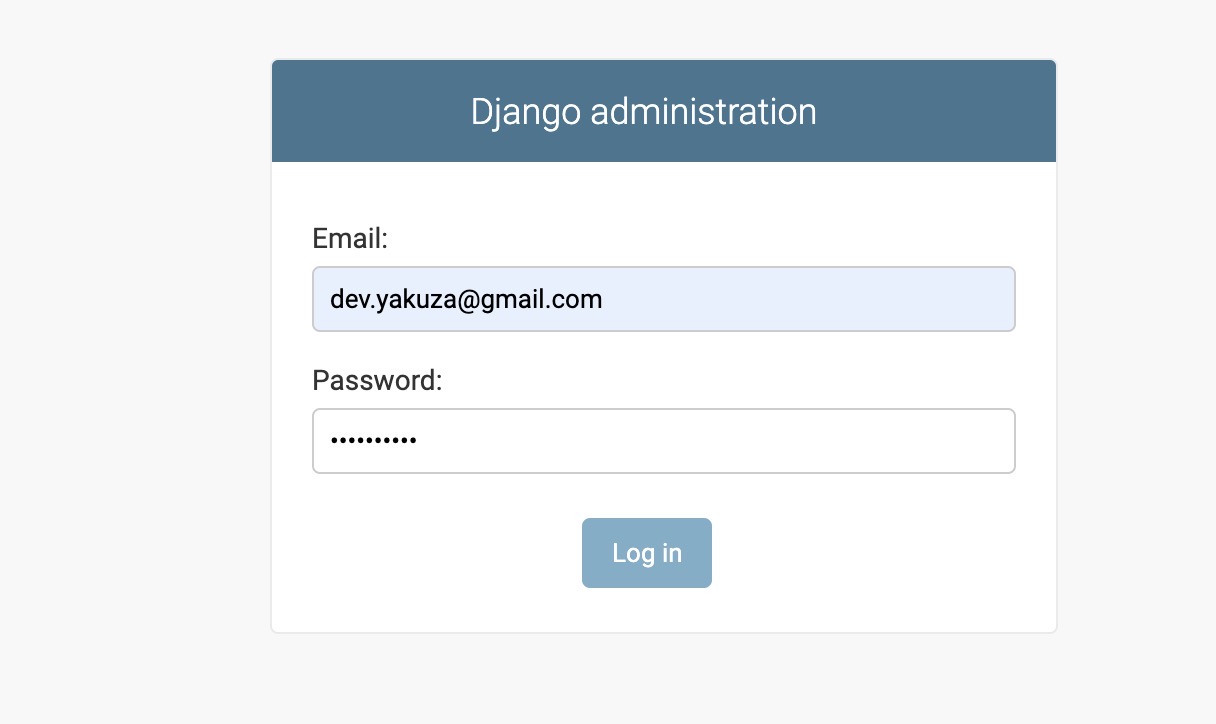
이제 아래에 명령어를 통해 장고(django)의 테스트 서버를 실행시키고 관리자 화면(http://127.0.0.1:8000/admin)에 접속합니다.
python manage.py runserver
그럼 이전과 다르게 email로 로그인하는 것을 확인할 수 있습니다.

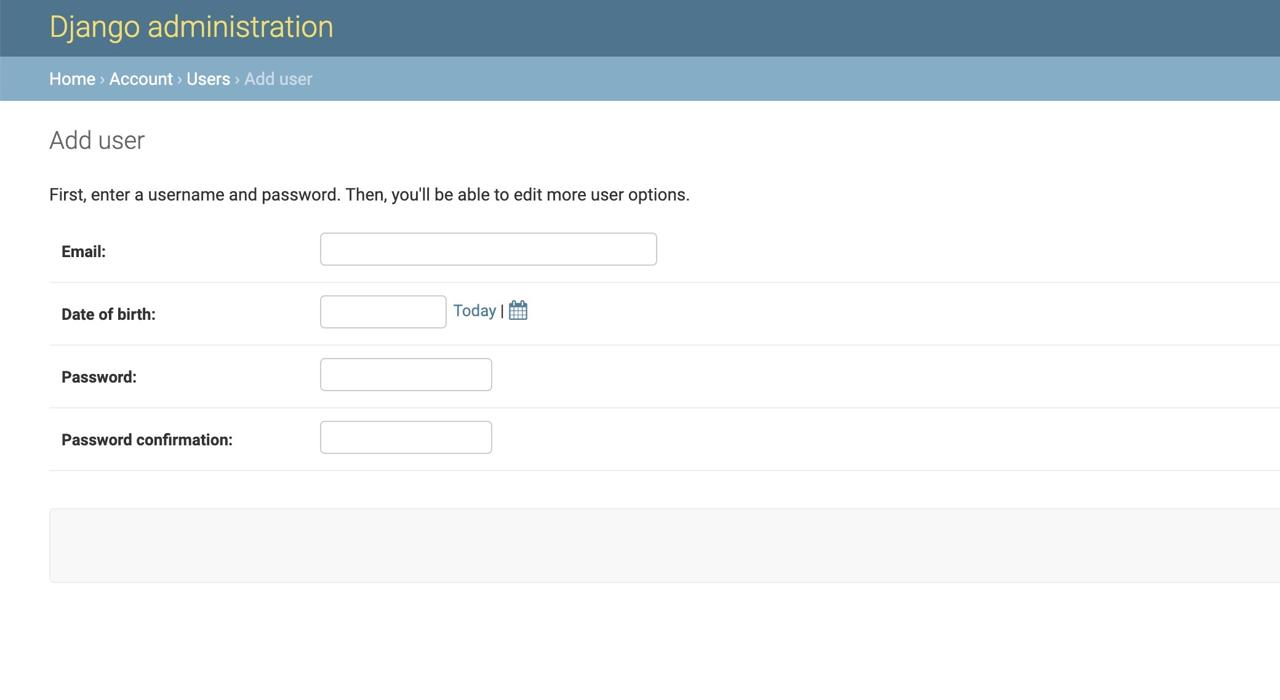
마지막으로 새로운 유저를 추가하거나 기존의 유저 정보를 수정할 때 아래와 같이 우리가 설정한 폼(Form)이 표시되는 것을 확인할 수 있습니다.

완료
이것으로 장고(django)의 커스텀 유저 모델(Custom User Model)을 사용하는 방법에 관해서 살펴보았습니다. 이제 장고(django)가 기본적으로 제공하는 유저 모델(User Model)이 아닌 우리가 필요한 정보를 가지고 있는 커스텀 유저 모델(Custom User Model)을 사용하여 서비스를 개발할 수 있습니다!
참고
- 장고(django) 설치하기
- 장고(django) 프로젝트 시작하기
- 장고(django) 모델(models) 사용해보기
- 장고(django)의 관리자 페이지
- 장고(django)의 라우팅(Routing)
- 장고(django)의 ORM
- 장고(django)의 뷰(View)
- 장고(django)의 폼(Form)
- 장고(django) 프로젝트를 헤로쿠(heroku)에 업로드하기
- https://docs.djangoproject.com/en/dev/topics/auth/customizing/#a-full-example
제 블로그가 도움이 되셨나요? 하단의 댓글을 달아주시면 저에게 큰 힘이 됩니다!
앱 홍보
Deku가 개발한 앱을 한번 사용해보세요.Deku가 개발한 앱은 Flutter로 개발되었습니다.관심있으신 분들은 앱을 다운로드하여 사용해 주시면 정말 감사하겠습니다.


![[심통]현장에서 바로 써먹는 리액트 with 타입스크립트 : 리액트와 스토리북으로 배우는 컴포넌트 주도 개발, 심통](https://img1c.coupangcdn.com/image/affiliate/banner/7cba8cb0601eebaf88a17a0c3cf65a63@2x.jpg)