目次
概要
マック(Mac)に新しく開発環境を構築しております。下記のブログポストリストは以前新しマック(Mac)に開発環境を手動で構築した内容を纏めたブログです。
今回のブログポストでは上記のプログポストリストにある開発環境をHomebrewとShell Scriptで自動化してもっと簡単に開発環境を構築できるようにしてみました。
開発環境の構成
今現在私が使ってる開発環境の構成です。
- git-flow
- mysql 5.7
- python3
- node
- watchman
- php
- zsh
- oh my zsh
- ruby
- ngrok
- jdk
- android studio
- sequel pro
- db browser for sqlite
- mysql workbench
- sketchapp
- postman
- sourcetree
- chrome
- iterm2
- xcode
- LINE
- KakaoTalk
- Slack
- Trello
- react native
- laravel
- jekyll
今から上にある開発環境をHomebrewとShell Scriptを使って自動で構築できるようにしてみます。
Brewfile
Homebrewを使って使うツール(tool)を自動にダウンロードすることができます。このようにHomebrewで自動にダウンロードしたいツールを定義するファイルがBrewfileです。下記のコマンドで現在使ってるマックのツールを定義するBrewfileを生成することができます。
brew bundle dump
このコマンドで生成されたBrewfileを確認しましたが、使ってるツールが全部入ってないでした。それで追加で欲しいツールを入れて作ったBrewfileが下記になります。
brew "mas"
brew "git-flow"
brew "[email protected]"
brew "python3"
brew "node"
brew "watchman"
brew "php"
# zsh is default in MacOS Catalina
# brew "zsh"
brew "ruby"

mas "LINE", id: 539883307
mas "KakaoTalk", id: 869223134
mas "Slack", id: 803453959
mas "Trello", id: 1278508951

cask "ngrok"
tap "adoptopenjdk/openjdk"
cask "adoptopenjdk8"
cask "android-studio"
cask "sequel-pro"
cask "db-browser-for-sqlite"
cask "mysqlworkbench"
cask "sketch"
cask "postman"
cask "sourcetree"
cask "google-chrome"
cask "iterm2"
このように使いたいツールを定義する方法について詳しく説明します。
brew
Homebrewで正式的ダウンロードが可能なファイルはbrew "node"ように作成します。定義するツールの名前を正確に分からない場合、下記のコマンドで名前を検索することができます。
brew search node
そしたら、下記のような結果を見ることができます。
==> Formulae
heroku/brew/heroku-node        libbitcoin-node                node                           node@10                        node_exporter                  nodeenv
leafnode                       llnode                         node-build                     node@8                         nodebrew                       nodenv

==> Casks
nodebox                                                        nodeclipse                                                     soundnode
検索結果をみたらFormulaeとCasks、2つのリストが見えます。Homebrewが公式的サポートするツールはFormulaeのリスト中にあります。このようにHomebrewが公式的サポートするツールはBrewfile中に下記のように作成しておいたら、将来に一個のコマンドを実行すると全てダウンロードすることができます。
brew "mas"
brew "git-flow"
brew "[email protected]"
brew "python3"
brew "node"
brew "watchman"
brew "php"
# zsh is default in MacOS Catalina
# brew "zsh"
brew "ruby"
cask
そしたらCasksは何でしょうか?CasksはHomebrewで公式的はサポートしないですが、Homebrewを使ってダウンロードできるツールを意味します。つまり、ウェブでダウンロードできるツールをHomebrewでインストールできるようにする機能がCasksです。
例えば、グーグルのChromeブラウザはHomebrewが公式的サポートしてないですが、HomebrewのCasksを使ってインストールすることができます。
brew search chrome
このようにグーグルのChromeを検索して見ると下記のような結果が見えます。
==> Formulae
chrome-cli                                                                                     chrome-export

==> Casks
chrome-devtools                                dmm-player-for-chrome                          mkchromecast                                   homebrew/cask-versions/google-chrome-dev
chrome-remote-desktop-host                     epichrome                                      homebrew/cask-versions/google-chrome-beta
chromedriver                                   google-chrome                                  homebrew/cask-versions/google-chrome-canary
この中で私たちが使うChromeブラウザはgoogle-chromeです。下記のHomebrewコマンドを使ってChromeブラウザをインストールすることができます。
brew cask install google-chrome
このようにHomebrewが公式的サポートしてないですが、ダウンロードが可能なツールをCasksを使ってBrewfileに作成します。
cask "ngrok"
tap "adoptopenjdk/openjdk"
cask "adoptopenjdk8"
cask "android-studio"
cask "sequel-pro"
cask "db-browser-for-sqlite"
cask "mysqlworkbench"
cask "sketch"
cask "postman"
cask "sourcetree"
cask "google-chrome"
cask "iterm2"
mas
もし、使いたいツールがマック(Mac)のApp storeにある場合、どうしたらいいでしょうか?これもHomebrewを使ってダウンロードすることができます。Homebrewを使ってApp storeにあるツールをダウンロードするためにはmasを使います。
下記のコマンドでmasをインストールします。
brew install mas
このようにmasをインストールした後、下記のコマンドでmasでインストールできるツールを検索することができます。
mas search xcode
このようにxcodeを検索したら下記のような結果が出ます。
 497799835  Xcode                                                                (11.1)
1183412116  Swiftify for Xcode                                                   (5.1)
...
このように検索出来たツールは下記のコマンドでインストールすることが出来ます。
mas install 497799835
masを使ってダウンロードできるツールを下記のようにBrewfileに作成します。
mas "LINE", id: 539883307
mas "KakaoTalk", id: 869223134
mas "Slack", id: 803453959
mas "Trello", id: 1278508951
もちろん、この部分はmasがないとインストール出来ないので、Brewfileの一番上にmasをインストールするように設定します。
brew "mas"
...
このように作ったBrewfileは下記のコマンドでインストールすることが出来ます。
brew bundle --file=./Brewfile
このコマンドを使うためにはもちろんHomebrewがマックにインストールされないとダメです。Homebrewのインストールや使うツールを細かく設定するためShell Scriptを作ってみましょう。
Shell Script
Brewfileを使ったら使うツールを簡単にインストールすることが出来ます。しかし、インストールだけではなく色んな設定もするためにはShell Scriptを使う必要があります。
HomebrewとBrewfileのインストール
まず、./install.shファイルを生成して下記のようにHomebrewをインストールして、Brewfileを実行して必要なツールをインストールするように作成します。
# !/bin/bash

# install brew
/usr/bin/ruby -e "$(curl -fsSL https://raw.githubusercontent.com/Homebrew/install/master/install)"

# install via brew
brew bundle --file=./Brewfile
このように作成したスクリプトは下記のコマンドで実行出来ます。
./install.sh
セキュリティとプライバシー
Casksでダウンロードしたツールはウェブでダウンロードしたツールと同じなので実行するとSecurityの問題で実行が出来ません。普通はこの時、設定 > セキュリティとプライバシーを開いて許可ボタンを押してツールを実行します。
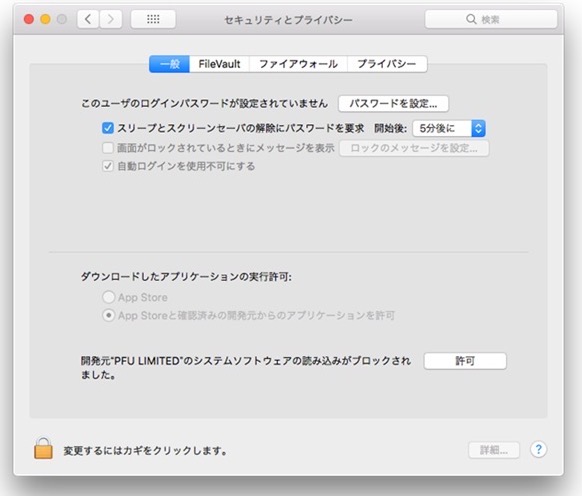
この部分も下記のコマンドで解決出来ます。
# sudo xattr -dr com.apple.quarantine /Applications/[App name]
sudo xattr -dr com.apple.quarantine /Applications/Sourcetree.app
また、下記のコマンドでツールを実行することも出来ます。
# open /Applications/[App name]
open /Applications/Sourcetree.app
この内容を./install.shに下記のように作成します。
...
sudo xattr -dr com.apple.quarantine /Applications/Sequel\ Pro.app
open /Applications/Sequel\ Pro.app
sudo xattr -dr com.apple.quarantine /Applications/DB\ Browser\ for\ SQLite.app
open /Applications/DB\ Browser\ for\ SQLite.app
sudo xattr -dr com.apple.quarantine /Applications/MySQLWorkbench.app
open /Applications/MySQLWorkbench.app
sudo xattr -dr com.apple.quarantine /Applications/Sketch.app
open /Applications/Sketch.app
sudo xattr -dr com.apple.quarantine /Applications/Postman.app
open /Applications/Postman.app
sudo xattr -dr com.apple.quarantine /Applications/Sourcetree.app
open /Applications/Sourcetree.app
sudo xattr -dr com.apple.quarantine /Applications/Google\ Chrome.app
open /Applications/Google\ Chrome.app
sudo xattr -dr com.apple.quarantine /Applications/Android\ Studio.app
open /Applications/Android\ Studio.app
sudo xattr -dr com.apple.quarantine /Applications/iTerm.app
open /Applications/iTerm.app
openコマンドを使ってツールを実行する理由はマックの下にあるDockに固定するためです。
フォント
VSCodeのソースコードフォントでD2codingを使うためzshとiTerm2でMeslo LG M Regular for Powerlineフォントを使うためフォントを事前にダウンロードして./fonts/フォルダにコピーします。
このように事前にダウンロードしたフォントを新しマックでインストールするためには下記のコマンドを実行します。
...
cp -a ./fonts/. ~/Library/Fonts
このコマンドを./install.shファイルに追加します。
zsh
zshのツールの設定を管理するため./zsh/フォルダを生成します。./zsh/install.shファイルを生成下記のように修正します。
sh -c "$(curl -fsSL https://raw.githubusercontent.com/robbyrussell/oh-my-zsh/master/tools/install.sh)"
このコマンドはoh my zshをインストールするコマンドです。
そして現在使ってる~/.zshrc設定を./zsh/フォルダにコピーします。私が使ってる設定は下記のようです。
# If you come from bash you might have to change your $PATH.
export PATH=$HOME/bin:/usr/local/bin:$PATH

# Path to your oh-my-zsh installation.
export ZSH="$HOME/.oh-my-zsh"

# Set name of the theme to load --- if set to "random", it will
# load a random theme each time oh-my-zsh is loaded, in which case,
# to know which specific one was loaded, run: echo $RANDOM_THEME
# See https://github.com/robbyrussell/oh-my-zsh/wiki/Themes
ZSH_THEME="powerlevel10k/powerlevel10k"

# Set list of themes to pick from when loading at random
# Setting this variable when ZSH_THEME=random will cause zsh to load
# a theme from this variable instead of looking in ~/.oh-my-zsh/themes/
# If set to an empty array, this variable will have no effect.
# ZSH_THEME_RANDOM_CANDIDATES=( "robbyrussell" "agnoster" )

# Uncomment the following line to use case-sensitive completion.
# CASE_SENSITIVE="true"

# Uncomment the following line to use hyphen-insensitive completion.
# Case-sensitive completion must be off. _ and - will be interchangeable.
# HYPHEN_INSENSITIVE="true"

# Uncomment the following line to disable bi-weekly auto-update checks.
# DISABLE_AUTO_UPDATE="true"

# Uncomment the following line to change how often to auto-update (in days).
# export UPDATE_ZSH_DAYS=13

# Uncomment the following line to disable colors in ls.
# DISABLE_LS_COLORS="true"

# Uncomment the following line to disable auto-setting terminal title.
# DISABLE_AUTO_TITLE="true"

# Uncomment the following line to enable command auto-correction.
# ENABLE_CORRECTION="true"

# Uncomment the following line to display red dots whilst waiting for completion.
# COMPLETION_WAITING_DOTS="true"

# Uncomment the following line if you want to disable marking untracked files
# under VCS as dirty. This makes repository status check for large repositories
# much, much faster.
# DISABLE_UNTRACKED_FILES_DIRTY="true"

# Uncomment the following line if you want to change the command execution time
# stamp shown in the history command output.
# You can set one of the optional three formats:
# "mm/dd/yyyy"|"dd.mm.yyyy"|"yyyy-mm-dd"
# or set a custom format using the strftime function format specifications,
# see 'man strftime' for details.
# HIST_STAMPS="mm/dd/yyyy"

# Would you like to use another custom folder than $ZSH/custom?
# ZSH_CUSTOM=/path/to/new-custom-folder

# Which plugins would you like to load?
# Standard plugins can be found in ~/.oh-my-zsh/plugins/*
# Custom plugins may be added to ~/.oh-my-zsh/custom/plugins/
# Example format: plugins=(rails git textmate ruby lighthouse)
# Add wisely, as too many plugins slow down shell startup.
plugins=(git)

# python virtualenv
plugins=(virtualenv)

source $ZSH/oh-my-zsh.sh

# User configuration

# export MANPATH="/usr/local/man:$MANPATH"

# You may need to manually set your language environment
# export LANG=en_US.UTF-8

# Preferred editor for local and remote sessions
# if [[ -n $SSH_CONNECTION ]]; then
#   export EDITOR='vim'
# else
#   export EDITOR='mvim'
# fi

# Compilation flags
# export ARCHFLAGS="-arch x86_64"

# ssh
# export SSH_KEY_PATH="~/.ssh/rsa_id"

# Set personal aliases, overriding those provided by oh-my-zsh libs,
# plugins, and themes. Aliases can be placed here, though oh-my-zsh
# users are encouraged to define aliases within the ZSH_CUSTOM folder.
# For a full list of active aliases, run `alias`.
#
# Example aliases
# alias zshconfig="mate ~/.zshrc"
# alias ohmyzsh="mate ~/.oh-my-zsh"

# remove user name in zsh
# prompt_context(){}
POWERLEVEL9K_LEFT_PROMPT_ELEMENTS=(virtualenv dir_writable dir vcs)
POWERLEVEL9K_RIGHT_PROMPT_ELEMENTS=(status time battery)

# vscode code command
export PATH="$PATH:/Applications/Visual Studio Code.app/Contents/Resources/app/bin"
# brew path
export PATH=/usr/local/bin:/usr/local/sbin:$PATH
# python3 default
alias python=python3
alias pip=pip3
# composer
alias composer="php /usr/local/bin/composer.phar"
# Laravel
export PATH="$HOME/.composer/vendor/bin:$PATH"
# mysql
export PATH="/usr/local/opt/[email protected]/bin:$PATH"
# jekyll
export GEM_HOME=$HOME/gems
export PATH=$HOME/gems/bin:$PATH
# Android path for React Native
export ANDROID_HOME=$HOME/Library/Android/sdk
export PATH=$PATH:$ANDROID_HOME/emulator
export PATH=$PATH:$ANDROID_HOME/tools
export PATH=$PATH:$ANDROID_HOME/tools/bin
export PATH=$PATH:$ANDROID_HOME/platform-tools
このファイルをコピーするため下記のコマンドを./zsh/install.shに追加します。
...
cp ./zsh/.zshrc ~/.zshrc
最後にはzshテーマをインストールするため下記のコマンドを./zsh/install.shに追加します。
...
git clone https://github.com/romkatv/powerlevel10k.git /Users/$USER/.oh-my-zsh/themes/powerlevel10k
完成した./zsh/install.shは下記のようです。
# !/bin/bash

#install oh my zsh
sh -c "$(curl -fsSL https://raw.githubusercontent.com/robbyrussell/oh-my-zsh/master/tools/install.sh)"

# copy my zsh settings
cp ./zsh/.zshrc ~/.zshrc

# install zsh theme
git clone https://github.com/romkatv/powerlevel10k.git /Users/$USER/.oh-my-zsh/themes/powerlevel10k
完成した./zsh/install.shスクリプトを./install.shで実行するため./install.shファイルを下記のように修正します。
...
# configure zsh
chmod 755 ./zsh/install.sh
./zsh/install.sh
VSCode設定
VSCodeのインストールや設定を管理するため./vscode/フォルダを作って、./vscode/install.shファイルを生成します。
VSCodeをインストールして実行するため下記のようにコマンドを追加します。
# !/bin/bash
brew cask install visual-studio-code

sudo xattr -dr com.apple.quarantine /Applications/Visual\ Studio\ Code.app
そして使ってるExtensionをインストールするため下記のようにコマンドを追加します。
...
# install vscode extensions
code --install-extension AlanWalk.markdown-toc
code --install-extension christian-kohler.npm-intellisense
code --install-extension christian-kohler.path-intellisense
code --install-extension CoenraadS.bracket-pair-colorizer
code --install-extension DavidAnson.vscode-markdownlint
code --install-extension dzannotti.vscode-babel-coloring
code --install-extension esbenp.prettier-vscode
code --install-extension felixfbecker.php-intellisense
code --install-extension fterrag.vscode-php-cs-fixer
code --install-extension gencer.html-slim-scss-css-class-completion
code --install-extension jcbuisson.vue
code --install-extension leizongmin.node-module-intellisense
code --install-extension mf.vscode-styled-components
code --install-extension ms-python.python
code --install-extension ms-vscode.vscode-typescript-tslint-plugin
code --install-extension msjsdiag.debugger-for-chrome
code --install-extension redhat.vscode-yaml
code --install-extension RoscoP.ActiveFileInStatusBar
code --install-extension shardulm94.trailing-spaces
code --install-extension vscode-icons-team.vscode-icons
VSCodeのextensionをインストールするためにはcode --install-extension [extension id]なようにコマンドを作ります。ここでextension idは下記のようにExtensionの詳細ページでExtensionの名前の横で確認できます。

最後には現在使ってるVSCodeの設定を./vscode/フォルダにコピーします。VSCodeの設定は下記のフォルダにあります。
~/Library/Application\ Support/Code/User/settings.json
このようにコピーしたsettings.jsonファイルを新しマックで設定するため下記のコマンドを./vscode/install.shに追加します。
...
cp ./vscode/settings.json ~/Library/Application\ Support/Code/User/settings.json
最終完成した./vscode/install.shは下記のようです。
# !/bin/bash
brew cask install visual-studio-code

sudo xattr -dr com.apple.quarantine /Applications/Visual\ Studio\ Code.app

# install vscode extensions
code --install-extension AlanWalk.markdown-toc
code --install-extension christian-kohler.npm-intellisense
code --install-extension christian-kohler.path-intellisense
code --install-extension CoenraadS.bracket-pair-colorizer
code --install-extension DavidAnson.vscode-markdownlint
code --install-extension dzannotti.vscode-babel-coloring
code --install-extension esbenp.prettier-vscode
code --install-extension felixfbecker.php-intellisense
code --install-extension fterrag.vscode-php-cs-fixer
code --install-extension gencer.html-slim-scss-css-class-completion
code --install-extension jcbuisson.vue
code --install-extension leizongmin.node-module-intellisense
code --install-extension mf.vscode-styled-components
code --install-extension ms-python.python
code --install-extension ms-vscode.vscode-typescript-tslint-plugin
code --install-extension msjsdiag.debugger-for-chrome
code --install-extension redhat.vscode-yaml
code --install-extension RoscoP.ActiveFileInStatusBar
code --install-extension shardulm94.trailing-spaces
code --install-extension vscode-icons-team.vscode-icons

# copy vscode settings
cp ./vscode/settings.json ~/Library/Application\ Support/Code/User/settings.json
この./vscode/install.shを実行するため./install.shファイルの下に下記のように追加します。
...
# configure VSCode
chmod 755 ./vscode/install.sh
./vscode/install.sh
iTerm2
iTerm2のインストールや設定を管理するため./iterm2/フォルダを生成します。そして現在のiTerm2を実行します。
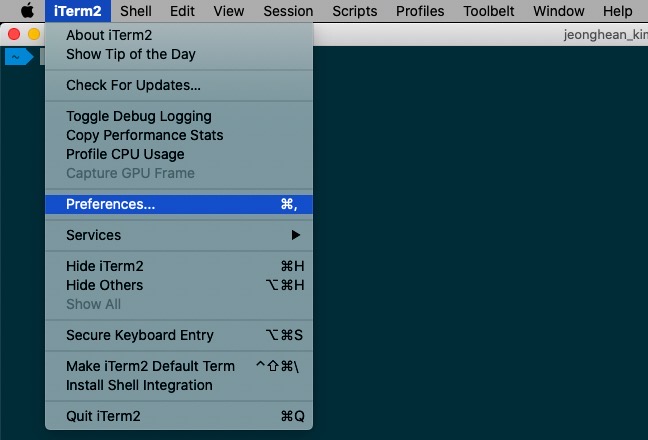
iTerm2の現在設定をエクスポートするためPreferences... > General > Preferencesを選択します。
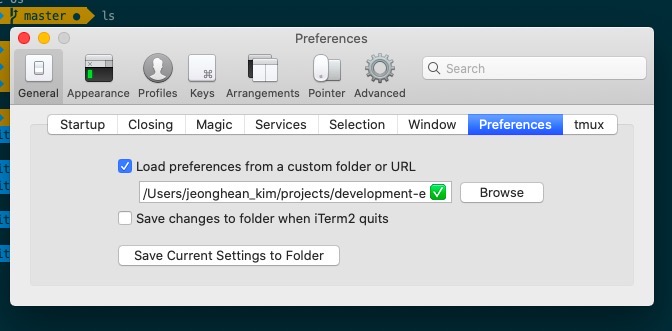
上の画面でLoad preferences from a custom folder or URLをチェックします。そしてBrowseボタンを押して上部で作った./iterm2/フォルダを設定します。
設定を完了したらSave Current Settings to Folderボタンを押して現在のiTerm2の設定をエクスポートします。
このように設定をエクスポートすると、./iterm2/com.googlecode.iterm2.plistファイルが生成されることが確認できます。
次は、./iterm2/install.shファイルを生成して下記のように追加します。
# !/bin/bash

cp ./iterm2/com.googlecode.iterm2.plist ~/Library/Application\ Support/iTerm2/DynamicProfiles/

chsh -s /bin/zsh
上部で生成したcom.googlecode.iterm2.plistファイルをコピーするコマンドとzshを基本Shellで設定するコマンド(chsh -s /bin/zsh)を追加しました。
次は./install.shファイルしたに下記の内容を追加します。
...
# copy iterm2 configuration
chmod 755 ./iterm2/install.sh
./iterm2/install.sh
jekyll開発環境
私はjekyllを使ってブログを運営しています。jekyllをインストールするため./jekyll/install.shファイルを生成して下記のように修正します。
# !/bin/bash

sudo gem install bundler jekyll
生成したフィルを実行するため./install.shファイルの下に下記のように追加します。
...
# install jekyll
chmod 755 ./jekyll/install.sh
./jekyll/install.sh
react-native開発環境
私はアプリ開発にReact Nativeを使ってます。React Nativeをインストールすため./react-native/install.shファイルを生成して下記のように修正します。
# !/bin/bash
npm install -g react-native-cli

npm config set save-exact=true

sudo gem install cocoapods
- npm install -g react-native-cli: react-native-cliをインストールします。
- npm config set save-exact=true: react-nativeのバージョンのせいで発生する問題を減らすためnpmモジュールをインストールする時package.jsonにバージョンを固定するようにします。
- sudo gem install cocoapods: iOSのpodを使うためcocoapodsをインストールします。
次は./install.shファイルを開いて下記のように修正します。
...
# install react-native
chmod 755 ./react-native/install.sh
./react-native/install.sh
python開発環境
python開発環境に必要なライブラリをインストールするため./python/install.shファイルを生成して下記のように修正します。
# !/bin/bash
pip install virtualenv pylint autopep8
生成したファイルを実行するため./install.shファイルを生成して下記のように追加します。
...
# install python3
chmod 755 ./python/install.sh
./python/install.sh
Xcode
これが最後です。Xcodeをインストールするため./xcode/install.shファイルを生成して下記のように修正します。
# !/bin/bash

mas install 497799835

sudo xcodebuild -license accept
- mas install 497799835: Homebrewのmasを使ってXcodeをインストールします。
- sudo xcodebuild -license accept: コマンドを使ってXcodeのライセンスに同意します。
生成したスクリプトを実行するため./install.shを下記のように修正します。
...
# install xcode
chmod 755 ./xcode/install.sh
./xcode/install.sh
開発環境の設定を保存(Github)
このように作った開発環境の設定をGithubに保存します。今まで作った私の設定内容は下記のリンクで確認することができます。
マックの初期化や最新OSインストール
マックを初期化して最新のOSをインストールするためマックを再起動します。再起動する時Command + Option + rを押してインターネット経由で macOS 復元を試します。詳しく内容は下記のリンクを確認してください。
新しマックに開発環境を設定する
このようにマックを初期化や最新のOSをインストールした後、ターミナルを実行して下記のコマンドでgitのバージョンを確認します。
git --version
まだ、マックにgitがインストールされてないので、gitをインストールする案内メッセージが出ます。案内メッセージを使ってgitをインストールします。
gitのインストールが終わったら、git cloneコマンドを実行して上で作った開発環境のスクリプトをコピーします。
git clone https://github.com/dev-yakuza/development-environment-for-mac-os.git
コピーが終わったら、下記のコマンドで開発環境を児童に設定します。
./development-environment-for-mac-os/install.sh
スクリプトが実行する際、管理者権限が必要なコマンドがあるので途中に管理者のパスワードを入力する必要があります。
iTerm2手動設定
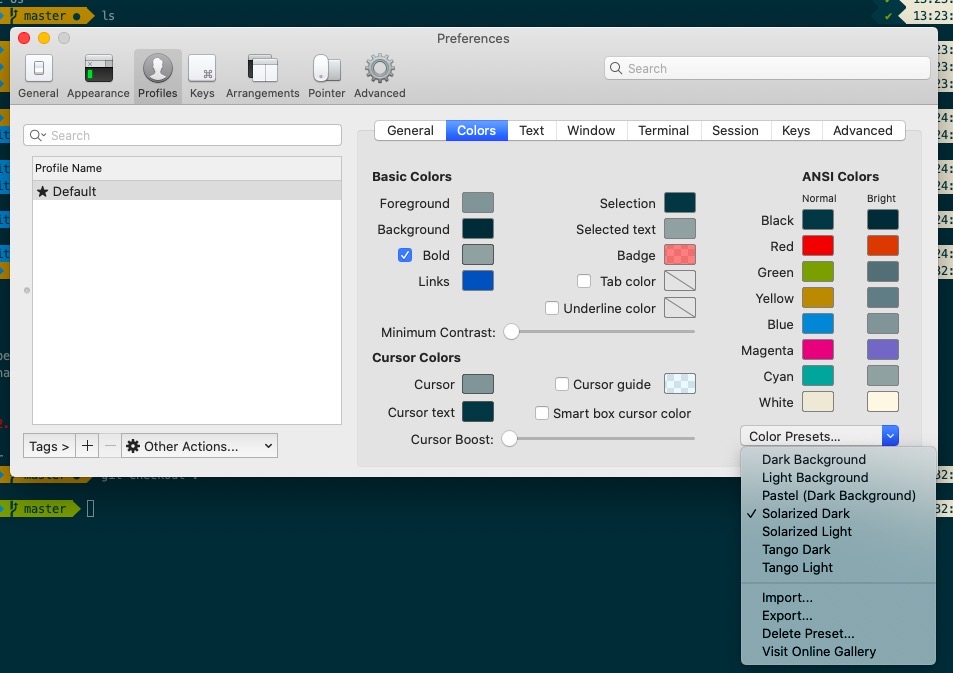
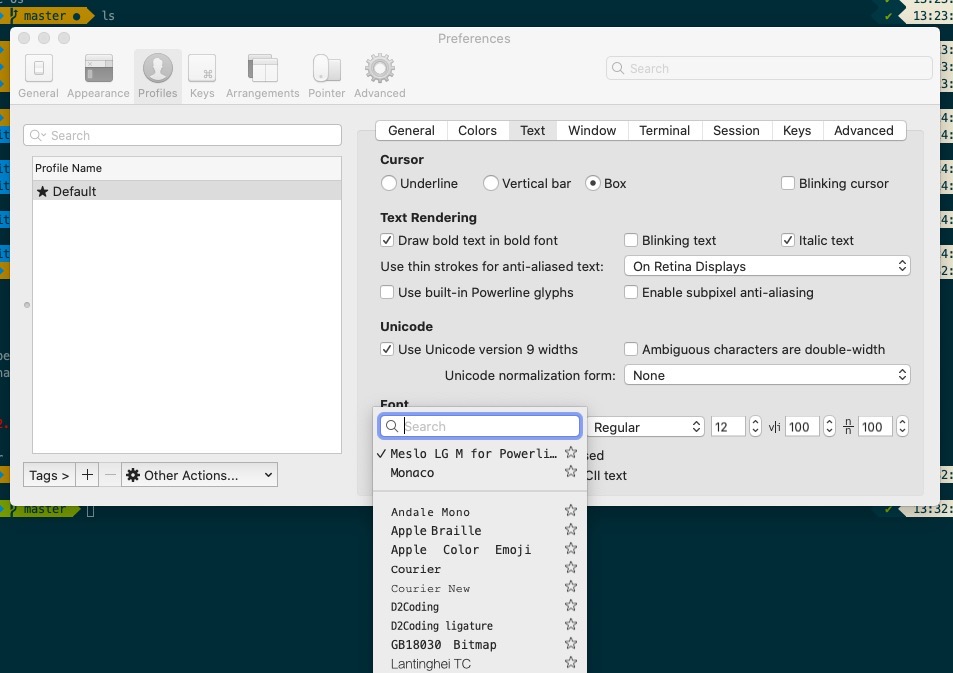
残念ですがiTerm2は手動でテーマとフォントを設定する必要があります。下記のように新しマックに手動でテーマとフォントを設定します。
完了
今回、マックのOSであるカタリナ(Catalina)をアップデートする際、マックの開発環境を最初から構築することになりました。毎回毎回、手動で一つ一つづつインストールしたものをちょっと効率的できる方法がないか探してみて、今回のブログを作成することになりました。
今後はHomebrewとShell Scriptを使ってマックをもっと簡単に再設定ができるようになりました。皆さんも皆さんのBrewfileとShell Scriptを作って簡単にマックの開発環境が設定できるようにしてみてください。
私のブログが役に立ちましたか?下にコメントを残してください。それは私にとって大きな大きな力になります!
アプリ広報
Dekuが開発したアプリを使ってみてください。Dekuが開発したアプリはFlutterで開発されています。興味がある方はアプリをダウンロードしてアプリを使ってくれると本当に助かります。


