概要
ジャンゴ(django)で開発する時基本的提供してるユーザーモデル(User Model)でログインするとusernameでログインします。またはサービスを開発する時、性別、誕生日やプロフィール写真など、他のユーザー情報が必要な場合もあります。このブログポストではジャンゴ(django)でカスタムユーザーモデル(Custom User Model)を使う方法について説明します。このブログの内容はdjango公式サイトの資料をベースにして作りました。
このブログで紹介してるソースコードはgithubに公開されております。下記のリンクを確認してください。
ジャンゴ(django)プロジェクトの準備
下記のコマンドでジャンゴ(django)プロジェクトを生成します。
django-admin startproject django_custom_user_model下記のブログを参考してデーターベースの連動だけします。(python manage.py migrateは実行しないようにします。)
下記のコマンドでジャンゴ(django)に新しaccountアプリを生成します。
python manage.py startapp accountそしてdjango_custom_user_model/settings.pyを開いて下記のように新しく追加されたアプリ(App)を登録します。
...
INSTALLED_APPS = [
    ...
    'account',
]
...
カスタムユーザーモデル(Custom User Model)生成
カスタムユーザーモデル(Custom User Model)を作るためaccount/models.pyを開いて下記のように修正します。
from django.db import models
from django.contrib.auth.models import (BaseUserManager, AbstractBaseUser)


class UserManager(BaseUserManager):
    def create_user(self, email, date_of_birth, password=None):
        if not email:
            raise ValueError('Users must have an email address')

        user = self.model(
            email=self.normalize_email(email),
            date_of_birth=date_of_birth,
        )

        user.set_password(password)
        user.save(using=self._db)
        return user

    def create_superuser(self, email, date_of_birth, password):
        user = self.create_user(
            email,
            password=password,
            date_of_birth=date_of_birth,
        )
        user.is_admin = True
        user.save(using=self._db)
        return user


class User(AbstractBaseUser):
    email = models.EmailField(
        verbose_name='email',
        max_length=255,
        unique=True,
    )
    date_of_birth = models.DateField()
    is_active = models.BooleanField(default=True)
    is_admin = models.BooleanField(default=False)

    objects = UserManager()

    USERNAME_FIELD = 'email'
    REQUIRED_FIELDS = ['date_of_birth']

    def __str__(self):
        return self.email

    def has_perm(self, perm, obj=None):
        return True

    def has_module_perms(self, app_label):
        return True

    @property
    def is_staff(self):
        return self.is_admin
もっと詳しく見て見ましょう。
...
from django.contrib.auth.models import (BaseUserManager, AbstractBaseUser)
...
class UserManager(BaseUserManager):
...
class User(AbstractBaseUser):
...
カスタムユーザーモデル(Custom User Model)を作るためには2つのクラス(BaseUserManager, AbstractBaseUser)を実装する必要があります。BaseUserManagerクラスはユーザーを生成する時使うヘルパー(Helper)クラスで、実際のモデル(Model)はAbstractBaseUserを相続して作るクラスです。
ヘルパー(Helper)クラスであるclass UserManager(BaseUserManager):は2つのファンクションを持ています。
create_user(*username_field*, password=None, **other_fields)create_superuser(*username_field*, password, **other_fields)
これを見たら分かると思いますが、最初のパラメーターはusernameパラメーターです。私たちはusernameの代わりでemailを使う予定なのでこのパラメーターにusernameではなくemailをセットします。他の部分はデーターを生成する部分なので詳しく説明は省略します。
じゃ、実際のモデル(Model)であるclass User(AbstractBaseUser):を見て見ましょう。
...
email = models.EmailField(
    verbose_name='email',
    max_length=255,
    unique=True,
)
date_of_birth = models.DateField()
is_active = models.BooleanField(default=True)
is_admin = models.BooleanField(default=False)
...このモデルはemail, date_of_birth, is_active, is_adminを持っています。is_active, is_adminはジャンゴ(django)のユーザーモデル(User Model)の必須フィールドです。
...
objects = UserManager()

USERNAME_FIELD = 'email'
...Userモデルを作る時必要な部分です。私たちが作ったヘルパークラスを使うように設定して(objects = UserManage())、usernameフィールドではemailフィールドを使えるようにします。(USERNAME_FIELD = 'email')
def has_perm(self, perm, obj=None):
    return True

def has_module_perms(self, app_label):
    return True

@property
def is_staff(self):
    return self.is_admin
カスタムユーザーモデル(Custom User Model)を基本ユーザーモデル(Model)で使う場合、この部分を実装する必要があります。
def has_perm(self, perm, obj=None):: Trueをリターンして権限があることを知らせます。Ojbectをリターンする場合当該Objectで使う権限があるかどうか確認する手続きが必要です。def has_module_perms(self, app_label):: Trueをリターンしてアプリ(App)のモデル(Model)へ接続できるようにします。def is_staff(self):: Trueがリターンされるとジャンゴ(django)の管理画面へログインできます。
管理画面修正
ジャンゴ(django)の管理者ページを使ってユーザーを管理するため管理画面を修正します。
フォーム(Form)生成
ジャンゴ(django)の管理画面で使うフォーム(Form)を修正するため自分たちが作ったカスタムユーザーモデル(CUstom User Model)に合うフォール(Form)を生成します。account/forms.pyを生成して下記のように修正します。
from django import forms
from django.contrib.auth.forms import ReadOnlyPasswordHashField

from .models import User


class UserCreationForm(forms.ModelForm):
    password1 = forms.CharField(label='Password', widget=forms.PasswordInput)
    password2 = forms.CharField(
        label='Password confirmation', widget=forms.PasswordInput)

    class Meta:
        model = User
        fields = ('email', 'date_of_birth')

    def clean_password2(self):
        password1 = self.cleaned_data.get("password1")
        password2 = self.cleaned_data.get("password2")
        if password1 and password2 and password1 != password2:
            raise forms.ValidationError("Passwords don't match")
        return password2

    def save(self, commit=True):
        user = super().save(commit=False)
        user.set_password(self.cleaned_data["password1"])
        if commit:
            user.save()
        return user


class UserChangeForm(forms.ModelForm):
    password = ReadOnlyPasswordHashField()

    class Meta:
        model = User
        fields = ('email', 'password', 'date_of_birth',
                  'is_active', 'is_admin')

    def clean_password(self):
        return self.initial["password"]
詳しく見て見ます。
from django import forms
from django.contrib.auth.forms import ReadOnlyPasswordHashField

from .models import User

class UserCreationForm(forms.ModelForm):
...
class UserChangeForm(forms.ModelForm):
...
私たちはユーザー生成フォーム(Form)とユーザー修正フォーム(Form)を作る必要があります。
class UserCreationForm(forms.ModelForm):
    password1 = forms.CharField(label='Password', widget=forms.PasswordInput)
    password2 = forms.CharField(
        label='Password confirmation', widget=forms.PasswordInput)

    class Meta:
        model = User
        fields = ('email', 'date_of_birth')

    def clean_password2(self):
        password1 = self.cleaned_data.get("password1")
        password2 = self.cleaned_data.get("password2")
        if password1 and password2 and password1 != password2:
            raise forms.ValidationError("Passwords don't match")
        return password2

    def save(self, commit=True):
        user = super().save(commit=False)
        user.set_password(self.cleaned_data["password1"])
        if commit:
            user.save()
return userユーザー生成フォーム(Form)はpassword1とpasswordを持ていて
class Meta:
    model = User
fields = ('email', 'date_of_birth')基本的私たちが作ったUserモデルのemailとdate_of_birthを持っています。そしてdef clean_password2(self):を使ってpassword2がpassword1と一致するか検証します。最後にdef save(self, commit=True):でデーターを保存します。
ユーザー情報修正フォーム(Form)はもっとあ簡単です。
class UserChangeForm(forms.ModelForm):
    password = ReadOnlyPasswordHashField()

    class Meta:
        model = User
        fields = ('email', 'password', 'date_of_birth',
                  'is_active', 'is_admin')

    def clean_password(self):
return self.initial["password"]ユーザーのパスワードをReadOnlyPasswordHashField()で持ってきて画面に表示します。(修正できない)
class Meta:
    model = User
    fields = ('email', 'password', 'date_of_birth',
'is_active', 'is_admin')また、ユーザーのemail, password, date_of_birth, is_active, is_adminフィールドを持ってきて、保存する時def clean_password(self):を使ってpasswordをそのまま保存します。
管理画面に適用
上で作ったフォーム(Form)をジャンゴ(django)の管理画面へ適用して見ます。account/admin.pyを開いて下記のように修正します。
from django.contrib import admin
from django.contrib.auth.models import Group
from django.contrib.auth.admin import UserAdmin as BaseUserAdmin

from .forms import UserChangeForm, UserCreationForm
from .models import User


class UserAdmin(BaseUserAdmin):
    form = UserChangeForm
    add_form = UserCreationForm

    list_display = ('email', 'date_of_birth', 'is_admin')
    list_filter = ('is_admin',)
    fieldsets = (
        (None, {'fields': ('email', 'password')}),
        ('Personal info', {'fields': ('date_of_birth',)}),
        ('Permissions', {'fields': ('is_admin',)}),
    )

    add_fieldsets = (
        (None, {
            'classes': ('wide',),
            'fields': ('email', 'date_of_birth', 'password1', 'password2')}
         ),
    )
    search_fields = ('email',)
    ordering = ('email',)
    filter_horizontal = ()


admin.site.register(User, UserAdmin)
admin.site.unregister(Group)
詳細内容を見て見ます。
class UserAdmin(BaseUserAdmin):
    form = UserChangeForm
    add_form = UserCreationForm
管理画面のユーザー変更フォーム(Form)とユーザー追加フォーム(Form)を私たちが生成したフォーム(Form)で設定します。
list_display = ('email', 'date_of_birth', 'is_admin')
list_filter = ('is_admin',)
fieldsets = (
    (None, {'fields': ('email', 'password')}),
    ('Personal info', {'fields': ('date_of_birth',)}),
    ('Permissions', {'fields': ('is_admin',)}),
)

add_fieldsets = (
    (None, {
        'classes': ('wide',),
        'fields': ('email', 'date_of_birth', 'password1', 'password2')}
        ),
)
私たちが作ったカスタムユーザーモデル(Custom User Model)を管理画面にどう表示するか設定します。
admin.site.register(User, UserAdmin)
admin.site.unregister(Group)
私たちが生成したカスタムユーザーモデル(Custom User Model)と管理者フォーム(Form)を使えるように登録しました。ジャンゴ(django)の基本的提供してるGroupは使えないようにしました。
カスタムユーザーモデル登録
私たちが作ったカスタムユーザーモデル(Custom User Model)をユーザー認証モデル(Authentication User Model)で登録してジャンゴ(django)の認証で使う基本モデル(Model)を変更します。django_custom_user_model/settings.pyを開いて下記のように修正します。
...
AUTH_USER_MODEL = 'account.User'
テーブル生成
私たちはジャンゴ(django)プロジェクトの準備のパートでデーターベースとは連動しましたがテーブルは生成しませんでした。その理由はジャンゴ(django)で提供してる基本ユーザーモデル(User Model)ではなく私たちが作ったカスタムユーザーモデル(Custom User Model)を使うためでした。下記のコマンドでカスタムユーザーモデル(Custom User Model)でテーブルを生成する準備します。
python manage.py makemigrations accountそして下記のコマンドでテーブルを生成します。
python manage.py migrate確認
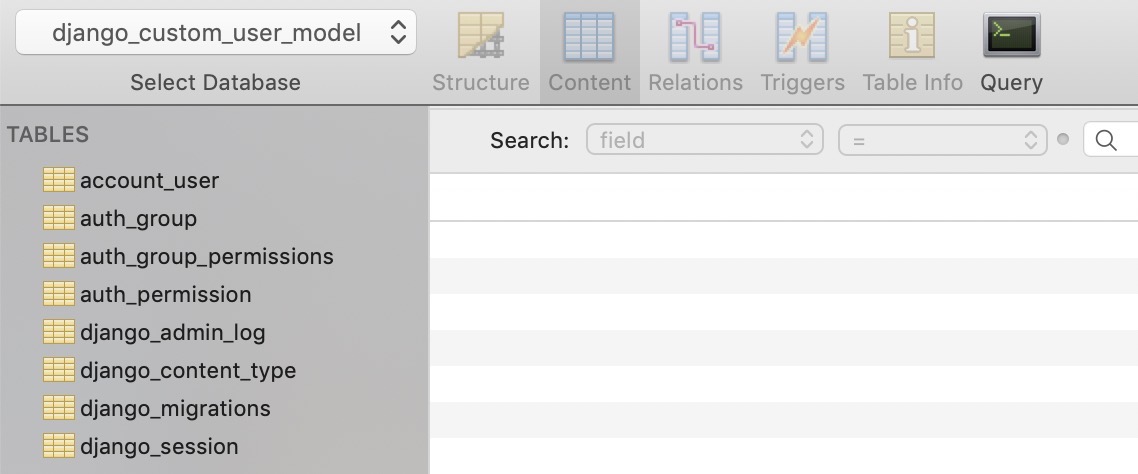
今まで作ったカスタムユーザーモデル(Custom User Model)がうまく適用されたか確認して見ます。まず、データーベースツール(database tool)で私たちが作ったテーブルを確認します。

以前と違ってauth_userテーブルが生成されないことが確認できます。下記のコマンドでジャンゴ(django)のsuperuserを生成して見ましょう。
python manage.py createsuperuserそしたら、以前と違って下記のように私たちが設定した内容でsuperuserが生成されることが確認できます。
Email: [email protected]
Date of birth: 2019-06-06
Password:
Password (again):
Superuser created successfully.下記のコマンドでジャンゴ(django)のテストサーバーを実行して管理画面(http://127.0.0.1:8000/admin)へ接続して見ます。
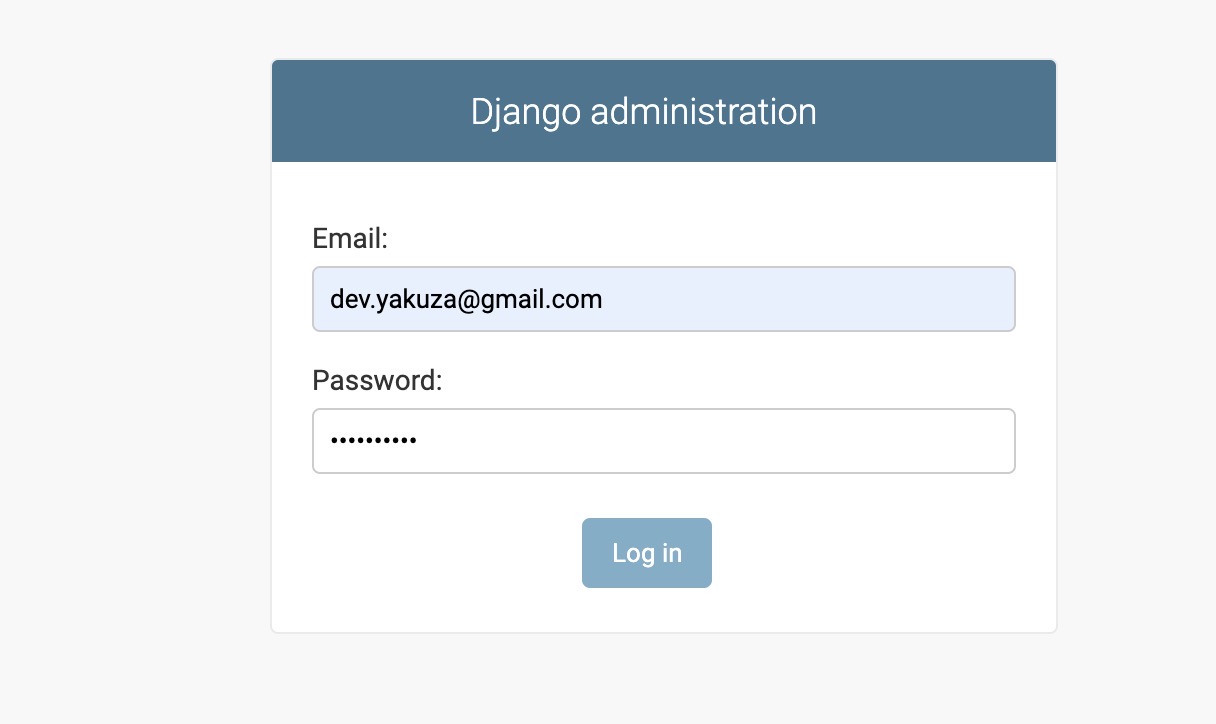
python manage.py runserver以前と違ってemailでログインすることが確認できます。

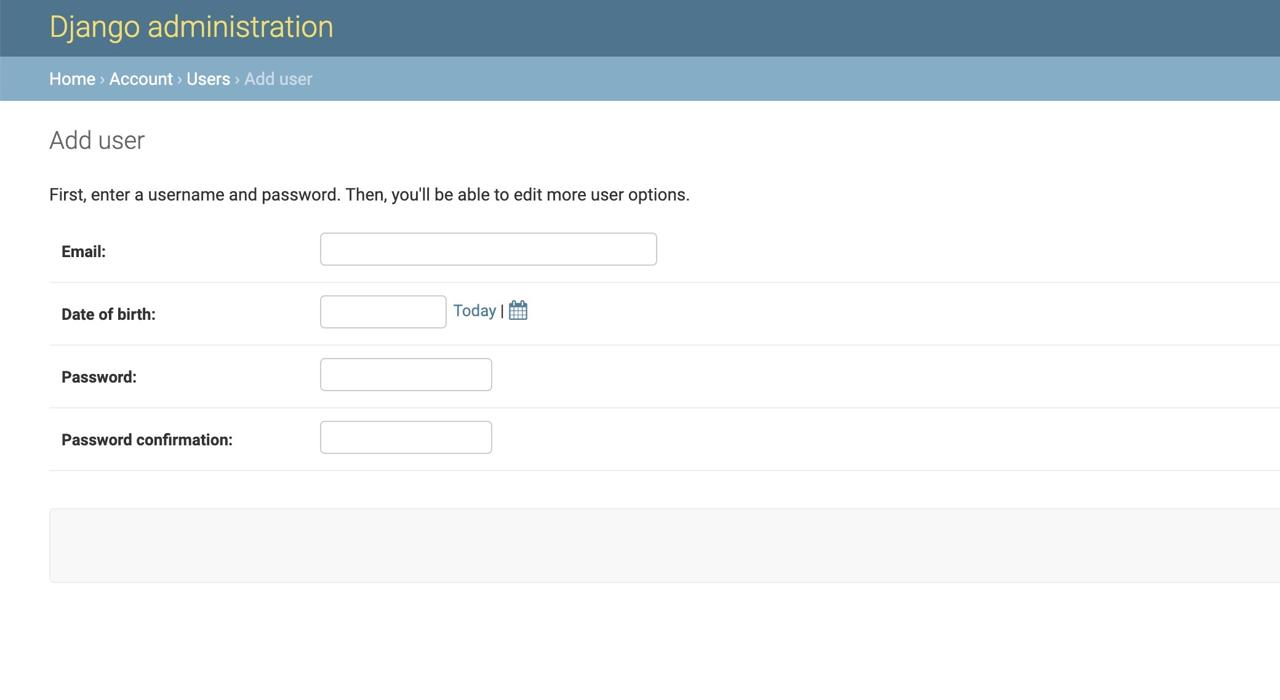
最後に新しくユーザーを追加したり既存のユーザー情報を修正する時下記のように私たちが設定したフォーム(Form)が表示されることが確認できます。

完了
これでジャンゴ(django)のカスタムユーザーモデル(Custom User Model)を使う方法について見て見ました。今からはジャンゴ(django)が基本的提供するユーザーモデル(User Model)ではなく私たちが必要な情報を持ってるカスタムユーザーモデル(Custom User Model)を使ってサービス開発ができます!
参考
- ジャンゴ(django)インストール
- ジャンゴ(django)のプロジェクト開始
- ジャンゴ(django)のモデル(models)の使い方
- ジャンゴ(django)の管理者ページ
- ジャンゴ(django)のルーティング(Routing)
- ジャンゴ(django)のORM
- ジャンゴ(django)のビュー(View)
- ジャンゴ(django)のフォーム(Form)
- ジャンゴ(django)プロジェクトをヘロク(Heroku)へアップロードする
- https://docs.djangoproject.com/en/dev/topics/auth/customizing/#a-full-example
私のブログが役に立ちましたか?下にコメントを残してください。それは私にとって大きな大きな力になります!
アプリ広報
Dekuが開発したアプリを使ってみてください。Dekuが開発したアプリはFlutterで開発されています。興味がある方はアプリをダウンロードしてアプリを使ってくれると本当に助かります。


